Procreate is a very simple and intuitive drawing software to use. And that’s especially true when it comes to Clipping Masks.
These Masks are very easy to use and allow for more creativity and different solutions in your artwork.
Let’s go over what exactly clipping masks are, how to create them, and how to use them efficiently!
Table Of Contents
What is a Clipping Mask in Procreate?
A Clipping Mask is a layer that masks its contents according to the layer it’s clipped to.
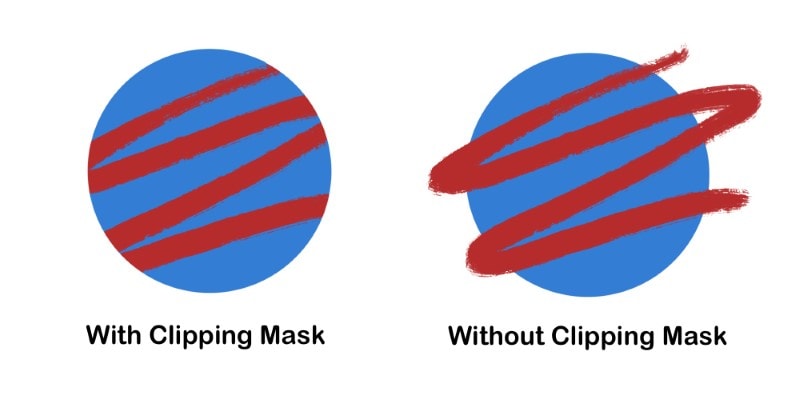
For example, if you draw a circle and create a Clipping Mask above it, whatever you draw in the masked layer will only take into account the circle and nothing else.
If you try to draw outside the circle lines, it won’t appear on your canvas.
In short, whatever you draw on the clipping layer will be limited to the layer beneath it.
Using a Clipping Mask instead of the mask option on a layer allows you more customization and control over your mask.
For example, I often use it to add shading to my artwork. This way, I can just paint shadows without worrying if I’m going out of the lines or not.
To learn more, check out our Shading Tutorial on Procreate!
Other than having more control over what you do with a Clipping Mask, you can also make as many changes to it as you want without affecting the other layer.
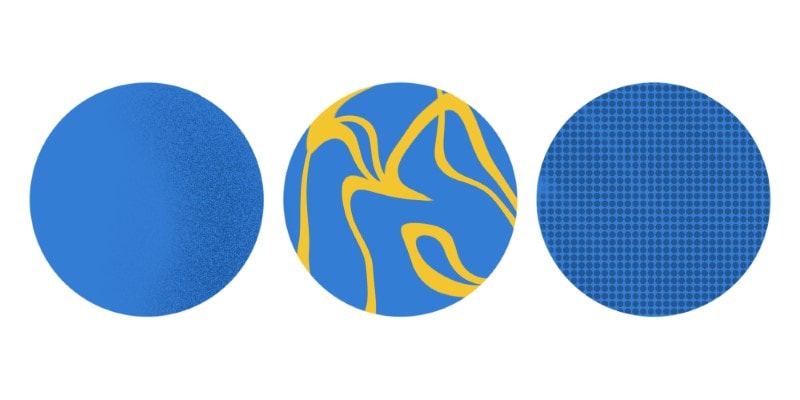
You can add textures, patterns, different colors, and half-tones to a drawing this way and edit it freely. This way, you can experiment and test different things in the same drawing without having to change the whole artwork.
If you don’t like the results, just clear the layer or delete it, and you can start anew!
How to Use Clipping Masks – Step-by-Step Tutorial
It’s very easy and straightforward to use Clipping Masks, and they’re going to be very useful to your workflow.
So let’s go over how to set them up step-by-step.
Step 1 – Open A New Or Existing File
You can open an illustration you’re already working on and wish to continue.
I’ll be using a simple illustration here.
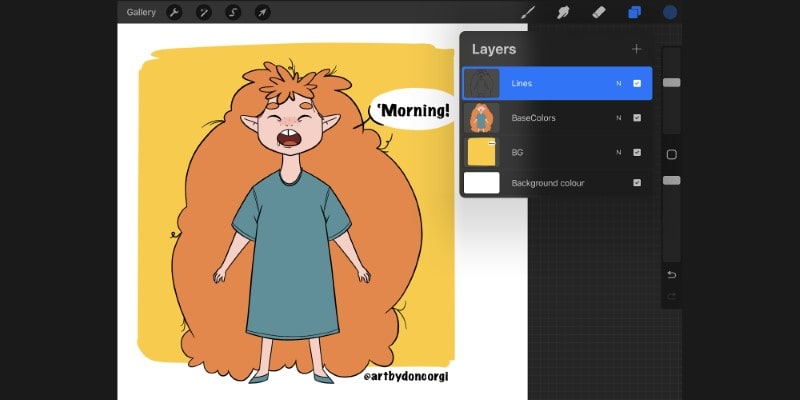
So far, all we have here is the line art, base colors, and a simple background which is more than enough to add a Clipping Mask!
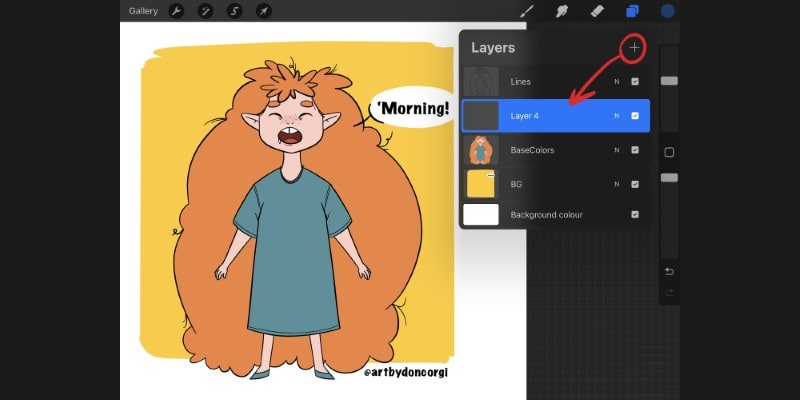
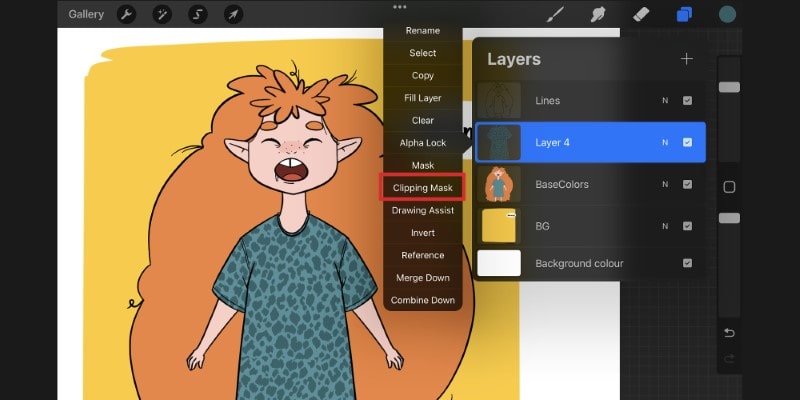
Step 2 – Create A New Layer and Set It As Clipping Mask
Ok, so let’s say I want to add a pattern or texture to my character’s clothing. But I don’t want to go beyond the clothes.
So, let’s create a Clipping Mask Layer above the colors layer.
To do that, with the colors layer highlighted, tap the ‘+’ sign in the layers panel. A new layer will appear above the previous layer.
Now, tap the new layer and then enable the Clipping Mask option.
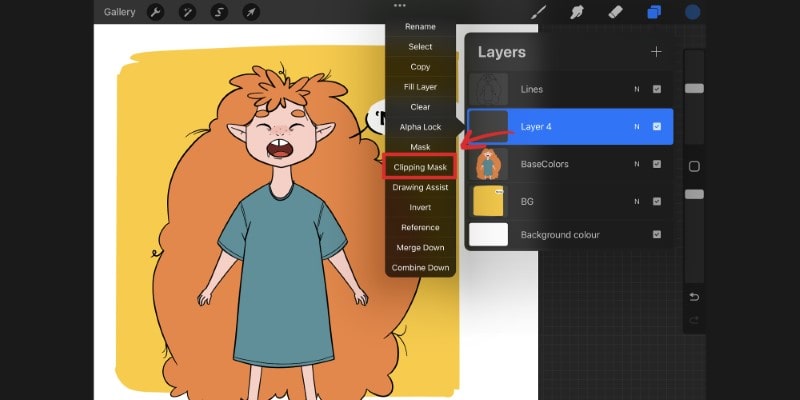
As you can see, a small arrow will appear next to it to let you know this layer is now clipped to the bottom layer.
Everything is ready, and all you need to do now is add something to your Clipping Mask!
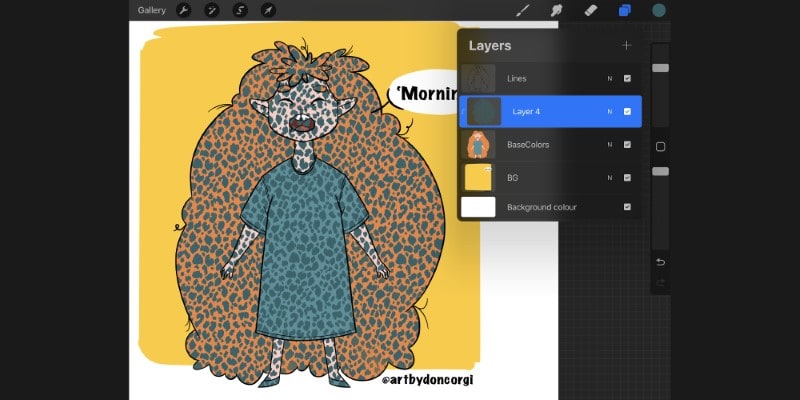
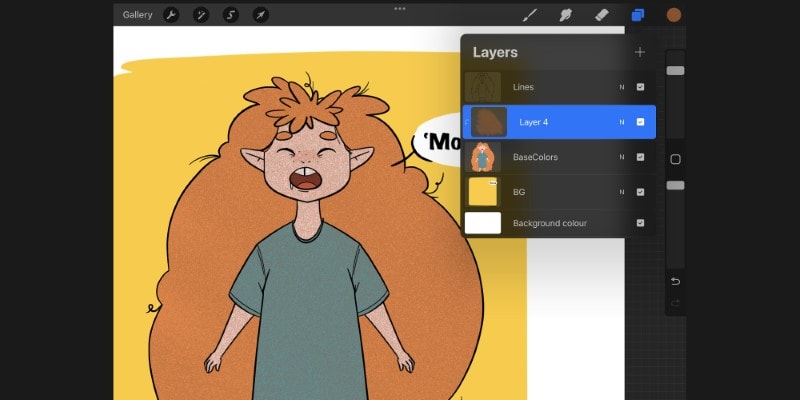
Step 3 – Draw Something In The New Clipping Mask
With the Clipping Mask layer selected, pick a brush and color you like.
Start painting the texture or pattern along the area you want. As you can see, anything you draw on your clipping mask will only take into account whatever’s showing in the layer below.
If, for some reason, you want to apply the texture to a specific element of the layer below, then draw a selection first using the Freehand option.

Then use the brush and paint inside that selection!
You can do whatever you want inside this mask without changing your original. Change colors, erase, and change brushes.
Whatever you do, the original layer will stay intact, and if you don’t like the results, you can just erase the clipping mask layer!
How to Erase a Clipping Mask?
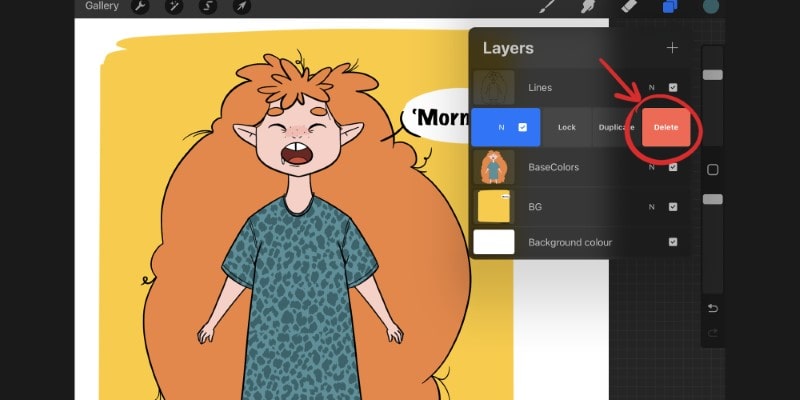
If, for some reason, you don’t want a Clipping Mask anymore or whatever it’s inside of that layer, you can delete it.
To do that, select the clipping mask layer and swipe it to the left.
Now, tap the ‘Delete’ button, shown in red.
If, on the other hand, you want to keep the layer by erasing everything inside of it, tap the layer.
Once the layer options show, tap the ‘Clear’ option.
Everything inside your Clipping Mask will be removed, and you can start over.
Alternatively, you can use an eraser brush to clear everything or just parts of the Clipping Mask’s contents.
Finally, if you don’t want this layer to be a clipping mask anymore, you can tap it and disable Clipping Mask again.
How to Select the Layer You Want for Clipping Mask?
You can set up any layer in your file as a Clipping Mask.
All you need to do is have the desired layer selected and then tap it to show the layer options menu.

Then, tap ‘Clipping Mask’, and the layer and all its contents are now clipped to the layer below!
If you ever change your mind, just tap the clipping mask button again, and it will be back to its original setting.
Other Uses For Clipping Masks In Procreate
There’s a lot you can do with a layer mask in Procreate. A clipping mask allows you to draw but also clip images to other layers.
With it, you can also resize and make other adjustments without changing the original layer!
Let’s take a look at a few examples.
Adding Shading Or Highlights To Your Artwork
As mentioned before, you can use a clipping mask to shade or add highlights to your artwork.
All you have to do is create a new layer above your base colors and then enable Clipping Mask.
Now pick a darker tone than the original color and start painting shadows accordingly!
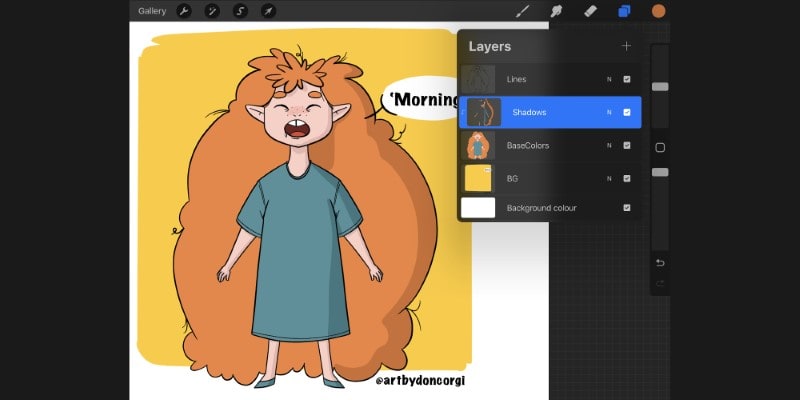
For a more detailed tutorial, don’t forget to read our Step-by-Step Shading Tutorial In Procreate.
The same can be done with highlights, but here, instead of using darker tones, we pick a light color and add small highlights to our artwork.
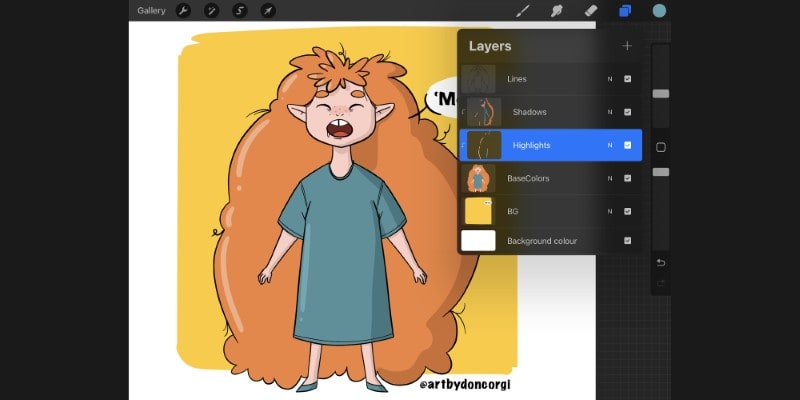
Shading and highlighting using a clipping mask is very helpful since you won’t have to worry about these going out of your drawing’s limits. All you have to do is paint to your heart’s content!
Add Different Effects And Textures To Typography
Similarly to a drawing, you can clip a layer to any text or typography!
To do this, you can first write something on your canvas.
Tap the wrench icon to access the Actions Menu. Then tap ‘Add’ and, finally, ‘Add Text’.
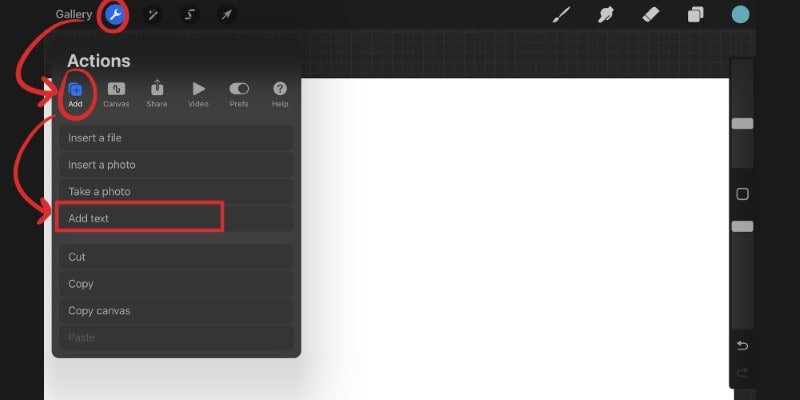
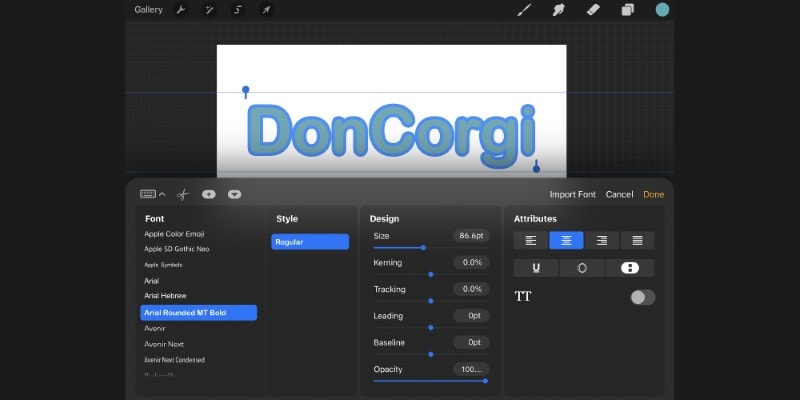
A text box will appear, and you can type anything you want inside of it.
Once that’s done, you can change the text’s font and size.
Now, create a new layer on top of your text and set it as Clipping Mask.
Choose any brush and color and paint along the text!
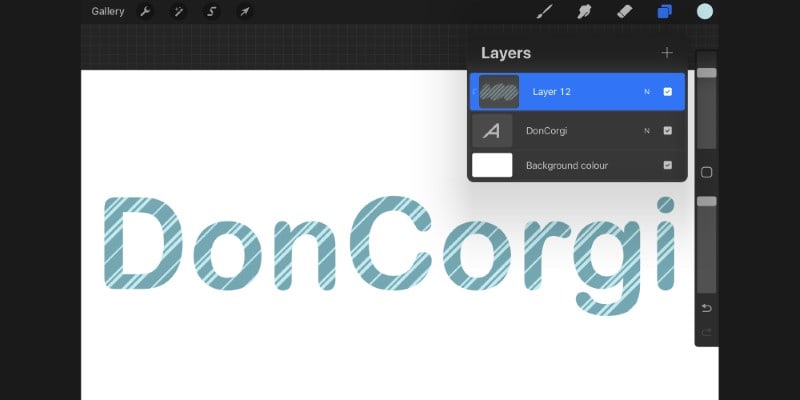
Use different textures and effects until you’re happy with the result. remember that you can always change your mind, so if there’s anything you don’t like, you can always erase it and try something else!
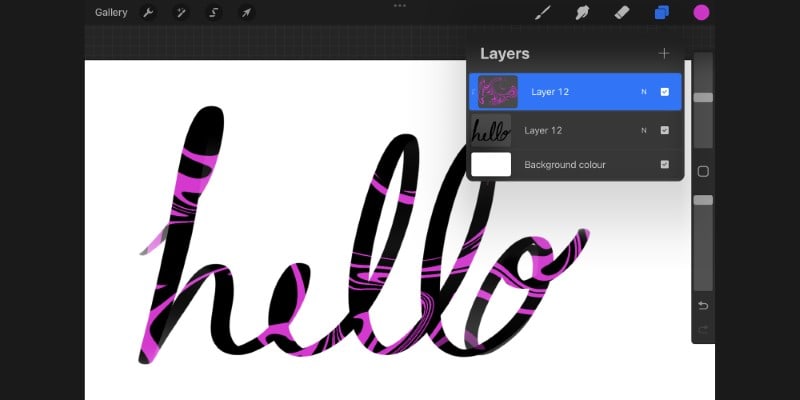
The same can be done if you draw your own typography instead of Procreate’s fonts. Just draw your own lettering in a layer instead of adding text.
Then, in a Clipping Mask, draw whatever you want to make it more interesting!
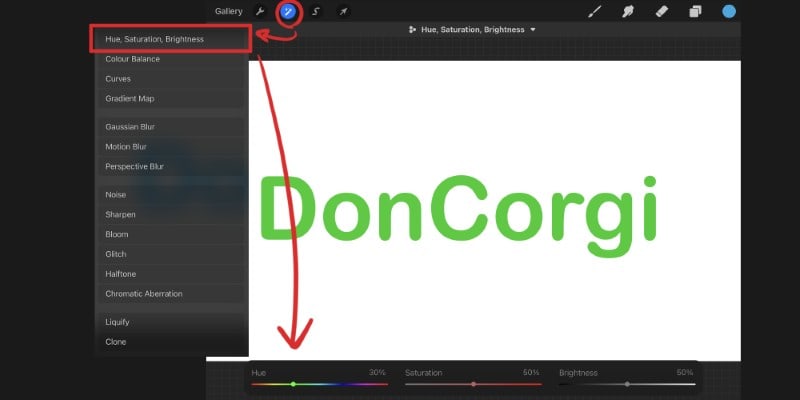
Add Different Colors To A Font
Let’s say you want to add some text to your artwork but easily change its color.
You can do this very easily with a Clipping Mask, and Procreate allows you to change those colors as many times as you want without changing the original text’s color!
Just like before, create a layer above the text and set it as Clipping Mask.
Now, pick a color and drag it to the text you want to fill.
If you need to change anything, you can do so. Recolor by picking another tone or use adjustment layers such as ‘Hue, Saturation, and Brightness’ to change the font’s color.
Just like before, you can do a lot of non-destructive editing here since the original type or font won’t be changed!
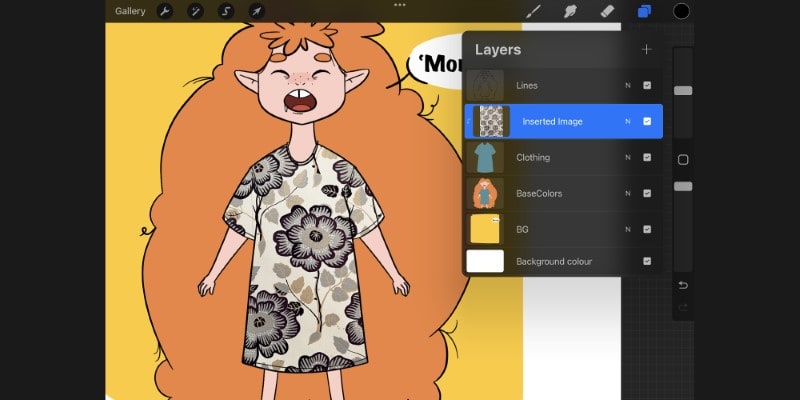
Clip An Image To A Specific Layer
Another thing you can do with clipping masks is incorporate images or photos you took into your artwork.
This can be quite helpful when wanting to add floral and other intricate patterns and backgrounds or even add designs to outfits and others.
Even if you didn’t make or have the specific image you’re looking for, there are many places that offer stock photos that you can download and use for free!
Websites like Unsplash and Pexels are great for finding this kind of material. And if you need more places to find references, even pose references, check out our list of 7 Of Our Favorite Reference Websites.
Now to incorporate an image on your artwork, first go to the Actions Menu and then the ‘Add’ tab. Here tap ‘Insert a Photo’.
A new layer will be created with the image you imported. Move that layer above the one you want to clip it to.
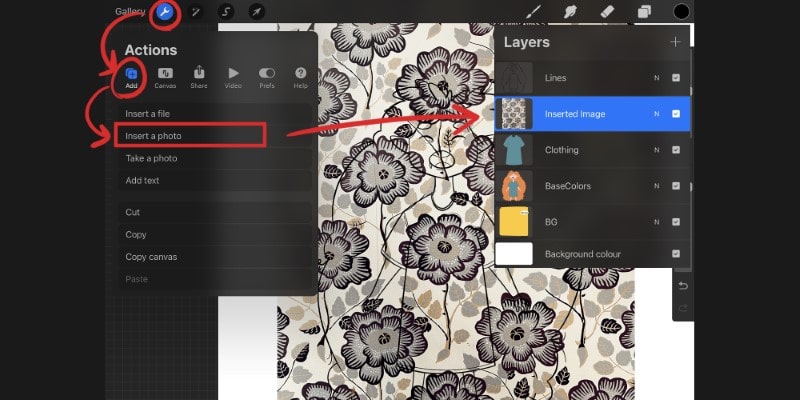
Enable the clipping mask and the image will be clipped to the layer below. You can now move it around using the Transform/Move tool and even make adjustments to it using the Adjustments menu.
You can also do the same, by taking a photo using your iPad and importing it into Procreate, by tapping ‘Take A Photo’ in the Add menu instead!
This can be done with any kind of image and even with other artworks and patterns you’ve created before, simply import them to the current artwork and make any adjustments you wish.
You can also crop your image in Procreate to just focus on a single part.
Clipping Mask vs. Alpha Lock: What’s the Difference?
Clipping Mask and Alpha Lock are both different ways to use masks in your artwork.
However, one allows for less destructive editing than the other.
With the Alpha Lock feature, it allows you to lock a layer’s transparency. This means that once activated, you will only be able to paint inside what exists inside that layer.
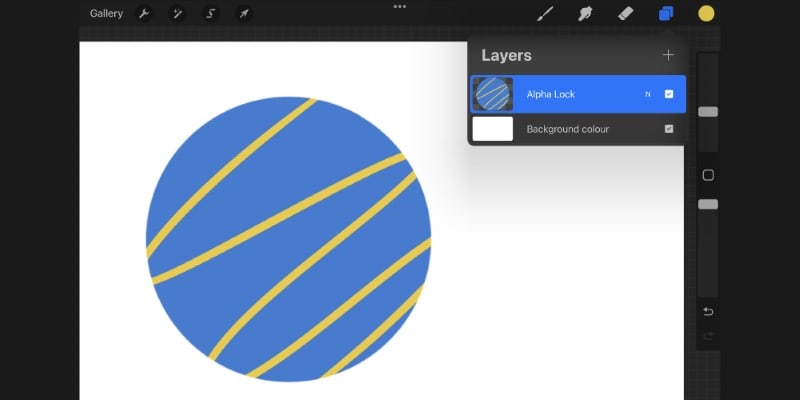
This can be useful in adding certain details to an element or even patterns. However, once you draw them in that layer, it’s more difficult to edit them or even undo them.
If you use the clipping mask, you can do the same thing but in a separate layer. This way, if you need to resize, recolor, or make any other adjustments, you can do so without worrying about changing anything in the original layer.
The advantage of using Alpha Lock is that it’s one less layer you lose since it applies to the activated layer.
So, if you’re running out of layers in your artwork and you know the changes you’re making are certain and don’t need much editing, the alpha lock might be a better choice of mask!
How to Use Alpha Lock in Procreate?
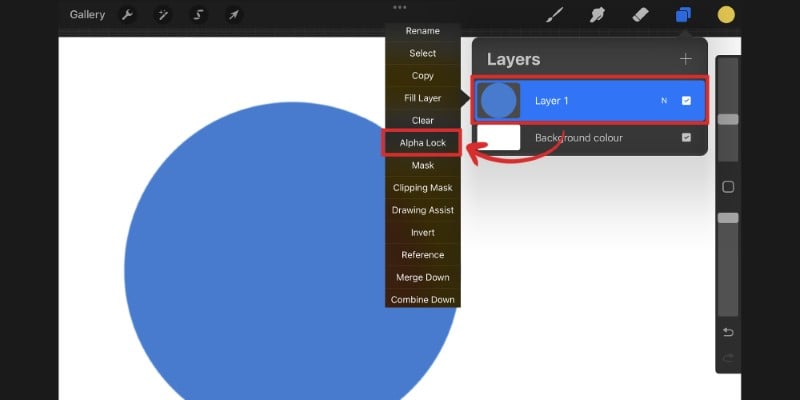
To enable Alpha Lock in one layer, first, be sure you have the layer you want to apply it to is highlighted.
Then, tap it to open the options menu, and finally, tap ‘Alpha Lock’.
You’ll notice that everything but what you’ve drawn will become transparent.
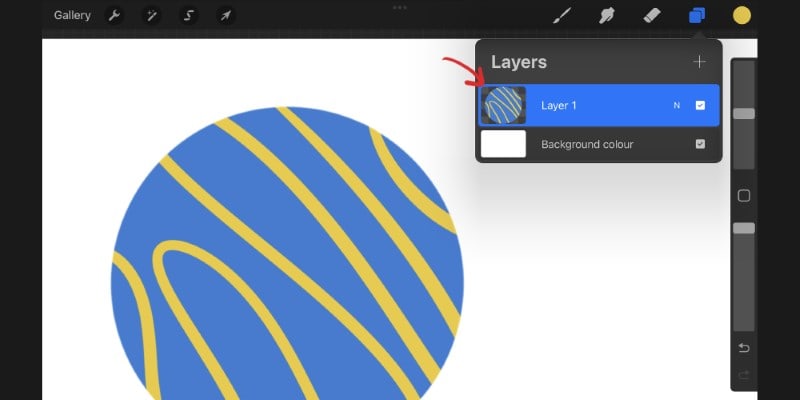
If you try to paint outside of your drawing, nothing will appear. So now you can add whatever you want to that layer without worrying about going out of your lines or making accidental strokes outside of it!
Summing It Up
As we’ve seen through this article, a Clipping Mask is a way of masking your artwork in a separate layer.
This layer is clipped to another, and whatever you draw in it will only take into account what’s in the clipped layer.
In other words, a Clipping Mask is a layer that masks its contents according to the layer it’s clipped to.
To create a Clipping Mask, first, create a new layer above the layer that you want to mask.
Then, tap the new layer to open the layer options menu and tap ‘Clipping Mask’!
With that done, you can now draw whatever you want.
Clipping masks can be useful for adding patterns and textures to certain areas of your artwork. It can also be used in lettering and typography.
Have fun masking, and experiment with different brushes while looking at our Top 7 Default Brushes In Procreate.
And upgrade your drawing skills with these 6 Best Procreate Drawing Exercises!
Patricia Caldeira is the main writer here at Don Corgi. She's an art teacher with over 20.000 happy students across many platforms and courses!
Enjoy your stay and as always:
Keep on drawing!
Patricia’s courses have enrolled 22 000+ students around the world, in platforms such as Udemy, Skillshare, Gumroad and more.

")
")
