Cropping in Procreate is very straightforward and easy to learn.
Although there are no specific crop tools, you can still do so with very simple steps.
In this article, you’ll learn how to crop, resize, and even cut on Procreate to unlock your artwork’s full potential!
Update: Here’s a video I created explaining the steps to crop in procreate in different ways!
Table Of Contents
Crop And Resize Your Canvas in Procreate
Sometimes, while drawing, we decide that the canvas is actually too big or, the opposite, too small.
When that happens, you’ll want to go through your canvas’s settings and change its size.
In Procreate, this is very easy to do!
How To Crop Your Canvas
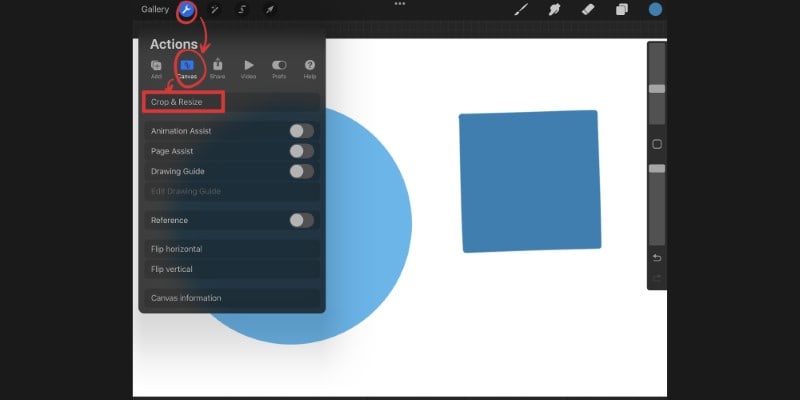
To crop your canvas in Procreate, tap the wrench to open the Actions menu.
Then tap ‘Canvas’ and, finally, tap ‘Crop & Resize’!
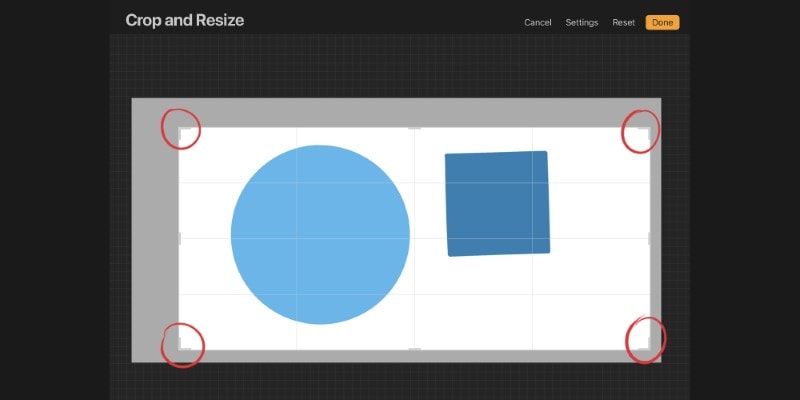
A new window will appear where you can see your whole canvas, with a frame around it.
To crop your entire canvas, drag any of the 4 corners of the frame anywhere you want.
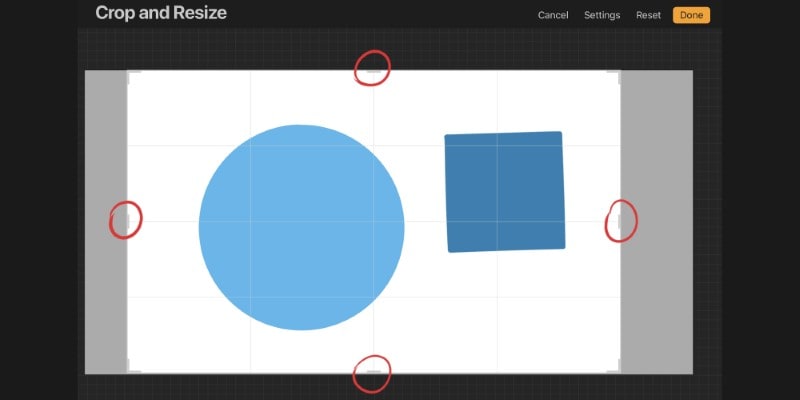
If you’d like to crop your canvas horizontally or vertically, you can instead drag any of the small bars that appear around the crop frame.
Adjust the crop box until you have the desired format or size. Tap ‘Done’, and your canvas will automatically change.
While cropping your canvas, you’ll notice that by the side of your finger, Procreate will inform you about the size of your crop.
Not only that but at the top of the screen, you’ll be able to see how many layers you can use.
The bigger the canvas, the fewer layers you’ll have access to.
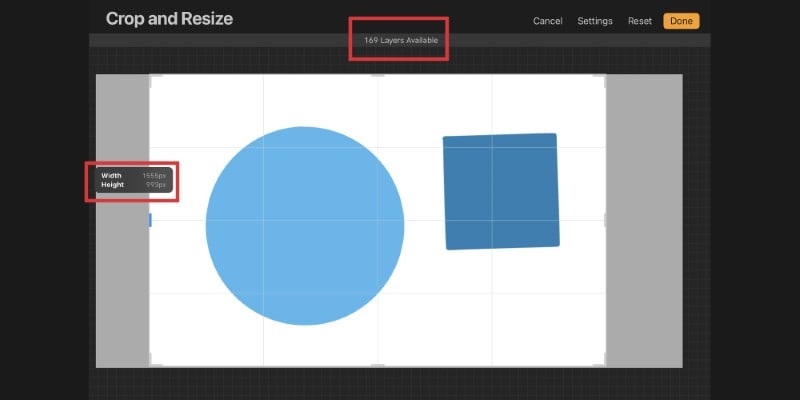
Having this information in real-time can be very useful for planning your illustration accordingly!
How To Resize Your Canvas
If you want, you can also change your canvas’s size manually.
To do so, go back to the Crop & Resize menu.
Now, instead of dragging the crop frame around, open the settings by tapping the ‘Settings’ option at the top right.
You can now input the exact dimensions you want your canvas to be!
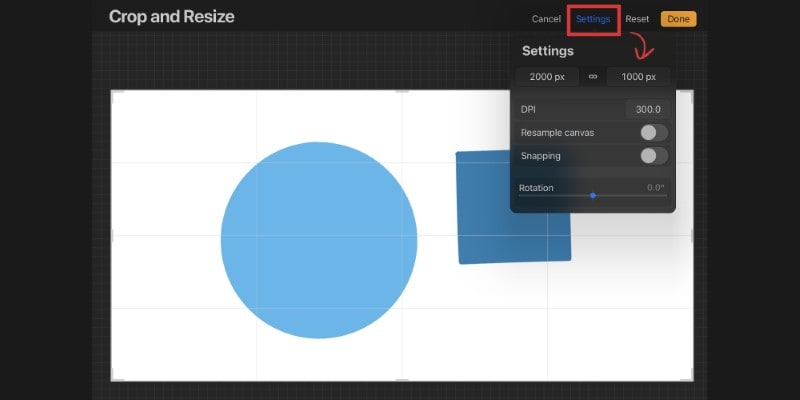
If you tap the chain symbol between the two numbers, you’ll lock the aspect ratio.
When you do this, when changing the number on one side, Procreate will automatically change the other side according to the aspect ratio of your canvas dimensions.
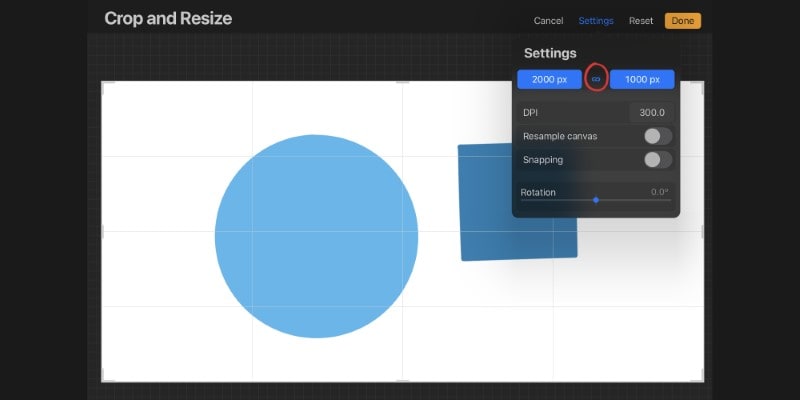
Furthermore, you can also change other settings of your file, such as DPI.
So, if you find the resolution too low or too high, you can change it here.
If you plan on printing your illustrations, 300 DPI is usually a good number to go with!
By activating the Resample Canvas button, you can change or crop your canvas without cropping your artwork.
This option will keep the aspect ratio of your file, and again, you’ll only need to type one of the desired dimensions.
Procreate will then adjust the other number automatically.
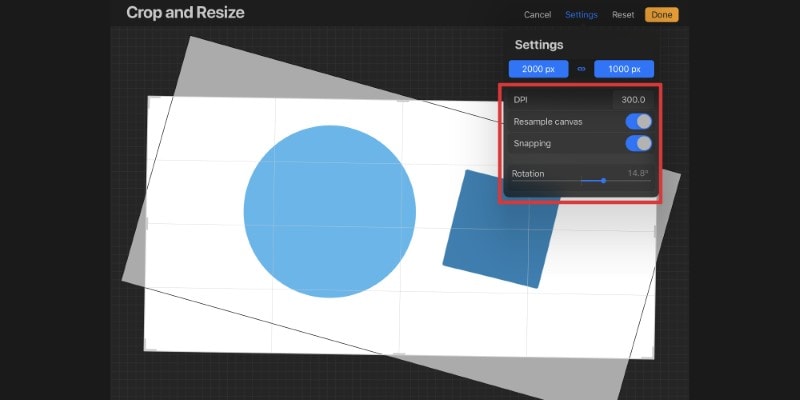
The Snapping button can be useful if you want to be more precise with your work.
By activating it, the crop box will snap to the edges of your current drawing and its elements.
Finally, the Rotation slider allows you to rotate your canvas, allowing you to be quite creative with your cropping!
Crop An Entire Layer Or Image in Procreate
There are no specific tools to crop a layer or an image. However, Procreate still has a creative option to deal with it!
Let me show you how to crop individual layers or images.
How To Crop Using The Transform/Move Tool
If you want to crop the edges of a single layer in Procreate, you can use the Transform or Move Tool.
First, be sure the layer you want to crop is selected.
Then tap the Arrow Icon on your toolbar. A frame will appear around the elements of your layer.
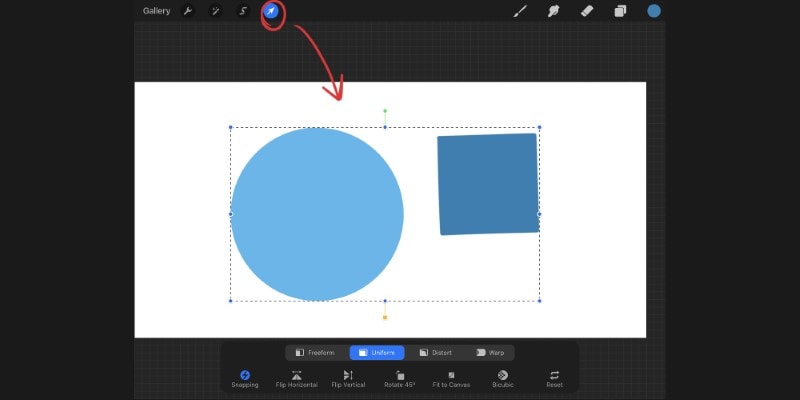
Now, drag the layer to any side or corner of the canvas until the area you want to crop is out of view, outside of your canvas.
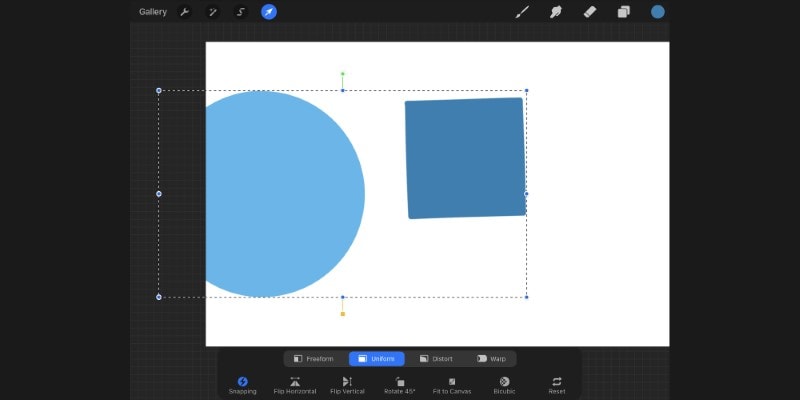
Finally, deselect the Transform Tool by tapping on it.
If you tap the Transform/Move Tool again and move the layer to the center of your canvas, you’ll notice that whatever was out of view has been cropped!
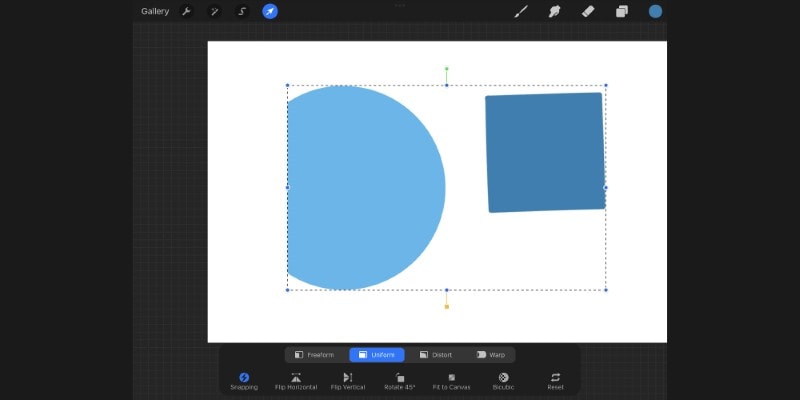
You can now repeat the same process for all the other sides of your illustration.
You can also crop images in Procreate using the same process.
Just import the image you want, and then crop around it by repeating the previous steps to crop it as you want!
How To Crop Using The Selection Tool And Clipping Mask
For more creative cropping of your artwork, you can also use the Selection Tool and Clipping Masks in Procreate.
First, create a new layer. Then tap the Selection Tool on your toolbar.
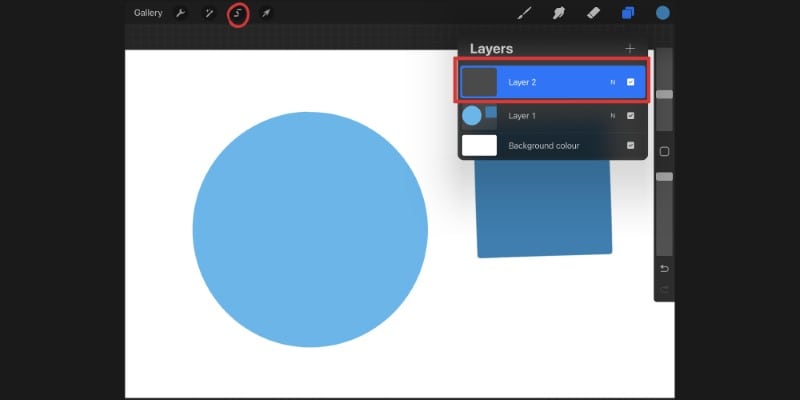
You have a few options here. If you want to cut a squared selection, activate the rectangle option and draw the shape in any size you want.
The same is also possible for round shapes by activating the Ellipse option.
On the other hand, if you want a more specific shape or drawing, use the Freehand option to draw your selection.
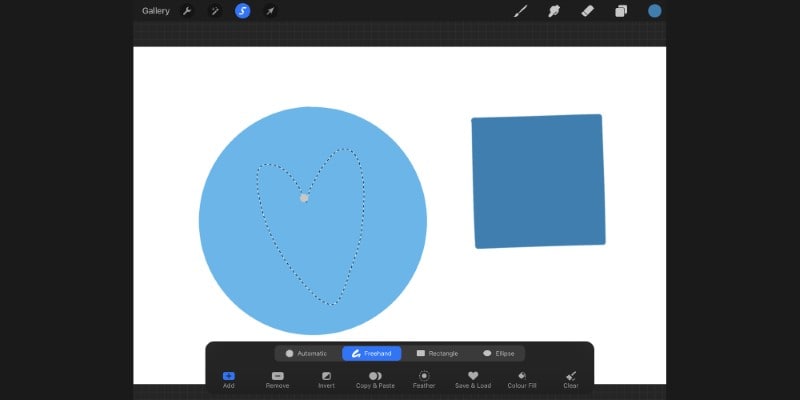
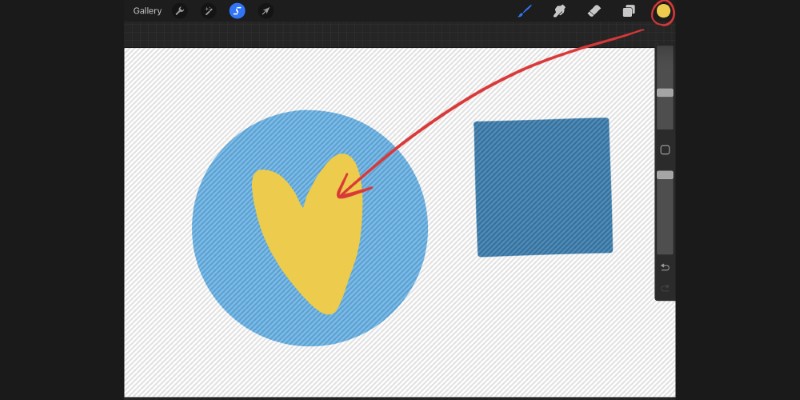
After drawing your selection, fill it with whatever color you want. You can even blur it if you’d like!
To do that, go to the color icon on the top right and then hold and drag the color into your selection.
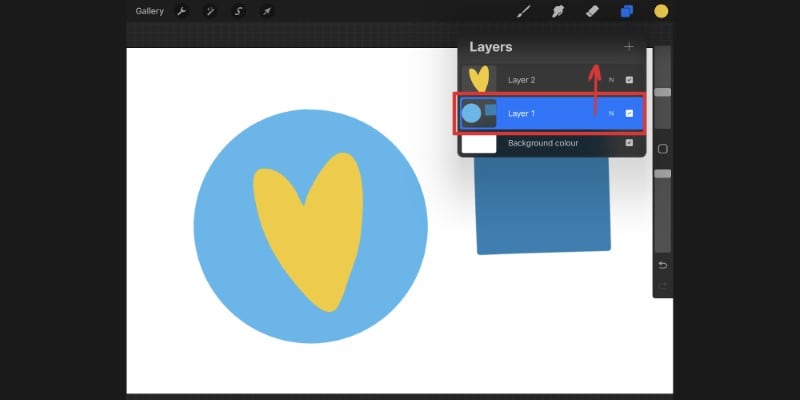
Now, select the original layer and move it above the selection layer.
Just hold and drag it upwards so it’s above the layer we created previously.
Now tap the layer you just moved to get the layers submenu, and then tap ‘Clipping Mask’
Your layer is now clipped to the layer below, so all you see is the area of the shape you created!
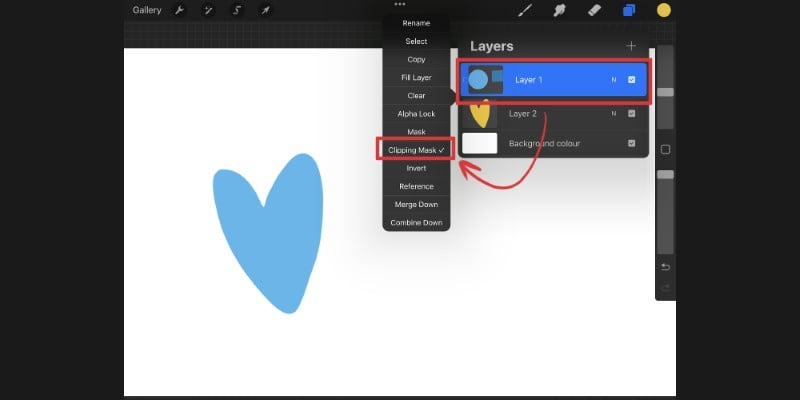
If needed, you can now resize, transform or move the shape around using the Transform/Move Tool like before.
This can be a fun and creative way to change elements of your illustrations, so make the most of it.
You can even use it for shading in procreate!
How To Cut In Procreate
Sometimes you’ll need to cut some elements out of an illustration and place them elsewhere.
Or, you need to move them to another layer.
This is also possible and easy to do in Procreate!
First, select your desired element to cut using the Selection Tool.
Now, tap the Actions Menu, then tap ‘Add’, and finally, tap ‘Cut’.
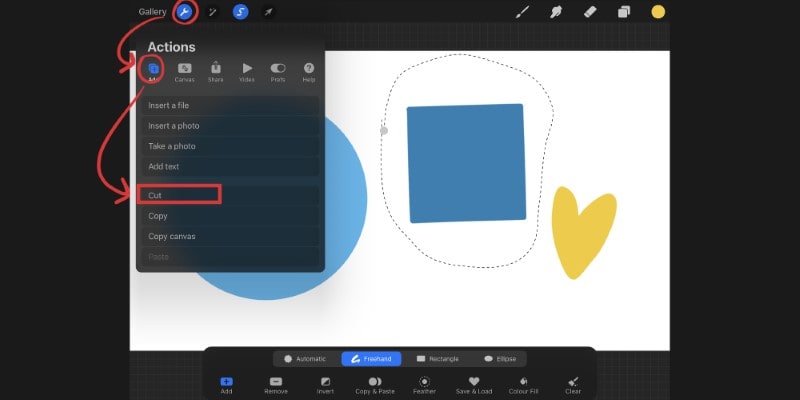
Now, all you have to the is go back to the ‘Add’ Menu, then tap ‘Paste’.
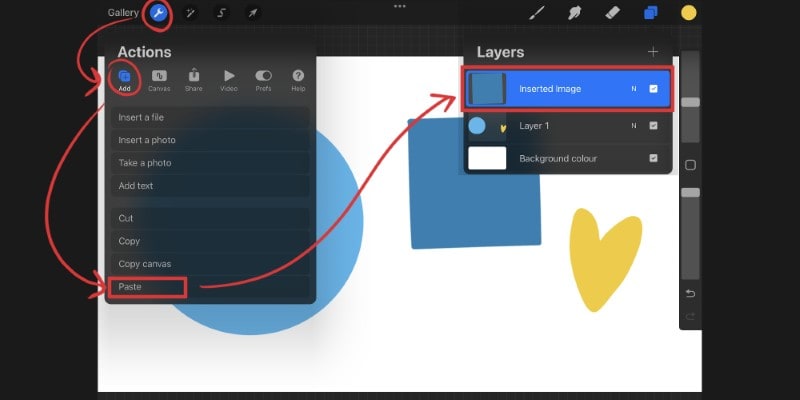
Your selection has been pasted into the new layer, and you can now edit it as you want!
And here’s a quick guide on how to copy and paste in procreate.
Summing It Up
As you can see, there are many different ways to crop in Procreate.
Whether it’s the entire canvas, an entire layer, an image, or even a specific area of your artwork, you can do so easily!
To resize or crop the entire canvas on Procreate, go to Actions Menu -> Canvas -> Crop & Resize.
To Crop an entire layer in Procreate, tap the Move/Transform Tool and then move the layer to the edges of the canvas to crop the pieces you don’t want.
You can use the same method to crop an image that was imported into Procreate.
Finally, to cut a specific element on your artwork, start by making a selection using the Selection Tool -> tap Actions Menu -> tap Add -> tap Cut.
You can paste it back by going to the Actions Menu again -> Add -> Paste.
As you can see, there is no single way to crop in Procreate.
You can do so by using different techniques, allowing you creative cropping and selections!
Now that you know how to crop and resize in Procreate, it’s time to draw something, so here are 6 Drawing Exercises You Can Try In Procreate.
Patricia Caldeira is the main writer here at Don Corgi. She's an art teacher with over 20.000 happy students across many platforms and courses!
Enjoy your stay and as always:
Keep on drawing!


