Using Blur can make a huge difference in your artwork, even if it’s used as a subtle effect.
With it, you can make certain areas of your illustrations out-of-focus or give the illusion of rapid movement!
In Procreate, there are several different blur options that you can use, and we’ll go through each of them in this article.
With this tutorial, you’ll be able to learn how to use blur in no time!
Table Of Contents
How to Access and Use the Blur Tool in Procreate
Just like many other tools in Procreate, accessing and using the Blur Tool is quite easy and intuitive.
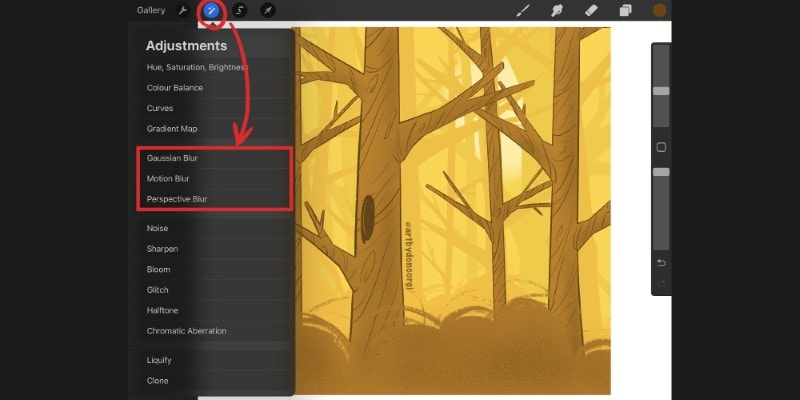
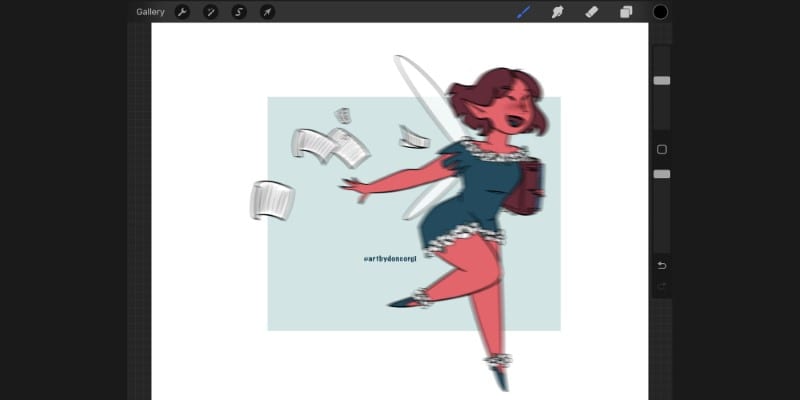
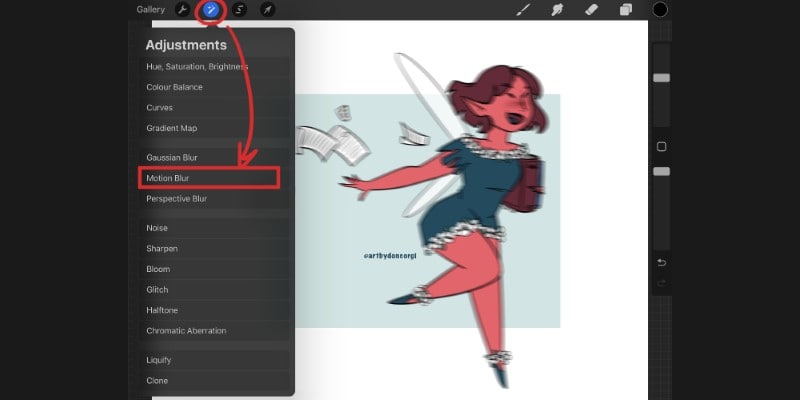
To blur in Procreate, go to the Adjustments tab by tapping the magic wand icon.
Then, choose one of the blur options: Gaussian, Motion, or Perspective Blur.
Once inside the chosen blur option, slide your finger to the right and left to adjust the amount of blur you want to apply to your layer or selected area!
Depending on the type of blur you’re using, there can be different gestures to apply or even extra settings to choose from, which we’ll talk about further in this article.
What are the Options for Blurring in Procreate?
In Procreate, you can use 3 different types of blur filters:
- Gaussian Blur: the simplest option to use, and is great to soften the edges of your artwork and an overall out-of-focus look to certain elements or even backgrounds;
- Motion Blur: the perfect blur option for when you want to give a sense of movement in your artwork, such as moving characters and vehicles, for example;
- Perspective Blur: best used to add depth to certain elements in your artwork. There are two different options that you can choose from: Positional and Directional.
Knowing what each of these does will be very helpful when adding final touches and effects to your artwork. It’s very common to use the Gaussian Blur filter to a background so that the viewer can focus on the foreground, for example.
And this small adjustment can really shift the whole mood of an illustration.
Exploring the other options can also offer interesting effects to take your work to the next level!
Adjust the Intensity and Percentage of Blur in Procreate
In Procreate, you don’t need to input any numbers or values to blur.
Instead, you can move your finger to the sides or up and down to increase or decrease the blur’s intensity.
As you move your finger, you’ll be able to see the percentage of Blur applied at the top of the screen.
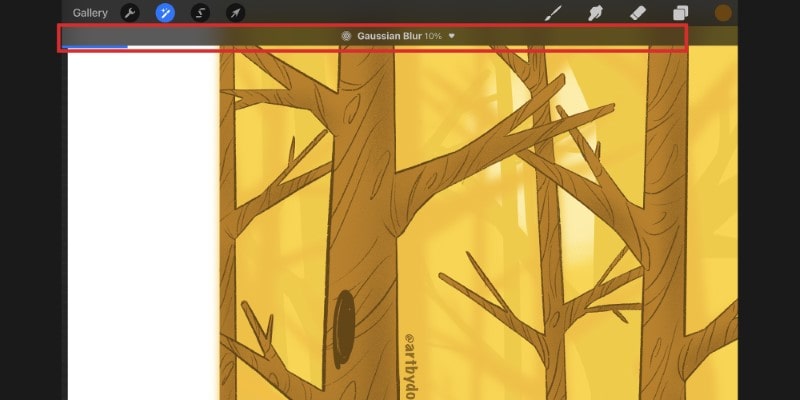
The blur effect will also be shown as you slide your finger. This way, you can see in real-time how your artwork looks, depending on the blur’s intensity, and easily decide what looks best!
Once you’ve achieved a good blur effect, you can tap the magic wand icon again to apply the effect.
If you tap anywhere on your screen, a few options will appear: Apply, Undo, Preview, Cancel, and Reset.
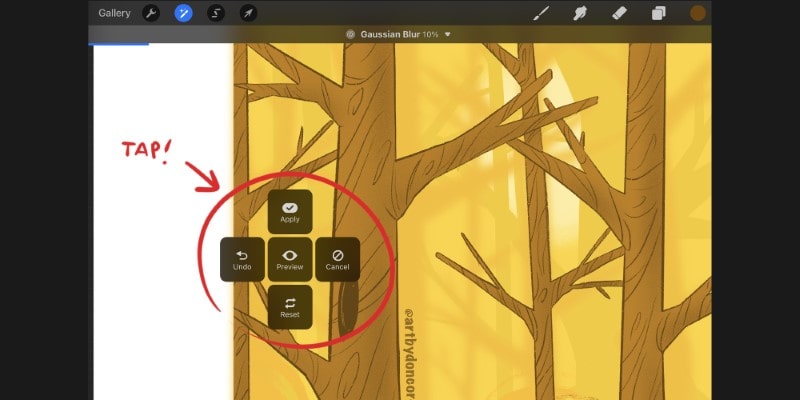
You can tap any of these options accordingly to what you need at the moment!
The Cancel button can be quite useful when you change your mind and don’t want to add a blur anymore, instead of having to undo it all the way back, for example.
Using Different Types of Blurs in Procreate
As mentioned before, there are different types of blurs you can use in Procreate: Gaussian Blur, Motion Blur, and Perspective Blur.
Let’s take a look at how you can use each of them!
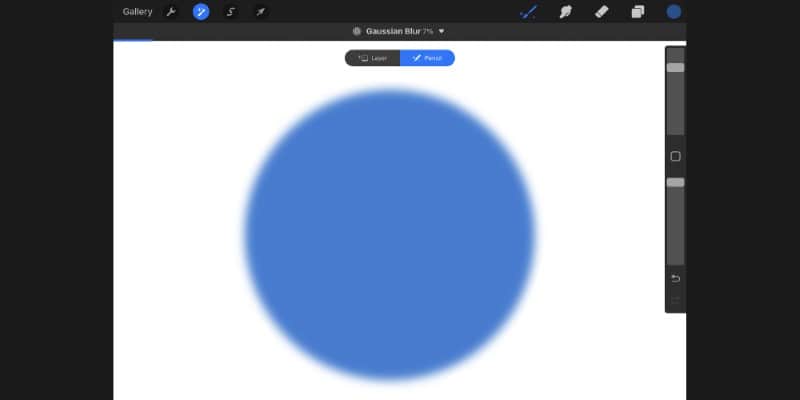
What is Gaussian Blur and How to Apply it in Procreate?
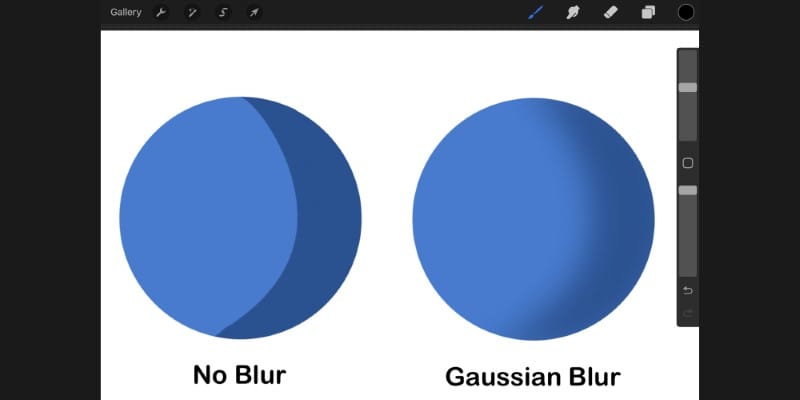
With Gaussian Blur, you can add a uniform and soft blur to an image, an entire layer, or even certain elements in your illustrations.
Due to its softness, this is the most common filter to use both in illustration and graphic design.
With it, you can make very subtle adjustments to certain areas, which helps to change the mood or guide the viewer’s eyes through the image.
To access Gaussian Blur, first tap on the adjustments tab. Then select Gaussian blur and slide your finger left or right to adjust the blur intensity desired.

Once you have the desired effect, tap on the magic wand icon again to apply the blur!
There are many uses for Gaussian blur, such as turning the background slightly out-of-focus or making objects or elements appear farther away, for example.
You can also use Gaussian blur to soften the shadows in your artwork!
These are very simple adjustments but can radically change your artwork. With a simple filter, you can change the mood or add depth to your drawings, so take advantage of it.
What is Motion Blur and How to Apply it in Procreate?
Motion blur is a great filter to use to create the illusion of speed and movement!
If you’re drawing your characters moving fast or a car, a bicycle, or any other vehicle going fast, using the motion blur will help create a sense of rapid movement.
To add Motion Blur to your artwork, tap the magic wand to open the adjustments panel and then tap ‘Motion Blur.’
When using Procreate’s motion blur setting, the direction of the effect depends on the direction you slide your finger on the screen.
If you want the motion to go to the sides, then slide your finger to the left or right. If, on the other hand, you want the motion to appear vertical, then slide your finger up or down for more or less intensity!
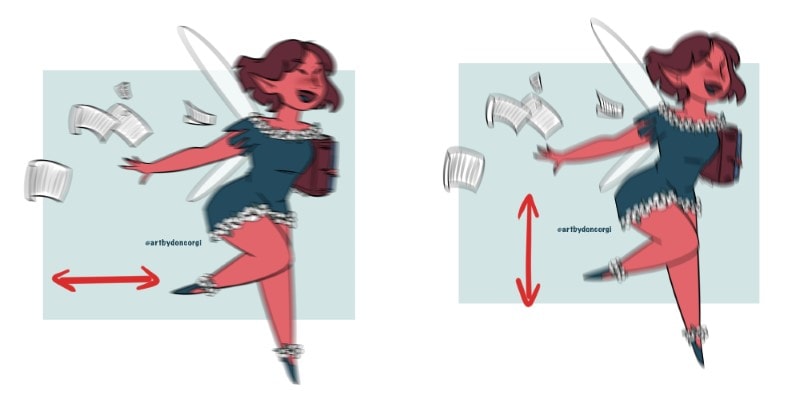
The more intensity, the faster the element will appear to be.
All you have to do is decide on the direction you want the motion to go and slide your finger accordingly. And with just a few quick gestures, you can change the whole dynamic of your artwork!
What is Perspective Blur and How to Apply it in Procreate
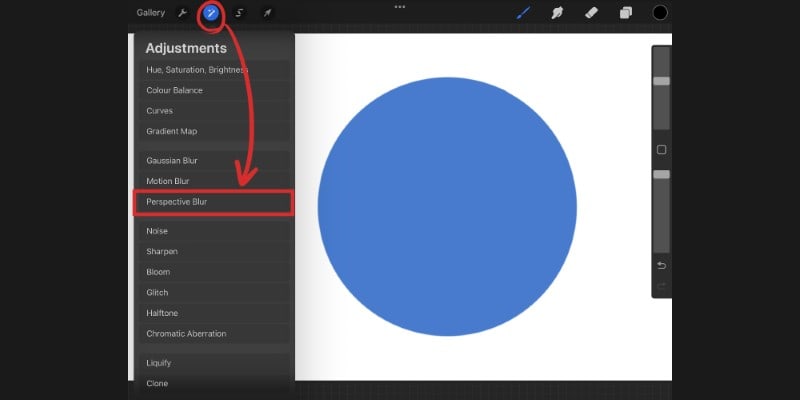
Perspective Blur will create a radial blur on the selected element of your artwork. Starting from the center, the blur will increase as it reaches the edges of the selected element.
This is a good blur to use when you want the focus of the viewer on a specific area of your artwork. The blur will draw the viewer’s attention and add depth to the illustration as well!
To use Perspective Blur, again tap the adjustments tab, then tap ‘Perspective Blur.’
Now, you’ll have two options: Positional and Directional. They’re not too different from each other, and it all comes down to your preference when using this tool to blur.
With positional, an ellipse will appear on the screen. When you move it around, the direction of the blur will change accordingly. Not only that but depending on how far or close it is to the blurred area, it also changes how far the blur goes.

With Directional, you’ll only control the direction of the blur by moving the small directional arrow around the circle.
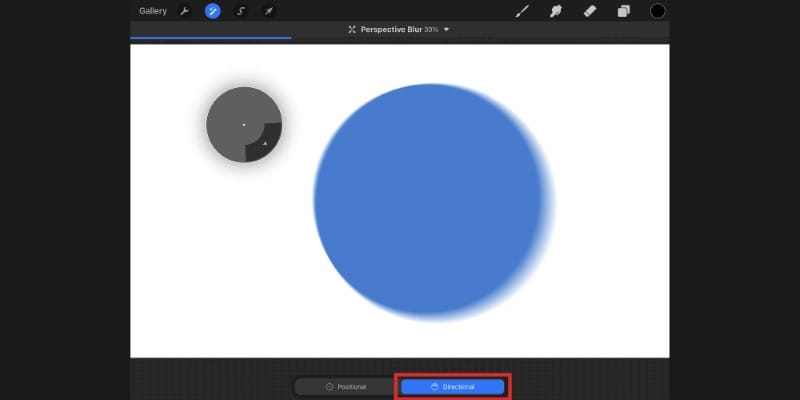
As for the blur’s intensity, again, you can slide your finger to the left and right to change the amount of blur you’ll apply.
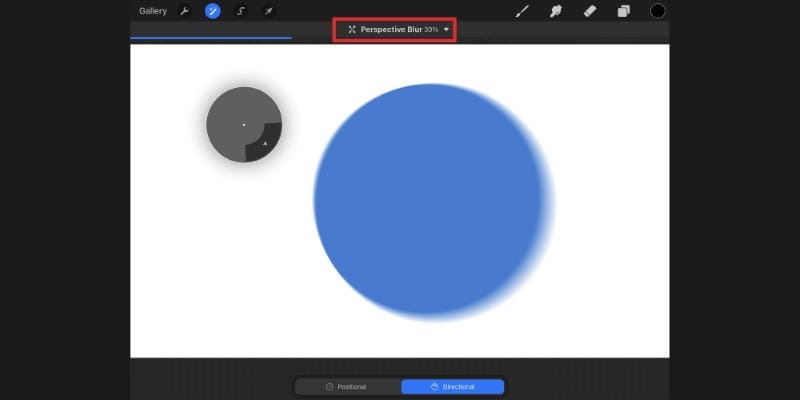
Just like before, you’ll be able to see the blur’s percentage at the top of the screen.
Related: The Best Procreate Drawing Exercises That Will Make You A Pro.
Tips and Tricks for Blurring in Procreate
There are different ways you can add blur to your artwork in Procreate.
Knowing more about them will help a lot in your workflow and ensure the right mood and atmosphere you had in mind for your illustrations!
Let’s take a look at a few tips and tricks when using blur filters in Procreate.
Blur Your Entire Layer in Procreate
If you want to blur your entire layer in Procreate, it’s very easy. Simply be sure the layer you want to blur is selected.
You know the layer is selected when it’s highlighted in blue.
Now go to the adjustments tab and selected the desired blur, for example, the Gaussian Blur, which is the most common to use.
Using your finger, slide right or left to adjust the blur’s intensity. Tap the adjustments icon again, and Procreate will apply a blur effect to the whole area!
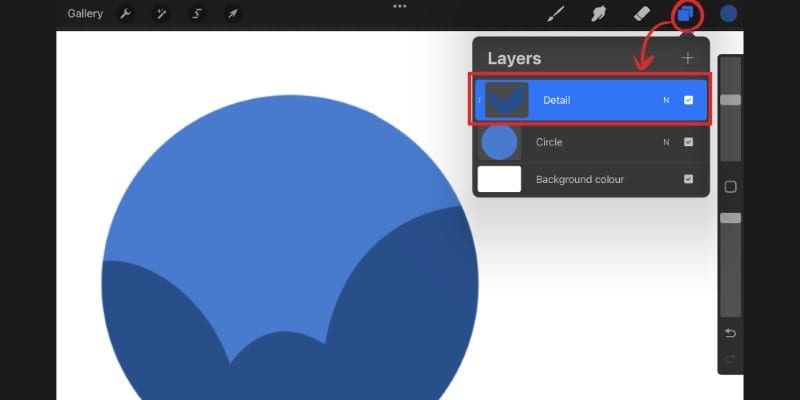
One thing to remember is that you can only blur one layer at a time. So, if you’d like to blur several layers, you can either merge them all together.
To do this, tap a layer to show the layer options tab and then tap ‘Merge Down.’ The layer you selected will be merged with the layer below.
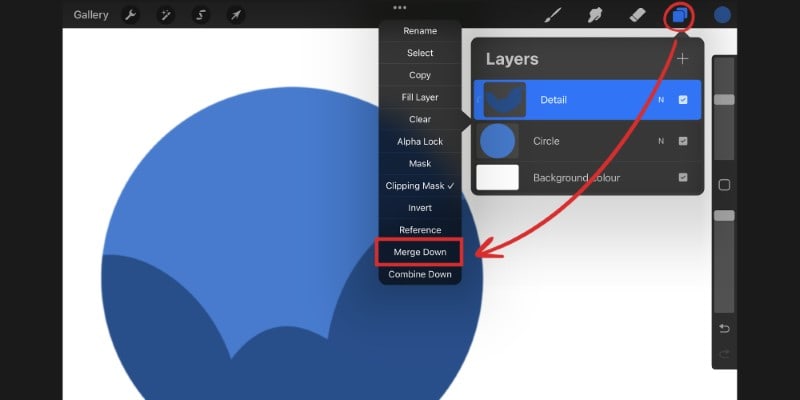
Do the same thing for every layer you want to merge, and then apply a blur effect to your entire layer!
Alternatively, if you want a different blur percentage or even effect for each of the layers, just blur each layer one at a time.
Blur Specific Areas in Procreate
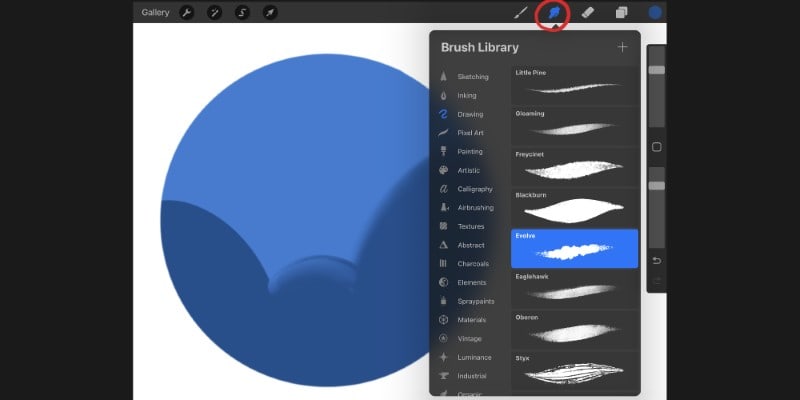
To apply your blur to smaller or specific areas of your artwork, you can use the pencil option instead.
First, choose the blur effect you want to add, then tap the small arrow at the top bar, and finally, tap ‘Pencil.’
This will turn your pencil into a blurring tool! Now, instead of adding blur to the whole layer, you can use the pencil to blur a specific area.
Just like before, you can use the slider to increase or decrease the blur intensity of the drawn area!
Using the pencil setting allows you more control over the blur applied but will also help you blur a particular object instead of big areas.
Blur an Image in Procreate
To blur an image in Procreate, you first need to import it into your canvas.
Go to the Actions menu with the wrench icon. Then tap ‘Add’ and finally tap ‘Insert a photo.’
You can also insert a painting or one of your sketches (procreate is pretty great for sketching).
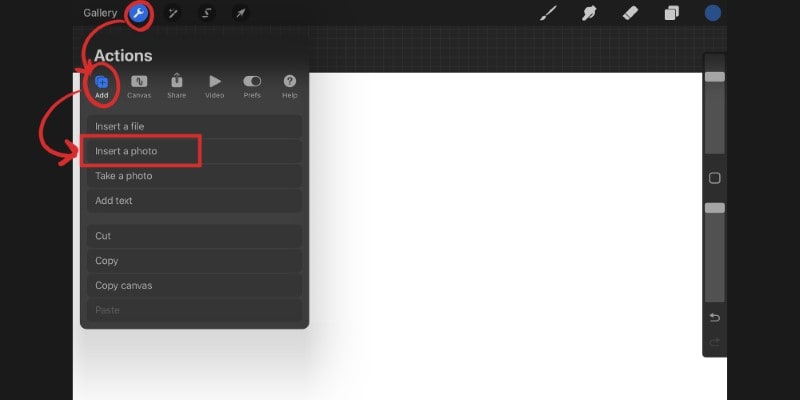
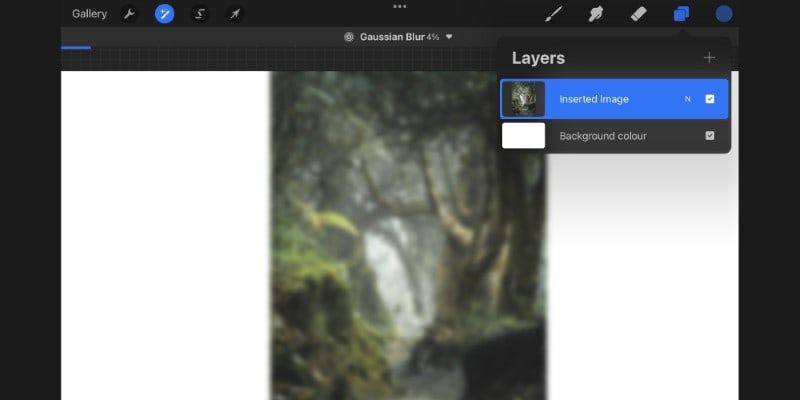
Select the image you want to add, and it will show in your canvas in a new layer.
With that new layer selected, you can now open your adjustments menu and choose any layer option!
Just like before, you can add as much intensity as you want to it or even use the pencil option to draw the area you would like to blur.
What are Some Other Ways to Blur in Procreate?
There are other ways that you can blur on Procreate. Some might offer more control over what you do with the effect, while others make it easier to select what you want to blur.
You can even crop the selected area in procreate first before applying the blur.
Let’s go over two other tools you can use to make blur easier for you!
How to Use the Smudge Tool for Blurring in Procreate
The smudge tool is an interesting tool mostly used to blend colors or even textures while drawing.
However, due to its smudge effect, you can also use it to make certain areas appear slightly blurry or out of focus.
The interesting thing about the smudge tool is that you can use it with any brush in your library. This allows for more control over how the blur will look.
You can play with color, texture, and style while blurring certain areas of your artwork!
To use the Smudge Tool, simply tap the hand icon right next to the brushes icon. Once you do, you can start to use it as you would any other brush.
However, if you tap the Smudge Tool again, you’ll be able to see your brush library and choose any of them to smudge!
You can also change the color, size of the brush, and even its opacity, so there are a lot of options while you smudge and blur your artwork.
How to Use the Selection Tool for Blurring in Procreate
If using the pencil option while blurring feels slightly weird for you, there’s another option.
Before using the blur feature, you can make a selection of what you want to blur!
Tap the Selection Tool and the top bar. Once you do, there are some options to choose from.
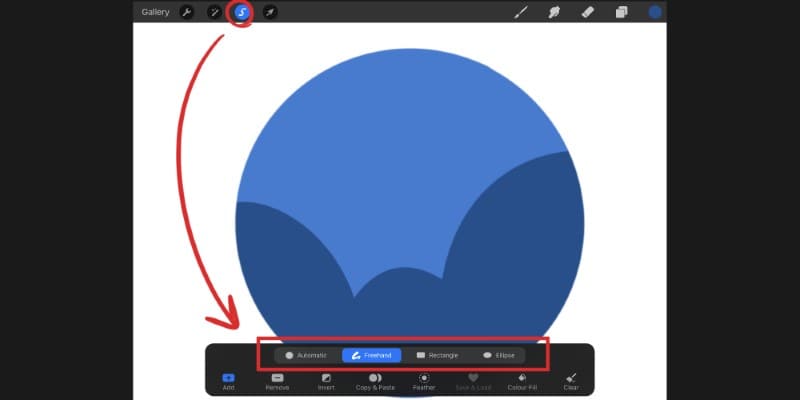
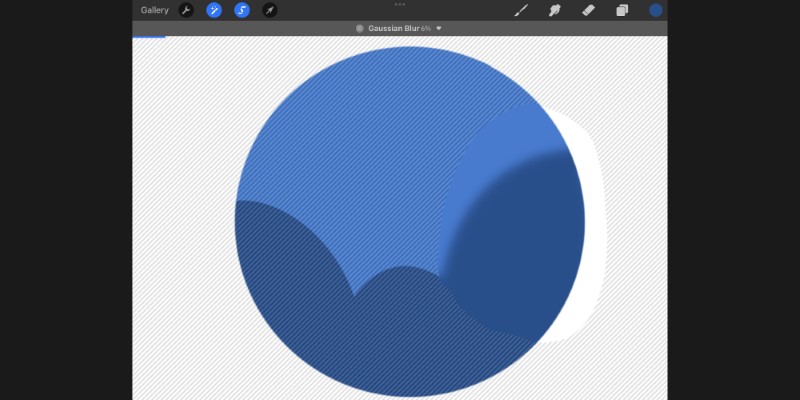
By using the Freehand option, you’ll have more control over the selection you make. You can draw any shape or line over an area you want to blur and then go to the Gaussian blur setting.
Once you do, the blur will only be applied to the area selected!
Using the rectangle or ellipse options to make a selection can also be quite useful when you want the blur to occur with those specific shapes.
It’s worth exploring both the selection and blur tools together and see what you can do with them!
Summing it Up
To use blur in Procreate is quite simple.
Tap the magic wand icon at the top bar to access the Adjustments tab. (You can find all other Adjustments you can use in Procreate here!)
Once you do, you’ll be able to see 3 different blur options to choose from:
- Gaussian Blur;
- Motion Blur;
- Perspective Blur.
Choose one and then slide your finger to the right and left to adjust the blur’s intensity.
Once you’re happy with the blur effect, tap anywhere on the screen to apply it!
You can apply blur to smaller sections or to the whole layer.
To apply blur to specific areas of your artwork, you can use the pencil option by tapping the small arrow that appears in the intensity slider.
It’s also possible to apply blur to specific areas by using the selection tool and drawing your own selections before using the blur filter.
This is all you need to know to start using and exploring the Blur tool in Procreate, so experiment with it along with some of these Easy Procreate Exercises.
Or dive in and experiment with these other Free Drawing Software for artists!
Patricia Caldeira is the main writer here at Don Corgi. She's an art teacher with over 20.000 happy students across many platforms and courses!
Enjoy your stay and as always:
Keep on drawing!

")

