If you’re transitioning from traditional to digital art, you might wonder if Procreate is a good option for sketching. After all, this is digital software that is quite unlike paper, right? There are a few ways to sketch in Procreate and keep that traditional feel!
In general, Procreate is excellent for sketching. Procreate has specific tools and brushes to mimic a sketch look, which makes it a fantastic option to sketch digitally.
Not only that, but you can do a LOT with Procreate, from sketches to fully finished illustrations.
Table Of Contents
What Pencil Or Brush Is Best For Sketching On Procreate?
One of the great things about Procreate is the extensive assortment of brushes. When you open the brushes menu, you’ll notice many categories.
Then, inside those categories, you’ll find many brushes to explore and try out.
Within those categories, you can even find one named ‘Sketching,’ and that’s what you want right now.
Even if you want to create a finished illustration, you want to sketch the idea first. For that, I think that a brush that resembles the feeling of an actual pencil works the best!
When I started to draw digitally, I would always sketch my ideas on paper with a pencil first. Then take a photo, bring that sketch to my computer, and start drawing.
However, ever since I got an iPad and started drawing on Procreate, I have done my whole process on it! From sketch to finish, I do it all on Procreate.
And the reason is mainly that these sketching brushes feel pretty good and almost like you’re using a pencil!
You got seven sketching brushes that resemble the use of a pencil:
- Peppermint;
- Derwent;
- Procreate Pencil;
- Technical Pencil;
- HB Pencil
- 6B Pencil;
- Narinder Pencil.
As you can tell by their names, the goal of most of these brushes is to mimic pencils that you’d use on traditional mediums. I like the feel of the Derwent brush, for example.
Now aside from these, you can find three more brushes in the sketching category:
- Soft Pastel;
- Oil Pastel;
- Artist Crayon.
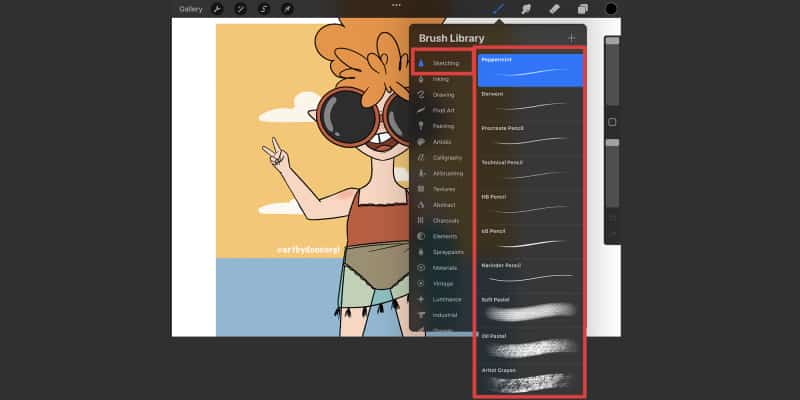
These brushes have great texture and are perfect for adding shading to your sketches or even if you prefer to sketch by creating big blocks of color and then shaping them into a clear subject.
As an aside, if you’ve messed up your procreate color palette before, know that it’s pretty easy to restore it, here’s how.
Finally, as we said before, there are many brushes to choose from in Procreate. Even though some brushes are made with sketching in mind, that does not mean you need to limit yourself to them.
Maybe you prefer to use more painterly or inky brushes when sketching, with more or less texture.
For example, I’m particularly fond of the Dry Ink brush from the Inking category. The same goes for the Vine Charcoal, hidden among the Charcoal brushes.
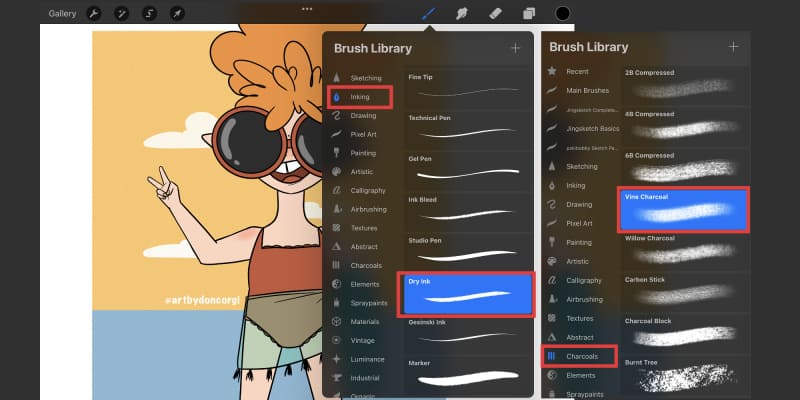
It’s good to try out different brushes and see what you prefer, for they all have different settings and will feel different from each other. It’s all part of the fun, just playing with some brushes until you find the ones you like!
How To Make A Good Sketching Brush In Procreate
Even if Procreate provides us with fun brushes to use, it’s natural for you to want to create your own.
After all, we all have our preferences, and sometimes the best thing is to create a brush specifically catered to our needs.
Thankfully, it’s effortless to do so in Procreate. It’s not only relatively straightforward, but everything is customizable when editing or creating a new brush.
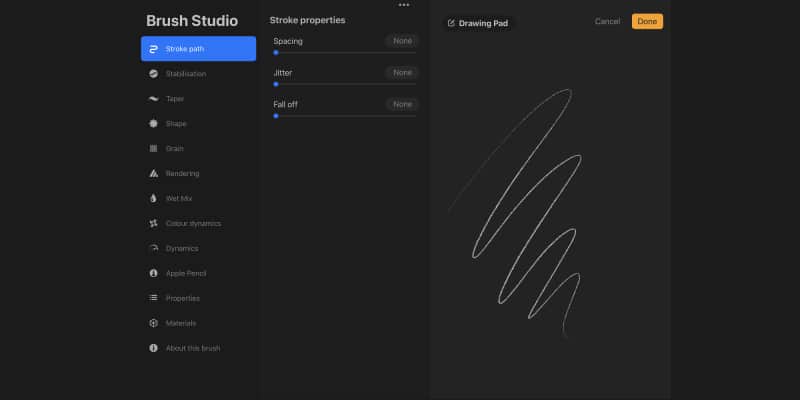
Opening Brush Studio
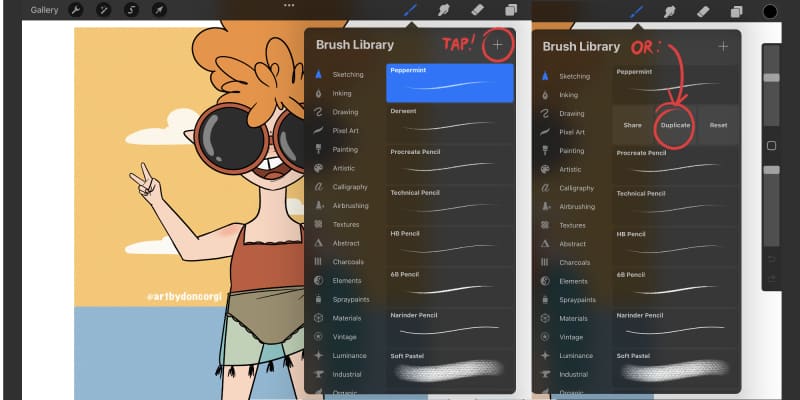
There are two ways that you can go about it:
- Open your Brush Library and tap the ‘+’ button on the top right corner. You now have access to the Brush Studio and can tinker with it;
- Choose a brush that you like. Now slide it to the left and tap ‘Duplicate’ once the option appears.
You’ll now see a copy of your chosen brush. Tap it, and you’re currently in the Brush Studio menu.
The first option is the best if you know what you need and want to create something from scratch.
On the other hand, if you prefer to use something that already exists and wish to tinker with it to create a brush that better fit your needs, then go with the second option.
I very rarely create my brushes, simply because it’s something I’m happy enough with what Procreate offers.
However, I sometimes like to modify them to try and create the exact texture I want!
So here’s an example of how to make your Sketching Brush on Procreate:
- Pick a brush. Any brush you like. I’m going to pick the Derwent sketching brush;
- Push the selected brush to the left and tap ‘Duplicate’;
- Open the new duplicated brush by taping it once;
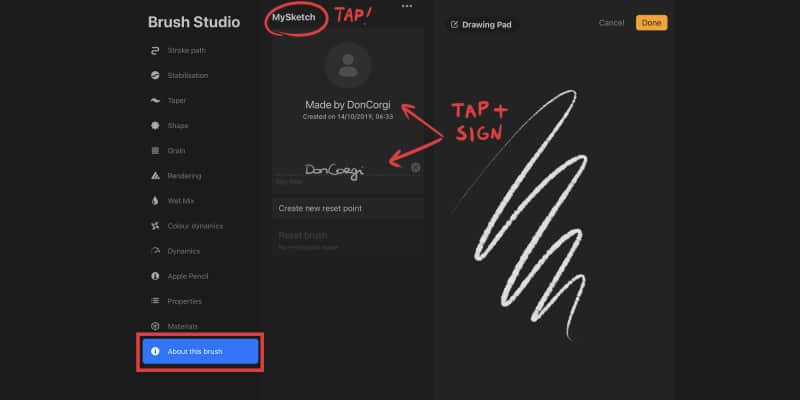
Giving A Name To Our New Brush
We are now in the Brush Studio menu and can start modifying our brush. First, let’s give it a new name:
- Go to ‘About this brush’;
- Tap once where you see the current name of your brush at the top;
- Name it whatever you want! I’ll keep it simple and name it MySketch;
- Below, you can also sign your brush and add your name to it! This way, if you’re planning on sharing that brush with someone or even selling it, it comes with your signature.
Creating A Sketching Brush
Alright, it’s time to start playing with our brush, so I’m going to go step-by-step through the process I used for this brush:
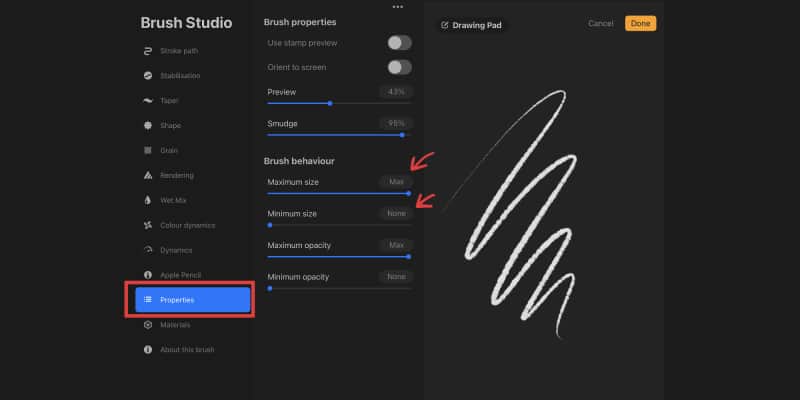
- First, go to the ‘Properties’ menu;
- On ‘Brush Behaviour’, pull the Maximum size slider to the maximum and the Minimum size slider to ‘None.’ This is a convenient setting because it gives you more flexibility on how big your brush can be!
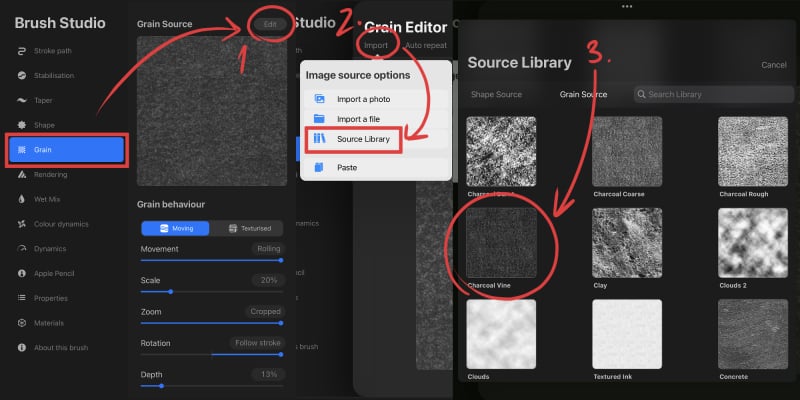
- Let’s change the texture of our brush. Go to ‘Grain Source,’ tap the ‘Edit’ button. Next, go to ‘Import’ and then ‘Source Library.’
A great thing about Procreate is that it provides a whole library with materials for us to use on our brushes!
You can also make your own textures and import them into Procreate. For that, simply choose the ‘Import a photo’ or ‘Import file’ and just select your materials.
Once you open the Source Library, you’ll see that you have much to choose from.
For this example, I used the ‘Charcoal Vine’.
Feel free to explore the library and choose something that might look more appealing!
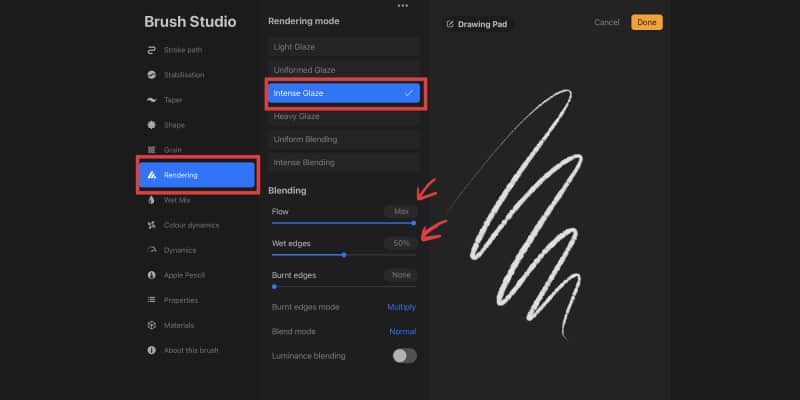
- There are some settings we can play with here; I’m not going to change many of them here. Here’s an image of what my settings look like right now:
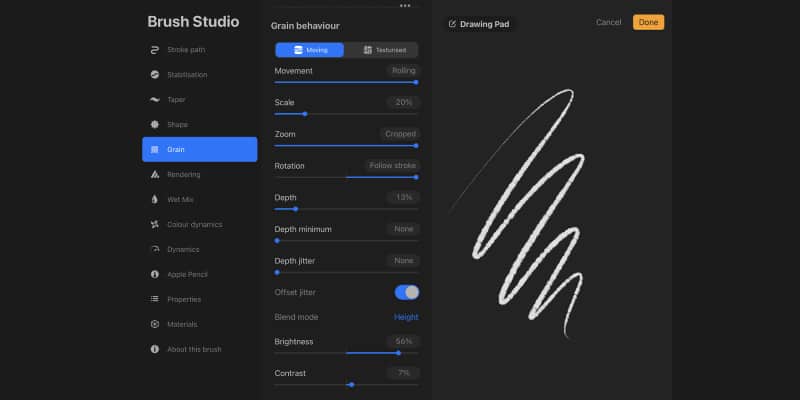
Remember that you can do whatever with your brush, so don’t be afraid to move sliders around and see what happens!
- Now let’s go to the ‘Apple Pencil’ menu. Again, go to ‘Size’ and push it to the maximum. On ‘Flow, set it at about 70%.
Notice that as you change things, you’ll immediately see the differences on the Drawing Pad to the right.
As you play with the settings of your new brush you can test it out and watch the changes live.
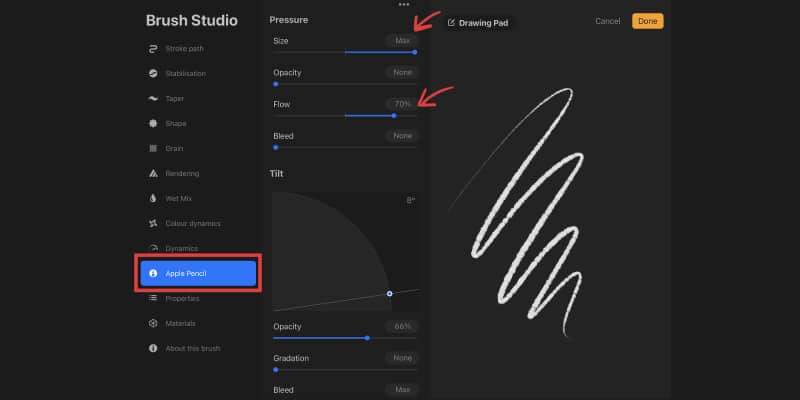
The drawing pad is very convenient, so use it as you play with the settings. Even if I’m sharing the values I used, you can go for something else that feels better for you!
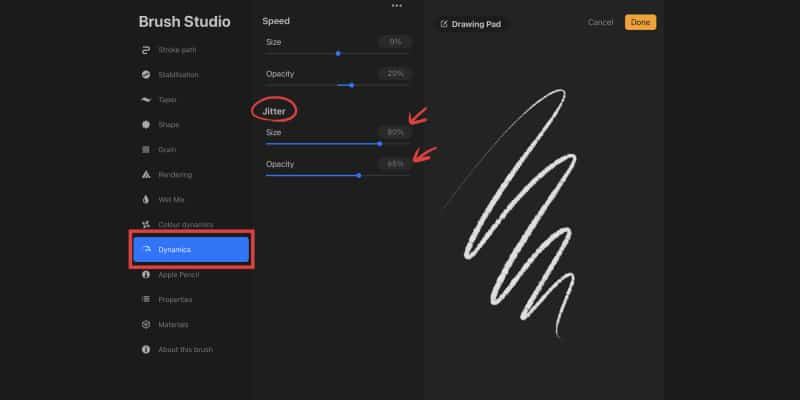
- I want a lot of texture here, so let’s go to ‘Dynamics’ and tinker with the Jitter option. Here I put the ‘Size’ at 80% and ‘Opacity’ at 65%
- I’m going to skip a few menus since they’re not of interest for the kind of brush we’re doing here, but feel free to play with those settings and see what happens to the brush!
You’ll notice several Rendering modes to choose from on the Rendering menu. I’m going to go with ‘Intense Glaze’ here, but try each and see what changes in each mode.
As you can see, Intense Glaze will create a soft line if you don’t apply a lot of pressure on your pen, and the line looks more intense the more pressure you use.
For the rest of the settings, I’ll push the ‘Flow’ to the maximum and put ‘Wet edges’ at 50%
We are done with our new brush! As you can see, it’s effortless to create or transform an already existing brush to make it more suitable and unique for you.
This is one of many outstanding features of procreate, which sometimes can make it a bit hard to learn (read more on it here).
Creating a sketching brush is a straightforward and easy process. But as you might’ve noticed, you can change and use many more options and settings.
I recommend you take some time around the Brush Studio menu, try everything, and see the changes in the brushes as you do!
Another thing I want to point out is that you can draw and write anything you want on the drawing pad.
Whenever it gets out of space, or you just want to reset the drawing pad and draw anew, you just need to tap ‘Drawing Pad’ and then ‘Clear drawing pad.’
The pad should be clear now, and you can, again, test your brush!
What Brushes Do Artists Use On Procreate?
Brushes are always a polemic topic in the digital art world.
Many artists use the brushes that come with Procreate, while others prefer and even have the most fun making their own brushes.
It’s very common for artists to start using Procreate, but being too used to a brush, or several, from another drawing software.
Since they feel so good about those brushes, it’s possible to go in and recreate them on Procreate.
Not only that, but beginner artists tend to use the default brushes since there’s already a lot to choose from, and they just don’t want to focus on creating more brushes at the moment.
However, as your skills develop and you understand your tastes and preferences, it’s natural to start creating your own brushes!
Just to give you an example, here’s a list of my most used brushes:
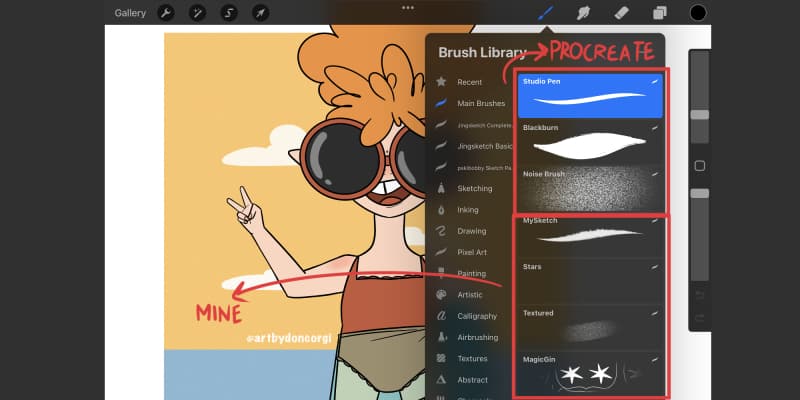
As you can see, it’s a mix of Procreate brushes and things I did or transformed, using other brushes as a base. Generally, I don’t even use a lot of brushes on my work, but that might not be true for everyone.
And that’s the beauty of Procreate, there’s something in it for everyone, and even if you can’t find the perfect brush, you can make it yourself!
Alternatively, you can buy brush packs online.
Many artists enjoy and prefer making their brushes. More commonly, those artists pick up those brushes and share them with others. Sometimes you can even find free brush packs for you to use!
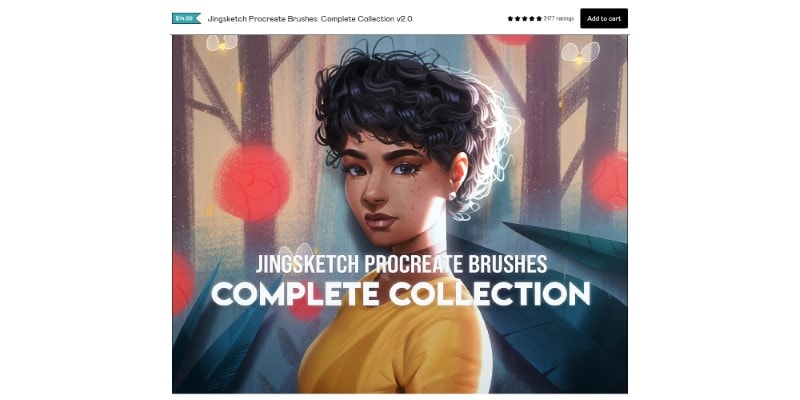
Jingsketch, on Gumroad, is an example of that. This artist has several brush packs you can buy and import into Procreate for you to use.
There are several packs with different brushes and even packs with varying amounts of brushes so that you can find the perfect fit.
Not only that, but Jingsketch even offers a smaller brush pack for free (or pay what you want), so you can just download it and see if you like it and if you want even more in the future! You can find Jingsketch’s Free Brush Pack right here.
Another favorite of mine is Kagebonito’s brushes! They enjoy exploring and creating new brushes and even sell some of them on their Ko-fi page.
Kagebonito’s Procreate Pack is very affordable and totally worth it, especially if you’re looking for sketching brushes! You can find Kagebonito’s Procreate pack right here.
Is Procreate Good For Art In General?

Learning to draw digitally means you’ll also learn drawing software, which is one of the most significant issues. There’s always an adaptation time and the need to know at least the essential tools.
With Procreate, however, that part is very easy to overcome. With it, you can quickly learn to draw digitally and develop your skills!
I believe Procreate is a great drawing software for art, both if you’re a beginner or a veteran artist.
It doesn’t matter if you want to use it just for sketching or finished illustrations. You can create beautifully finished pictures and ready them for printing in Procreate.
You can just open some reference images and draw quick studies from them.
It’s even possible to create your animations on it, as simple or as complex as you want!
Not only that, but you can store your procreate work on iCloud, which is pretty handy when you’re using multiple devices.
Due to its friendly interface and ease of use, Procreate makes it easy to start drawing anywhere at any time of the day.
Since it’s so easy to start drawing on Procreate on the iPad, I also think it helps keep us motivated to draw.
Sometimes the most challenging part of drawing is to start, which is almost effortless in Procreate, so go ahead and have fun sketching!
To help you out, here’s a list of 23 Easy Drawing Ideas for you.
Patricia Caldeira is the main writer here at Don Corgi. She's an art teacher with over 20.000 happy students across many platforms and courses!
Enjoy your stay and as always:
Keep on drawing!
")


")