Drawing a torso is usually one of the first body parts beginner artists want to learn after being able to draw a portrait. It is an easier feature to draw, but it also complements a portrait or half-body drawing well.
There are several muscles, such as the trapezius, obliques, and many others, including back muscles you can learn and draw.
However, in this tutorial, we’ll focus on shapes and proportions, step-by-step, so you can successfully draw the human torso with 0 complications!
Table Of Contents
- 1 Finding The Torso Proportions Using The Head Method
- 2 How To Draw The Torso Using Simple Shapes
- 2.1 Step 1 – Draw 2 Circles For The Torso’s Length
- 2.2 Step 2 – Draw An Upside-Down Trapezium For The Pectoral Area
- 2.3 Step 3 – Draw A Long Upside-Down Trapezium For The Abdominal Area
- 2.4 Step 4 – Add Two Triangles On Each Side Of The Previous Shape
- 2.5 Step 5 – Add Details
- 2.6 Step 6 – Clean Your Sketch With New Lines
- 3 Drawing Male And Female Torsos
- 4 Drawing Torsos In Different Perspectives
Finding The Torso Proportions Using The Head Method
When learning to draw the torso, the most challenging part is figuring out its proportions.
One of the most common mistakes beginner artists make is drawing the torso too long. This is very normal to happen, even though frustrating.
Here, we will figure out the torso proportions using the head as a measurement.
Many artists use the head method to understand human body proportions better. The Loomis [1] method is a great example and worth studying.
If you start a drawing by drawing the head, you can use it for the rest of the body.

As you can see from this example, an average body is about 7-8 heads long.
Now let’s focus on the torso.
Using this example, we can see that the torso is about two heads long.
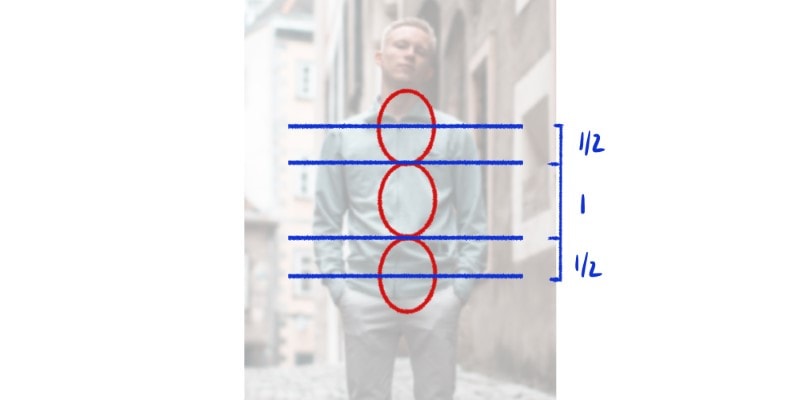
Knowing this, you can now confidently draw any torso and be sure its length is correct.
You’ll get the proportions right if your head measurement stays the same throughout the body!
Now that we know where our torso will be, we can start drawing it.
How To Draw The Torso Using Simple Shapes
We know how long the torso will be. Our next step is figuring out and breaking the torso into simple and basic shapes.
This way, instead of seeing the whole and trying to draw it, we focus on one step at a time until the torso is properly built!
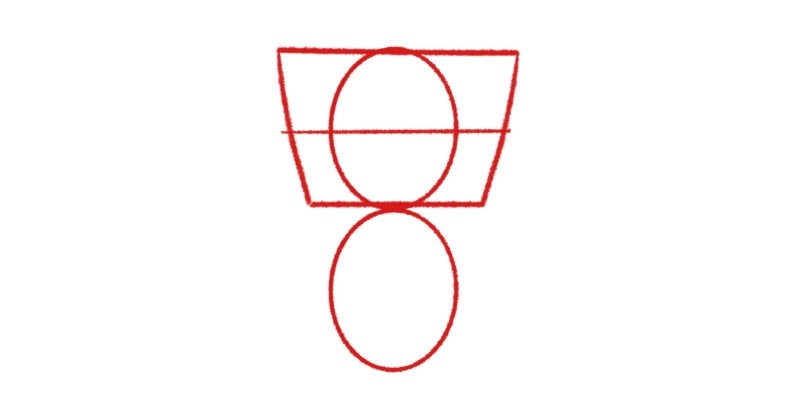
Step 1 – Draw 2 Circles For The Torso’s Length
As we’ve seen previously, the torso is two heads long. That said, we’ll start our torso by drawing two circles.
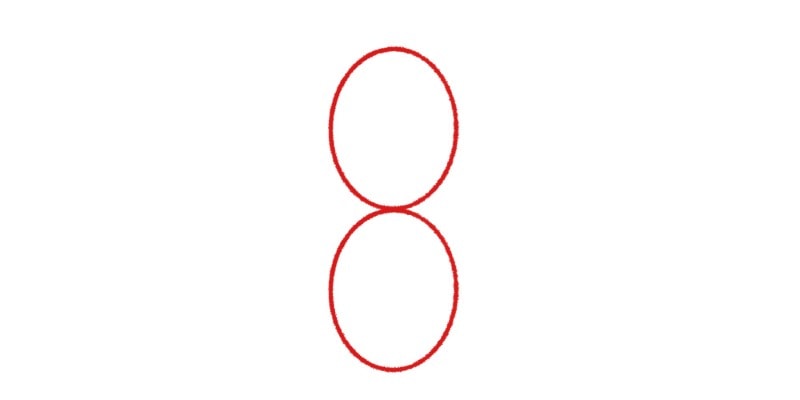
How big you draw these circles is up to you as long as they’re the same size.
So you can better understand and discern all the details later on, I recommend drawing these circles quite big.
If you do this, it’s less confusing as you add lines and shapes.
If your drawing is clear enough, it can be a reference sheet for later use!
Step 2 – Draw An Upside-Down Trapezium For The Pectoral Area
Starting at the top of the first circle, draw an upside-down trapezium. The bottom area of this shape should reach the bottom of the same circle.
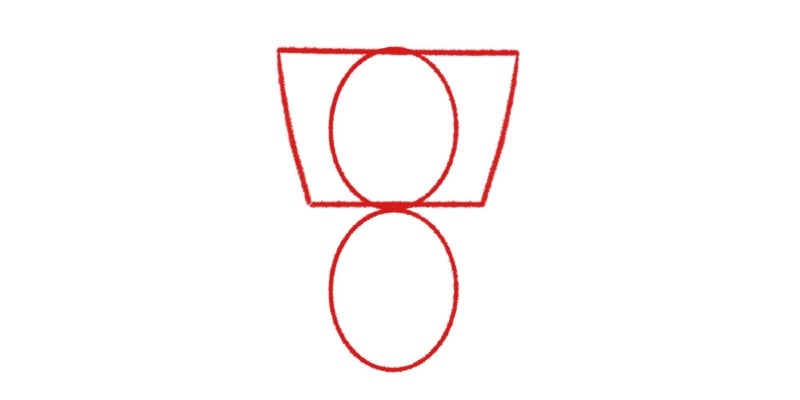
This is the chest area. With one simple shape, the area for the upper torso is finished!
Later on, we can add some details to it, but for now, let’s leave it as it is and continue building our torso.
Step 3 – Draw A Long Upside-Down Trapezium For The Abdominal Area
Roughly find the center of the trapezium shape you just drew with a horizontal line.
Draw another but longer trapezium shape from that line until it reaches the bottom of the second circle.
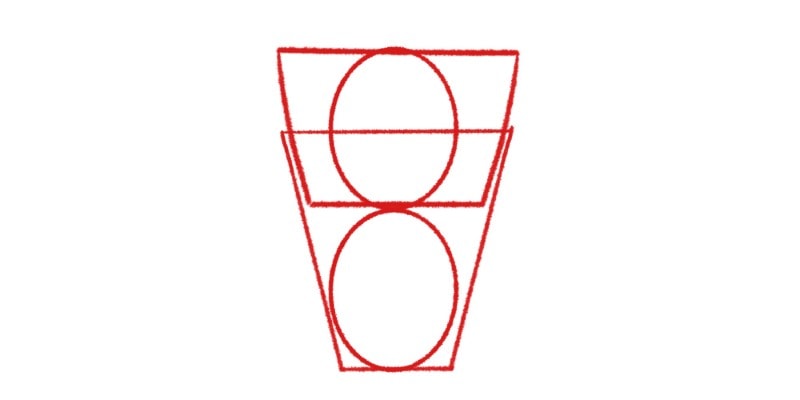
We now have the upper and lower torso areas done by using very simplified forms!
Step 4 – Add Two Triangles On Each Side Of The Previous Shape
Finally, let’s add two triangles to the sides. These are for the hips area and can be as wide or narrow as you want. It mostly depends on the kind of body you’re drawing!
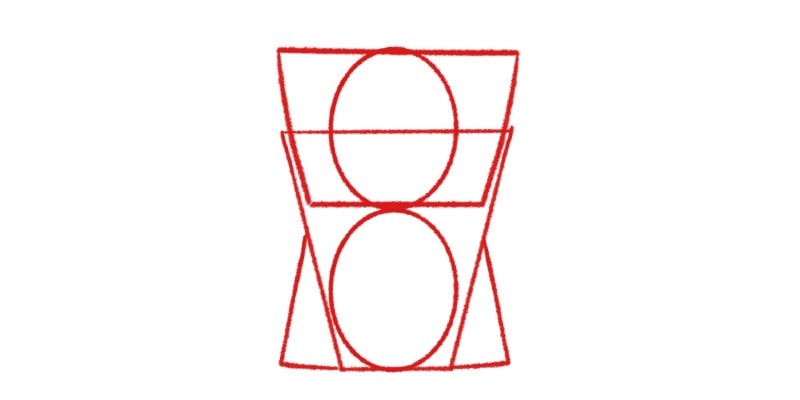
In this tutorial, we’re using these specific shapes. However, you might find another form that makes more sense when you draw a torso.
Follow these steps to learn how to draw a torso; afterward, you can experiment with other shapes!
Step 5 – Add Details
Now that all the shapes are in place, we can add details.
For example, so the chest doesn’t look as bare, we can draw two circles for the nipples.
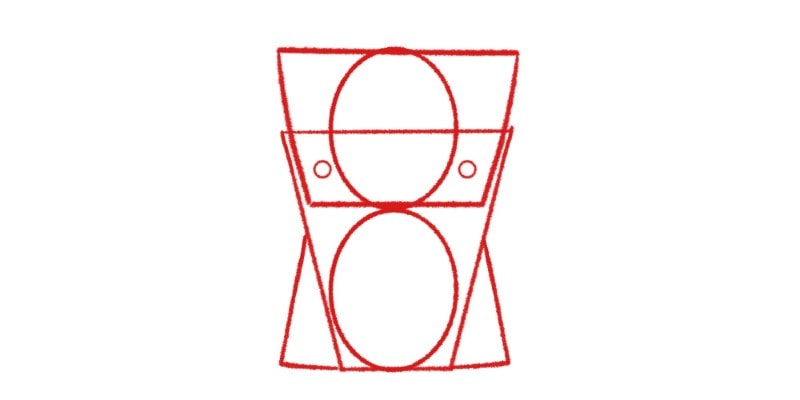
Further down, draw a horizontal line traversing the triangles.
Roughly find the center of that line and draw another but vertical line.
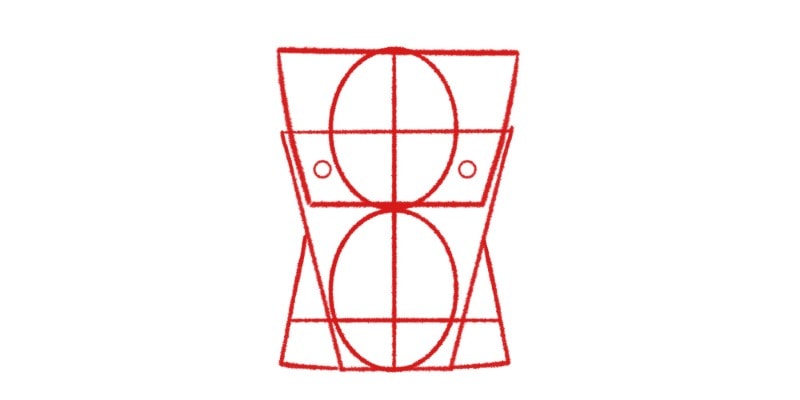
You can draw a small dot where the two lines connect for the belly button.

You can add many other details, such as hair or abdominal muscles!
So, this is a good time to experiment and try different things.
For now, everything seems very technical with lots of guidelines, so you don’t forget where everything goes.
However, with enough practice, you get more experienced and won’t need all those guidelines.
With time, drawing a torso with fewer steps will become much easier!
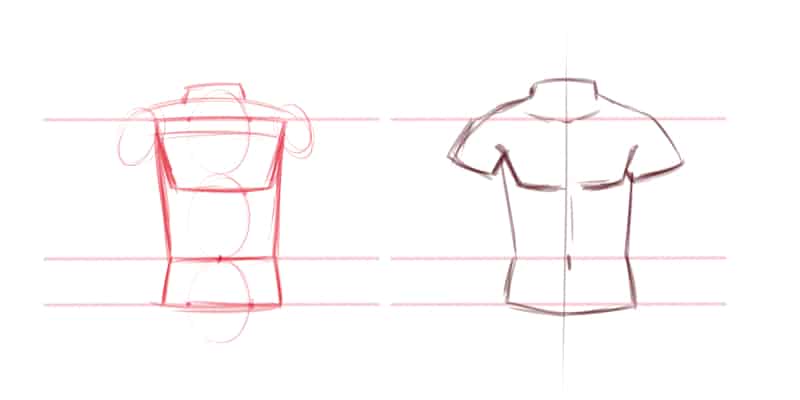
Step 6 – Clean Your Sketch With New Lines
Our sketch is finished, so we must review everything with new and clean lines.
Instead of drawing each shape like before, outline the overall shape of the torso.
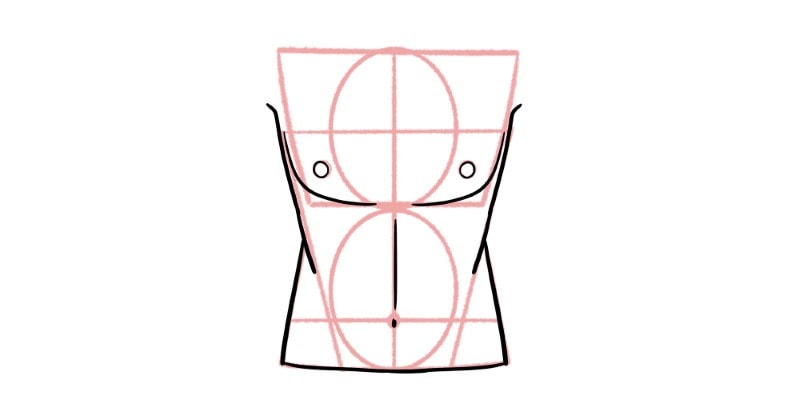
Once that’s done, you can even go in and add some colors and shadows.
On the other hand, if you need more practice, keep practicing the sketch phase until you get the hang of it.
You can render it properly whenever you’re confident about your torso drawing!
As you can see, it’s very easy to draw something, focusing on the major shapes, without needing to learn the whole anatomy of the torso.
Just go one shape at a time, slow and steady, until the whole structure is finished. Then, outline your torso drawing, and it’s done!
And once you’re ready to Draw the Arms, check out this article!
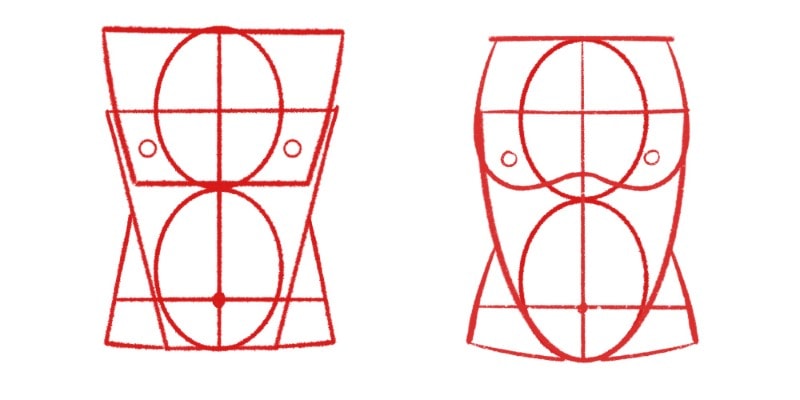
Drawing Male And Female Torsos
There are many types of bodies you can draw. Some people are thinner, while others are rounder.
Some appear quite squared or very muscular. Deciding who you’re drawing before starting to draw is good when drawing the torso.
Drawing a male torso is quite different from a female torso.
For example, the major forms of a male figure are rectangular and straight. On the other hand, a female figure is made out of curves and rounder forms.
Not only that, but the chest area is quite different as well. A male figure has a more rectangular and, generally, flatter breast area.
The female figure, however, has rounder breasts that can differ in size and shape!
Practicing both figures is good so that you can adapt your drawings accordingly.
One thing you can do that makes it much easier to figure out what shapes you should use is find some good reference photos of different people.
Lower their opacity and draw the major forms on top of those images.
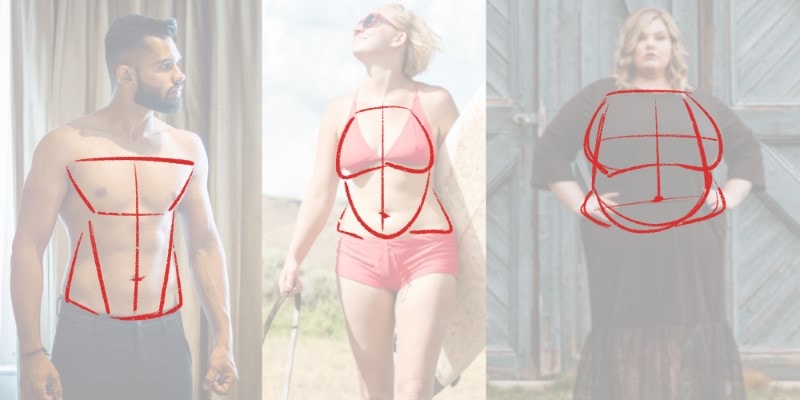
It can be oval shapes, rectangles, trapeziums, or even a bean shape. What matters is that those shapes make sense to you!
This is one of the anatomy drawing tips I recommend you pay attention to.
I like to group up the major muscle groups, but you can divide the torso into even more shapes.
Try different things until you find what works for you. Then, practice those shapes until you have a finished drawing of a torso!
Drawing Torsos In Different Perspectives
It’s good to start drawing a torso from the front view since it’s the less difficult perspective.
Once you get the hang of it, it’s time to practice drawing the torso from other perspectives.
Here the challenge increases since you’ll have to give more depth and dimensionality to your shapes.
However, you can easily adapt the forms with the knowledge you gained from drawing the torso from the front.
Instead of flat shapes, you can draw blocks and other three-dimensional forms that make sense.
Divide them into several planes so it’s easier to understand what goes where.
You need to remember your main shapes and give them depth. These can be made out of squared boxes or rounder blocks.
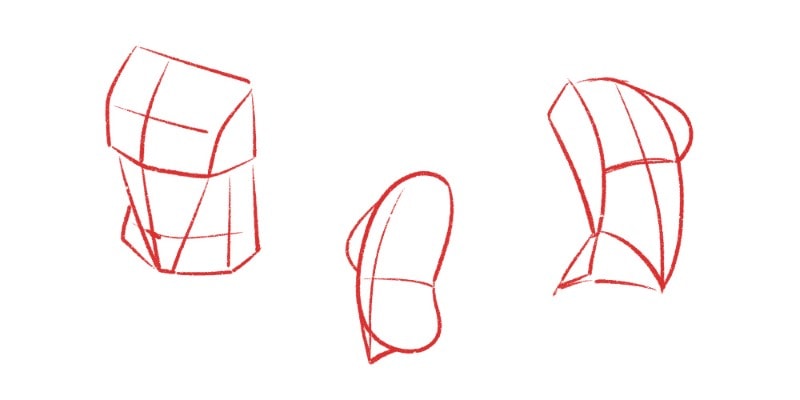
Again, you can adapt them to the kind of body you’re drawing. Straighter and rectangular blocks might work best if you draw a more muscular or thinner body.
If you’re drawing a more feminine or robust body, then rounder shapes will help!
Again, you can use reference images to help you find the necessary shapes.
Go over different photos and draw different shapes on top of them.
Once you have a good set of shapes, practice them from different views and perspectives.
Go slowly, step by step, breaking everything into simple and basic shapes. Soon you’ll get the hang of it!
The torso is a complex part of the human anatomy! So I hope this drawing tutorial has helped improve your human torso drawings.
You can learn anatomy and more figure-drawing fundamentals by clicking here!
Or join our best-selling course on Figure Drawing: Draw Dynamic Characters right here (at a discount).
Patricia Caldeira is the main writer here at Don Corgi. She's an art teacher with over 20.000 happy students across many platforms and courses!
Enjoy your stay and as always:
Keep on drawing!


")