Figuring out the basic human body proportions can be the most frustrating topic when learning anatomy drawing.
If there’s no base structure, it’s easy to get the proportions of different body parts wrong.
However, you can easily figure them out by using the rule of the head as a measurement.
This is a very simple drawing technique and the method we’ll follow in this tutorial.
Everything in this human proportions drawing tutorial is easily explained step-by-step. So you never get human proportions wrong again!
Note: You can find the TEMPLATE of the basic human proportions at the end of the post, along with different views!
Table Of Contents
- 1 How To Draw Basic Human Body Proportions
- 1.1 Step 1 – Start by Drawing a Head
- 1.2 Step 2 – Draw 7 More Heads for the Height of the Body
- 1.3 Step 3 – Draw a few Guidelines
- 1.4 Step 4 – Draw a Simple Shape for the Torso
- 1.5 Step 5 – Add an Oval for the Waist Area
- 1.6 Step 6 – Create a New Shape for the Pelvis
- 1.7 Step 7 – Draw the Shoulders to Complete the Upper Body
- 1.8 Step 8 – Add the Arms, Wrists and Hands
- 1.9 Step 9 – Next, Draw the Legs and Knees
- 1.10 Step 10 – Finally, Draw Two Trapezium Shapes for the Feet
- 2 How To Draw Human Basic Proportions From Different Views
How To Draw Basic Human Body Proportions
Finding the correct human body proportions takes time and practice.
However, a great way to easily figure them out is by using the head as a measurement!
This way, it doesn’t matter the size of the head. Whether big or small, you’ll always get the right proportions to draw the human figure.
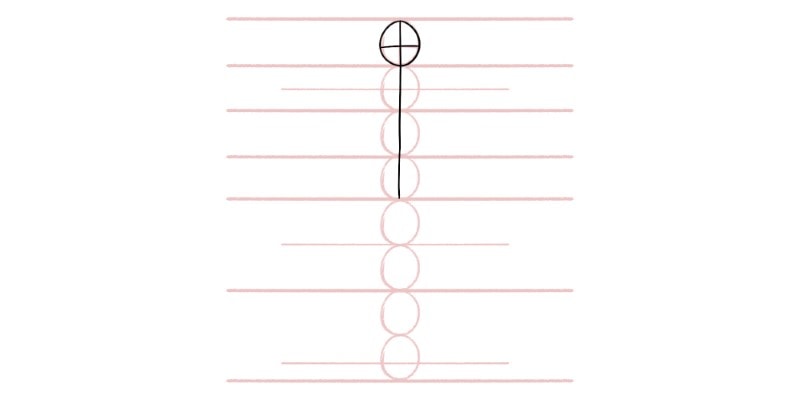
Step 1 – Start by Drawing a Head
Start with the head by drawing a circle or ellipse.

This shape can be of any size. Just remember to have enough space for the rest of the body.
Go ahead and draw two lines. One horizontal and another vertical, to find the center of the face!
Step 2 – Draw 7 More Heads for the Height of the Body
Below the first circle, draw 7 more heads, roughly the same size as the first.
Distribute them along the page, vertically aligned.
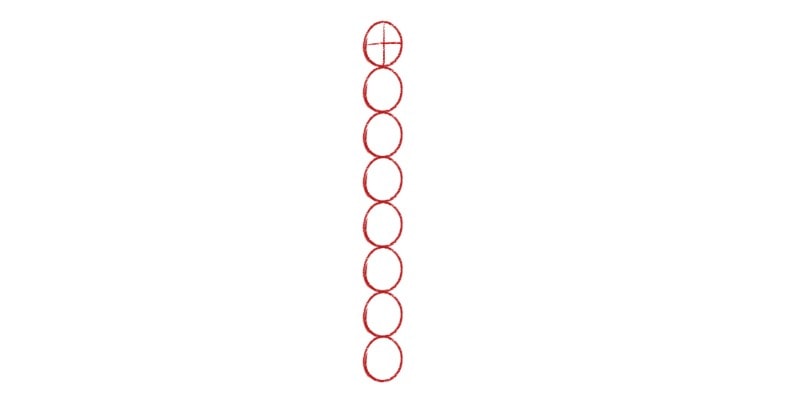
As a rule of thumb, the height of a figure is about 8 heads long.
However, this number can change when drawing different heights or even people of different ages.
Draw fewer heads for shorter people and more heads for taller bodies!
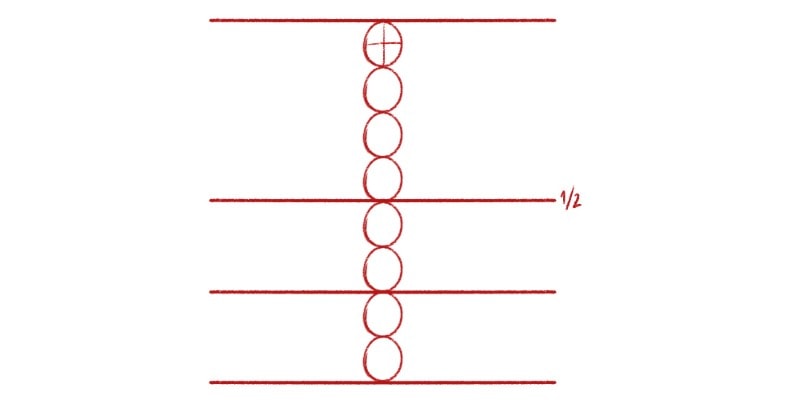
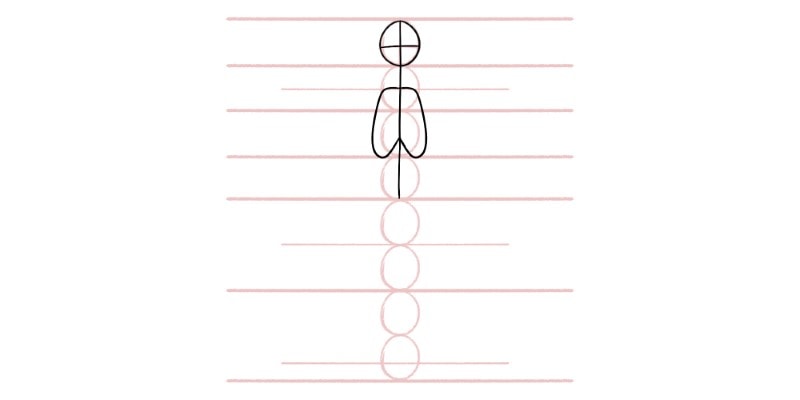
Step 3 – Draw a few Guidelines
It’s time to draw a few guidelines to divide the body into different parts.
Each guideline will help us learn where each body part goes!
Start by drawing 3 guidelines: one for the top of the head, another for the bottom of the feet, and a last horizontal line dividing the body into two equal parts.

Next, we’re going to divide the legs area into two parts.
You can do this by dividing the bottom area of the body into two equal parts with another guideline.
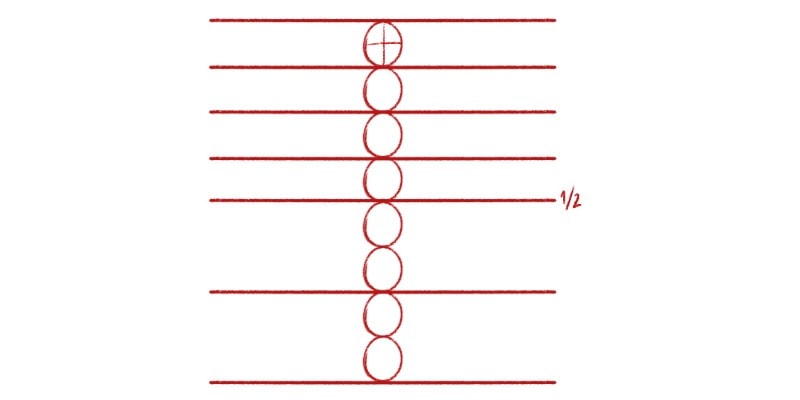
For the upper body, we need a few more lines. Do this by drawing a horizontal line below each circle.
Finally, I recommend adding 3 extra guidelines for focal areas of the body, such as the shoulders, fingers, and ankles.
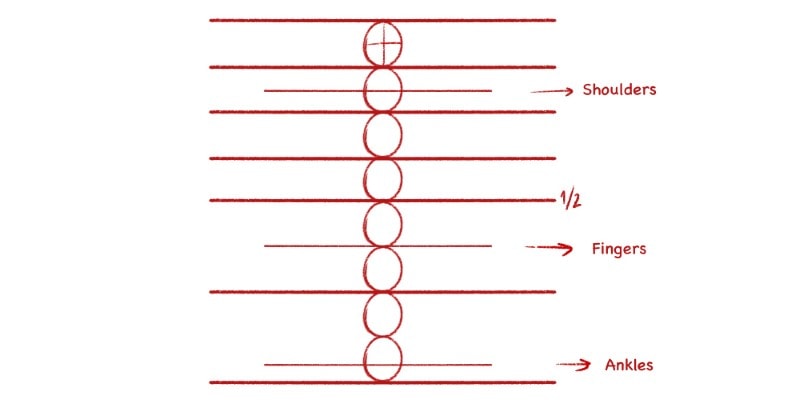
This way, you’ll be able to draw these more easily!
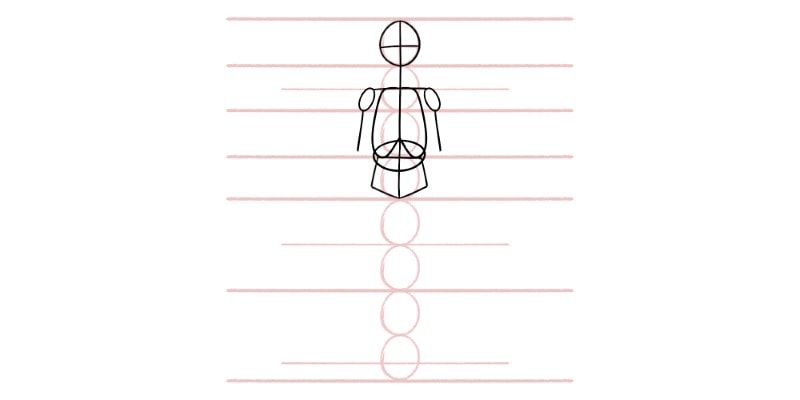
Step 4 – Draw a Simple Shape for the Torso
We have the whole structure needed to draw the human body.
Let’s start with the torso. First, draw a vertical line starting on the bottom of the first head until it reaches the middle of the body.
The torso starts on the shoulder line and ends at the bottom of the third head, where a guideline rests.
For its shape, draw a simple shape that resembles a ribcage.
Step 5 – Add an Oval for the Waist Area
Right below the torso, draw an oval shape for the waist area.
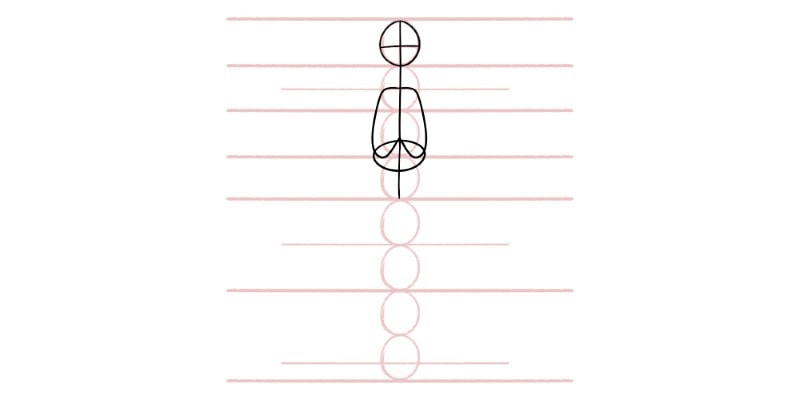
This shape is centered with the vertical line and the torso’s bottom guideline.
Step 6 – Create a New Shape for the Pelvis
We reach the pelvis area, and for this one, use a rectangular or a pentagon shape.
As for its position, it intersects the waist, and the crotch touches the next guideline!
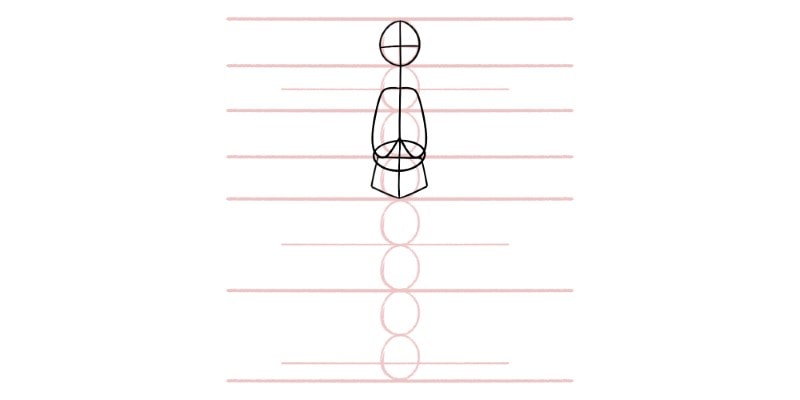
Step 7 – Draw the Shoulders to Complete the Upper Body
Let’s finish the upper body by drawing two ellipses, one on each side, for the shoulders.

These shapes start on the shoulder guideline we drew before and end on the next line.
Step 8 – Add the Arms, Wrists and Hands
Let’s keep things very simple to the arms and hands.
Starting on the shoulder, draw a line, going down until it reaches the next guideline.
This is the upper arm, and resting in this line, we can draw another circle for the elbow!

Now, draw another line going down, stopping at the next guideline.
Here is our wrist, and you can draw another circle for it.

Finally, draw a rectangular shape and a few strokes for the hand.
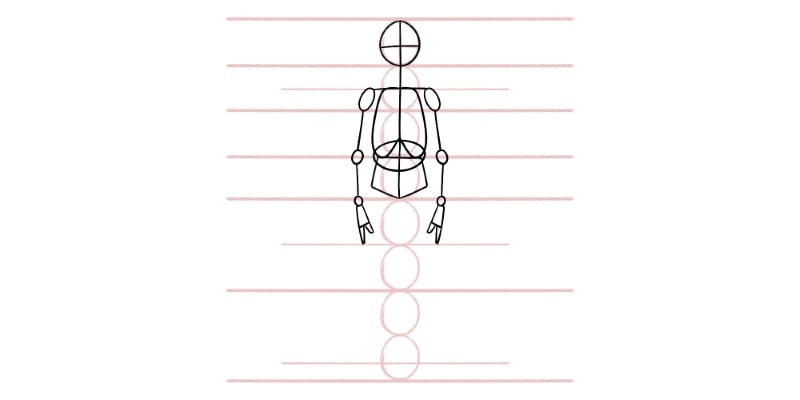
Remember that the fingers go as far as the next line!
Step 9 – Next, Draw the Legs and Knees
We will use a similar structure as we just did, but this time for the legs.
Starting from the pelvis, draw two lines going down, one for each leg.
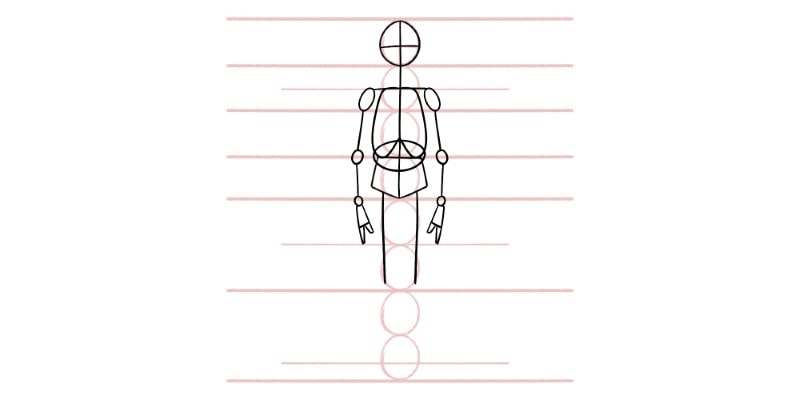
The upper leg is two heads long. Once you reach that length, draw a circle for the knees.

Then, draw another two lines until they touch the ankle line.
You have the necessary structure to draw the legs now!
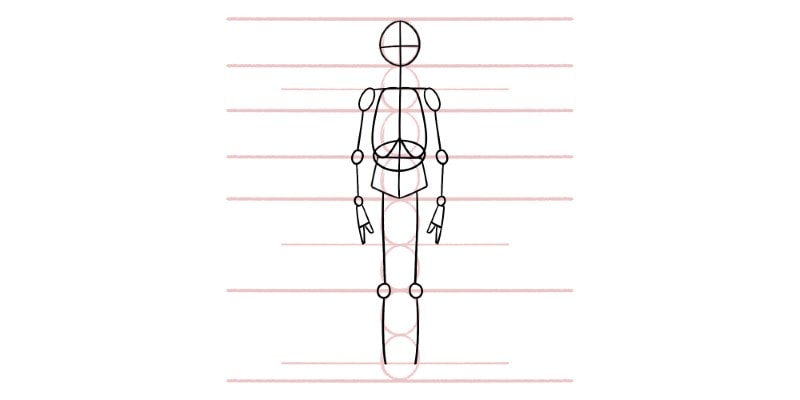
Step 10 – Finally, Draw Two Trapezium Shapes for the Feet
The only thing we’re missing now is the feet.
For those, start by drawing two small ellipses right where the legs ended—one ellipse on each side.

Then, below these, draw a trapezium shape for each foot!
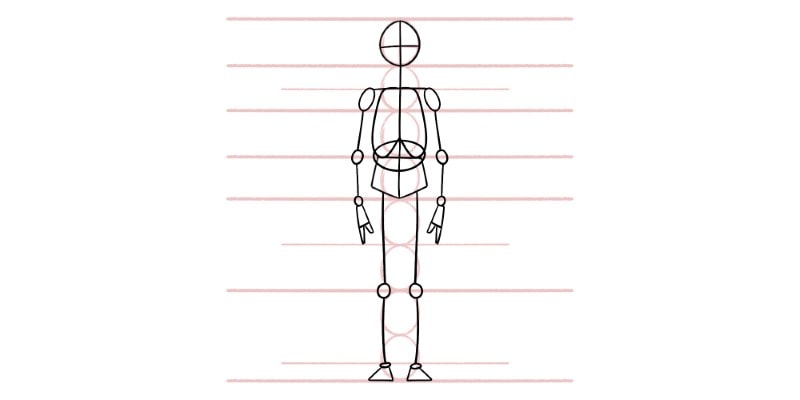
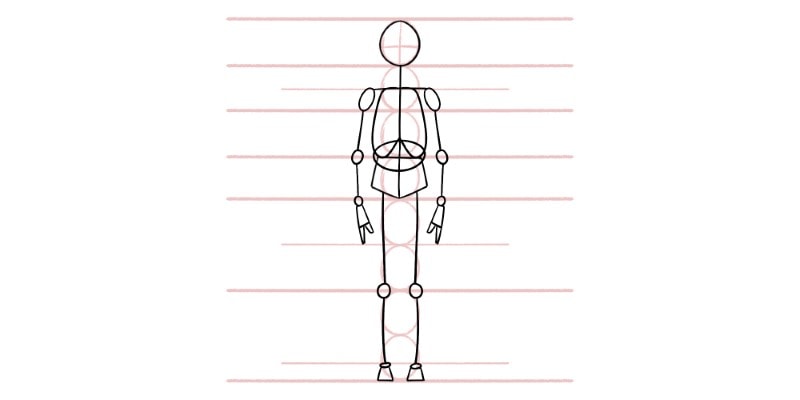
And that’s it! Our human proportion drawing is finished.
With very simple shapes and lines, you could find a simple structure for the human form.
Now, it’s time to practice these and then learn some human anatomy!
How To Draw Human Basic Proportions From Different Views
The proportions are mostly the same when drawing the body in different views.
The shapes are roughly the same, although some have to be adapted to fit the new angle.
Let’s see a few examples!
Side View Basic Proportions
From the side view, you only have to draw one side.
This makes things easier since you don’t have to worry much about symmetry.
The shapes are mostly the same, except the torso and the pelvis.
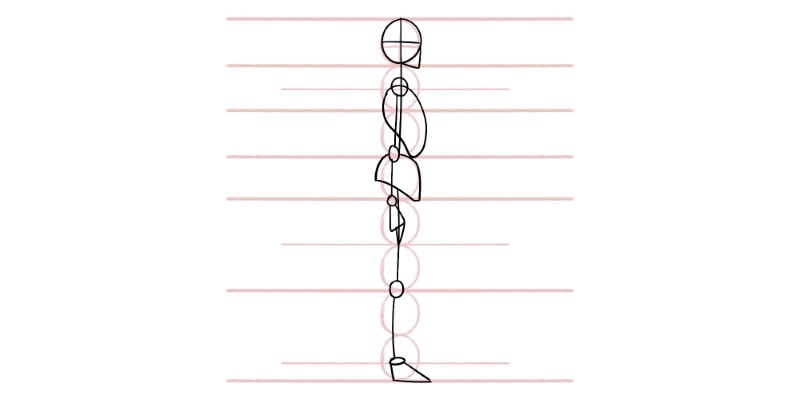
For the torso, draw a bean shape. As for the pelvis, we can still draw a similar shape but add a few curves instead!
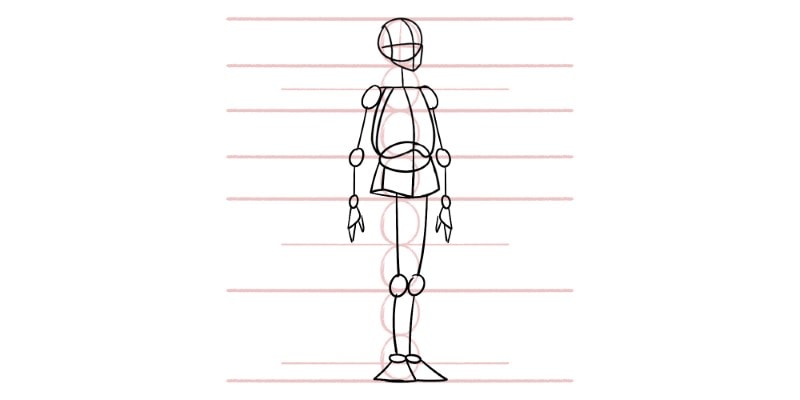
Back View Proportions
The back view has the exact same structure as the front view. So you don’t have to worry much about it!
So that you don’t forget the view you’re drawing, you can omit the face guidelines, for example.
You can also draw smaller shapes for the feet since we mostly see the heels from a back view.
3/4 View Basic Proportions
The 3/4 view is notoriously more difficult to draw. However, it can be done using the same method we did.
Again, some shapes need to be adapted. It’s helpful to add some dimensionality to some of them as well.
This way, the body gains more depth, and the 3/4 view gains more form and believability.
And that’s it for mastering proportions!
Want to dive into Figure Drawing? Click here.
And if you want to find 15+ Tutorials on How To Draw People click here!
Patricia Caldeira is the main writer here at Don Corgi. She's an art teacher with over 20.000 happy students across many platforms and courses!
Enjoy your stay and as always:
Keep on drawing!

")

")