Drawing the head is one of the first things beginner artists want to learn how to draw. This is especially true if the goal is to draw faces, interesting characters, friends, and family portraits.
Learning how to draw the head is a good start for beginners since it allows you to learn a very important basic of human anatomy while keeping things simple and easy-to-follow.
Throughout this article, we’ll guide you through drawing the head in easy steps filled with images so you can practice right away and level up your drawing skills! Along with some guidance on the head construction.
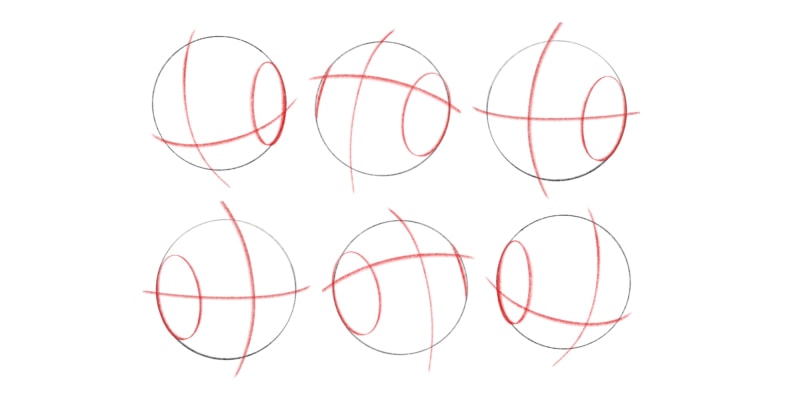
Table Of Contents
- 1 Step 1 – Draw A Circle
- 2 Step 2 – Find The Center
- 3 Step 3 – Flatten The Circle
- 4 Step 4 – Draw the Eyes and Chin Lines
- 5 Step 5 – Draw the Nose And Mouth Lines
- 6 Step 6 – Draw the Hair Line
- 7 Step 7 – Connect Everything
- 8 Drawing The Head In Different Angles
- 9 Placing Facial Features In The Head
- 10 Other Methods For Drawing The Head
- 11 Related Questions
Step 1 – Draw A Circle
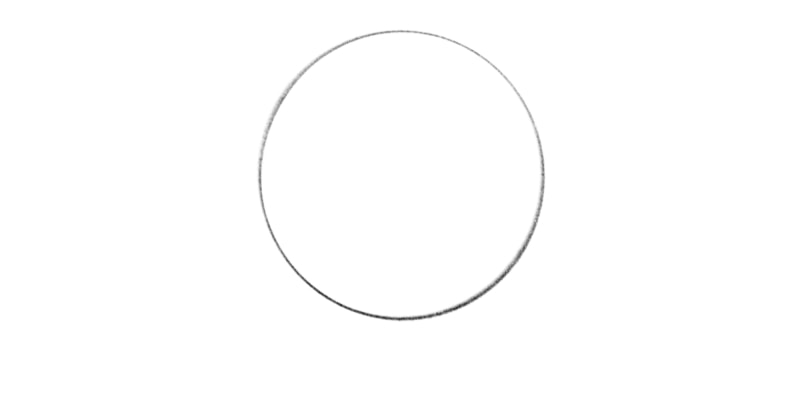
The first step when drawing heads is to draw a circle. This circle is your basic structure when drawing a head!
From here, you can draw a head from any angle and with the right proportions.
It doesn’t matter which tutorial you follow, most artists will start the head with a circle. This is based on the popular Loomis method.
The Loomis method [1] is a very helpful and easy way to understand how to draw the head and overall anatomy.
You can draw this circle as big as you want. It all depends on the size you want your drawing to be. However, if you’re starting to learn how to draw the head, start with a big circle on your page.
This circle represents a big part of our head drawing.
This way, you’ll have enough space for everything, allowing for some changes and clarity in your drawing.
Step 2 – Find The Center
Now that we have a circle, it’s time to add some guidelines to complete our structure.
We’re going to draw two lines. First, a vertical line in the middle of the circle. Then, do the same with a horizontal line.
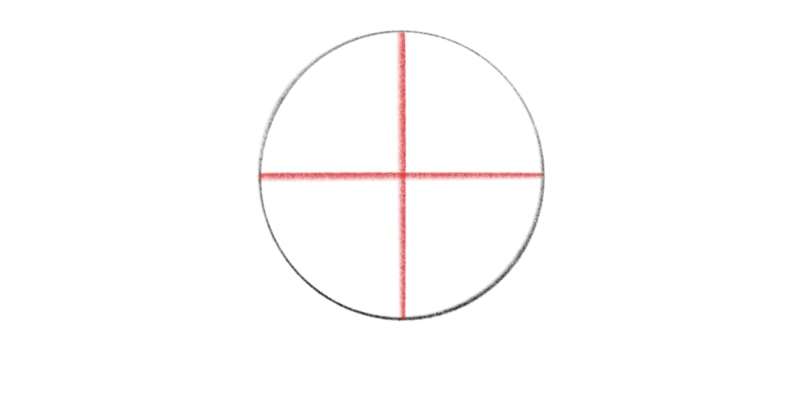
We found the center of our circle, which will be very useful when adding features to the head.
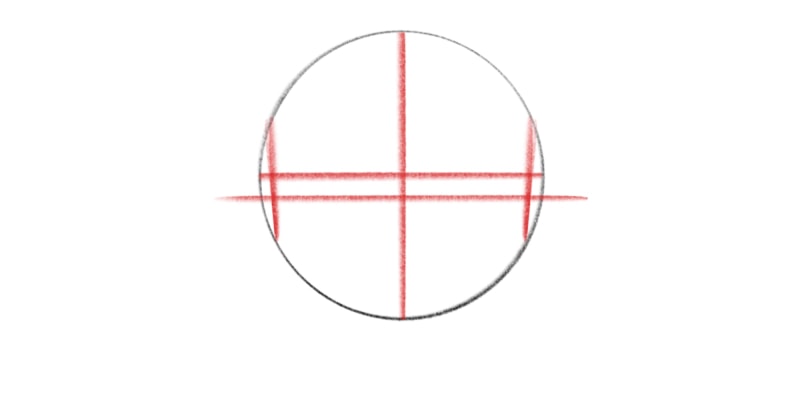
Step 3 – Flatten The Circle
If you look at a photo of yourself or any other reference photo, you’ll notice that our heads are not completely round.
Instead, it’s round at the top of the head but funnels at the bottom. So we don’t forget about this, let’s draw two angled lines at each side.
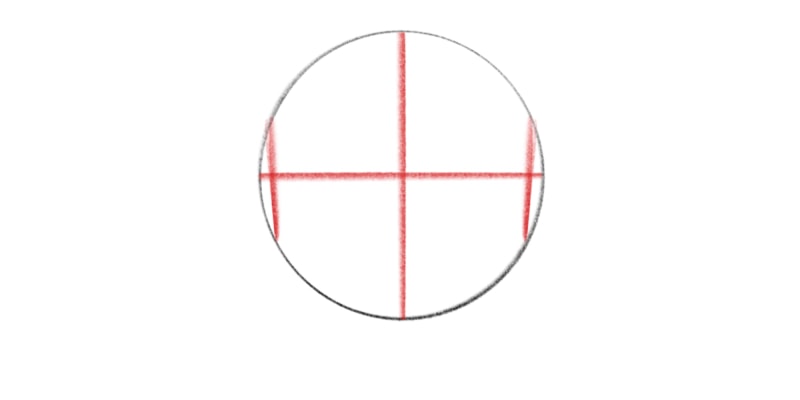
How slanted you draw these lines is totally up to you. If you want to draw a stylized head, you can exaggerate the angle of these lines!
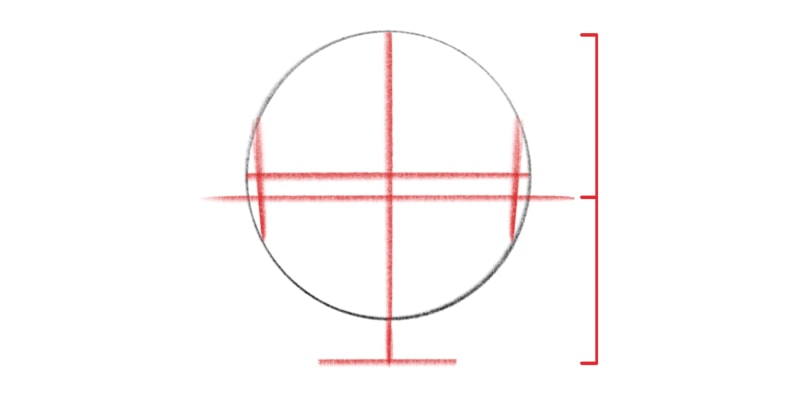
Step 4 – Draw the Eyes and Chin Lines
We’re not done yet. Below the first horizontal line we drew, let’s draw another across the circle.
The first line represents the brow line, while the second represents the eye line.
Now from the eye line, extend the vertical line down towards the chin line. To know where the chin line will be, simply take a rough measure of the distance between the eye line and the top of the head.
You’re going to have the same distance between the eyes and the chin, like this:
And if you want to give extra cuteness to the eyes, follow this guide.
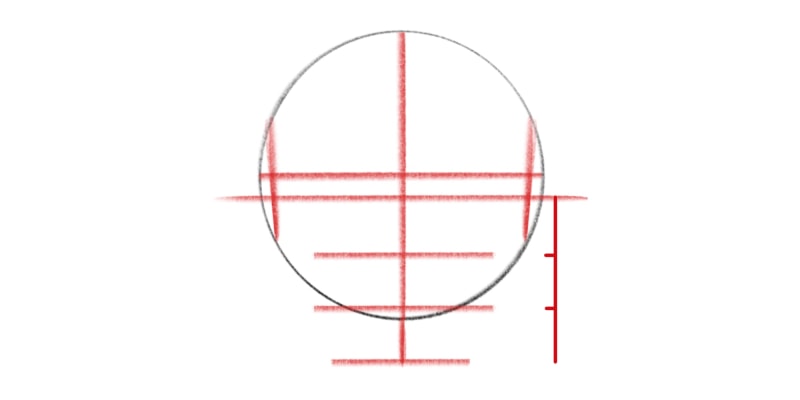
Step 5 – Draw the Nose And Mouth Lines
Let’s find our nose and mouth lines. We will divide the space between the eyes and chin into three equal parts.
The first line below the eyes is the nose line. The second is our mouth line!
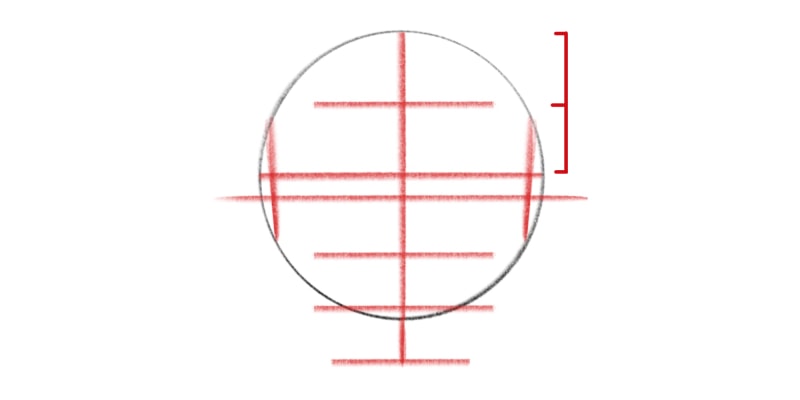
Step 6 – Draw the Hair Line
Finally, all we are missing is the hair line. For that, find the middle of the vertical line between the brow line and the top of the head.
Draw a horizontal line there, and you have the hair line.
These steps might all seem very mathematical and exact. But after a few tries and practice, you’ll notice that drawing the head and facial features is more intuitive.
This is why it’s important to understand this whole structure first, especially if you want to focus on portrait drawing.
A common mistake is to skip these altogether and try to draw the entire head at once. Leave this to later on when you’re more used to drawing heads!
Once you understand these steps, drawing faces and the whole head will be easier.
Step 7 – Connect Everything
Although we have all the guidelines and basic forms, it still doesn’t resemble 100% a human head.
For that, we need to connect our lines to finish our head.
Connect the bottom of the slanted lines to the chin line. Take the opportunity and draw a curved line instead. Like this:
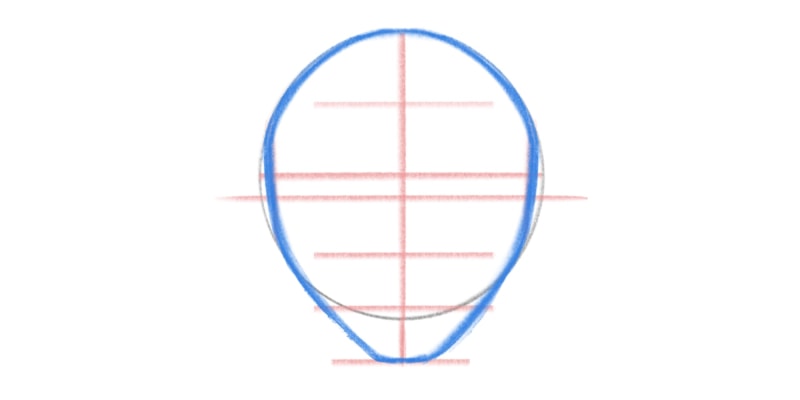
This is how to draw the head in very simple and easy steps!
Drawing The Head In Different Angles
Now that you know how to draw the head, it’s time to apply that knowledge to other angles.
This process can initially seem challenging since we must think about perspective and three-dimensionality.
I recommend first getting familiar with all the shapes and guidelines we used when drawing the head from the front.
When you feel confident about those head drawings, it’s time to go to the next level.
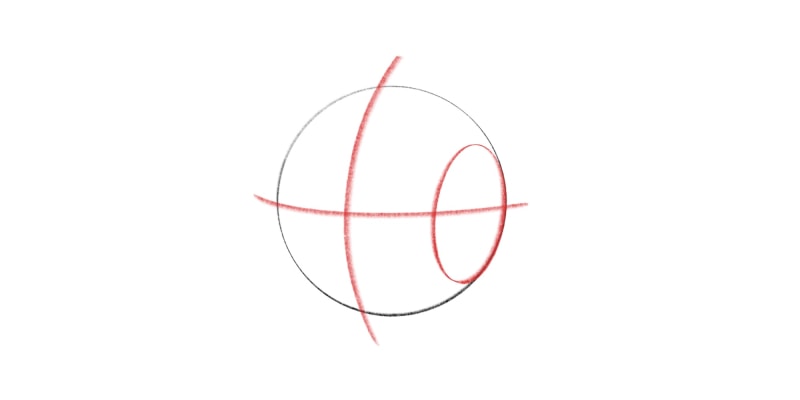
What we need to do now is instead of thinking of a circle, we think and draw a sphere!
Don’t forget to add your guidelines along with the slanted sides, which, in this case, you can draw circles for it instead of slanted lines:
A good exercise to better understand this concept is getting a ball and drawing lines. Now turn the ball around your hand and see how it looks from different angles.
Now go on paper and draw what you see!
Depending on which direction you’re turning it, the head and guidelines appear differently, even though they have the same proportions, measurements, and placement.
If you remember the necessary shapes and measurements, you’ll be able to draw the head from any angle. You might need extra practice, but the results will show sooner or later.
It’s also good to focus on the head and its basic forms first, without facial features. This way, you can learn the basics and add one feature at a time as you get confident in each step!
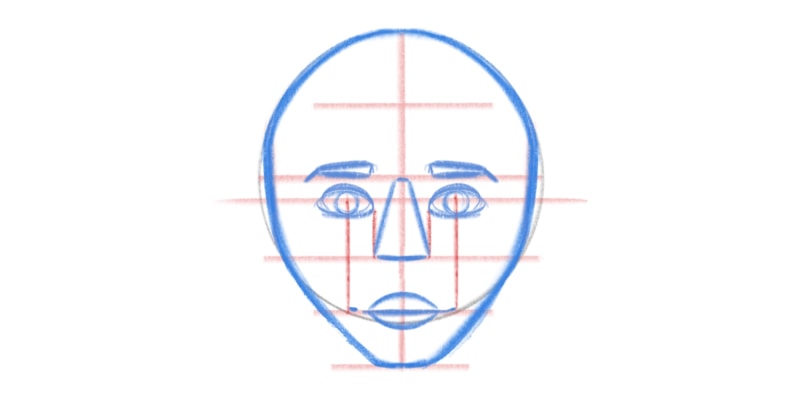
Placing Facial Features In The Head
Even though we’re not focusing on the details of the face, it’s still good practice to learn where to place them.
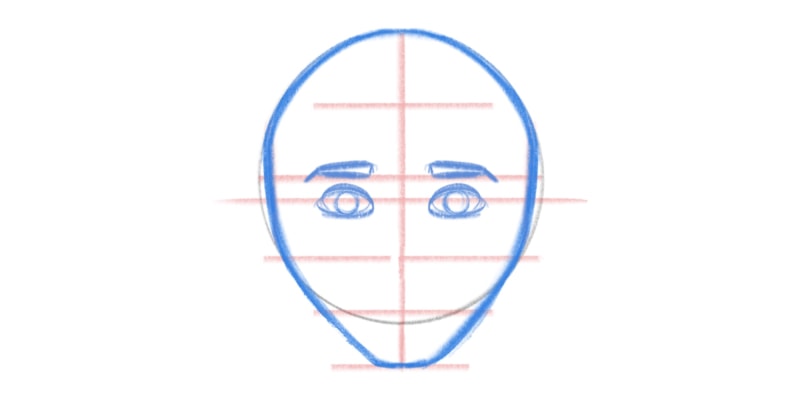
We already have guidelines that tell us where the eyebrows, eyes, nose, and mouth go.
But let’s properly place them with very simple shapes.
Let’s start from top to bottom. The center line we first drew is where the eyebrows sit, while the eyes are drawn along the line below.
You can follow a complete guide on drawing eyes right here.
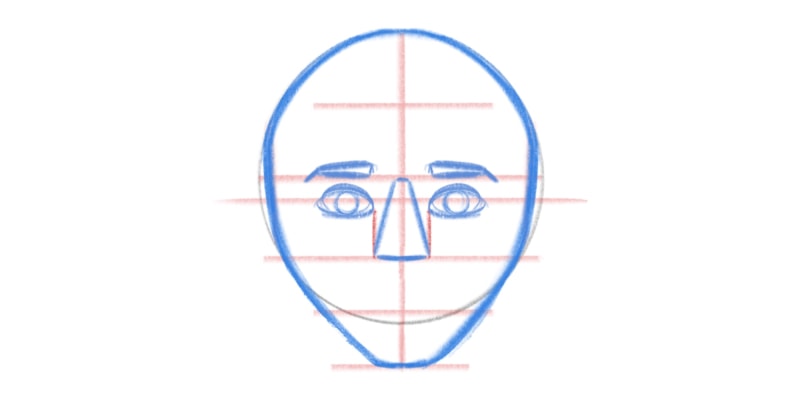
Next, the nose sits on the nose line.
You can read a complete guide on drawing the nose right here.
We can use a triangular shape for it. One thing to remember is that, generally, the nose width can go as far as the corners of the eyes.
As for the mouth, it is drawn on our next guideline, right below the nose. Again, a good trick to remember how wide the mouth can be is that its corners should be in line with the center of the eyes:
You can also follow my complete guide on How to Draw Lips in 5 Easy Steps here!
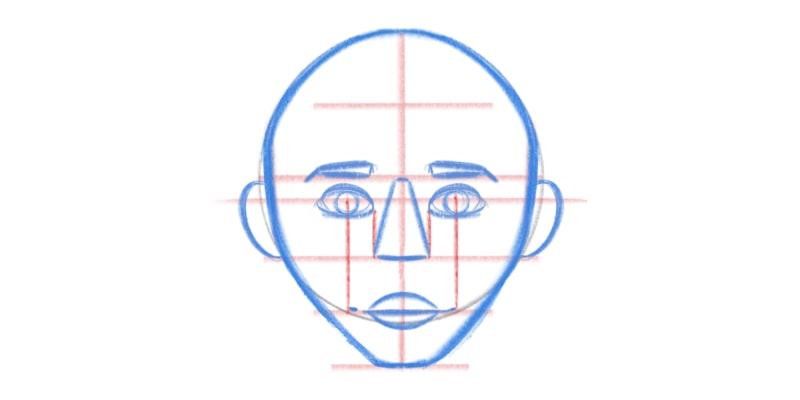
Finally, we are missing the ears.
These are drawn on each side of the face and, generally, won’t go higher than the brow line and won’t go below the nose line. That is, unless you’re drawing elf ears.
For a more detailed guide, check my article on how to draw ears!
As for the hairline, we can also create a very simple shape to know where the hair goes, like this:
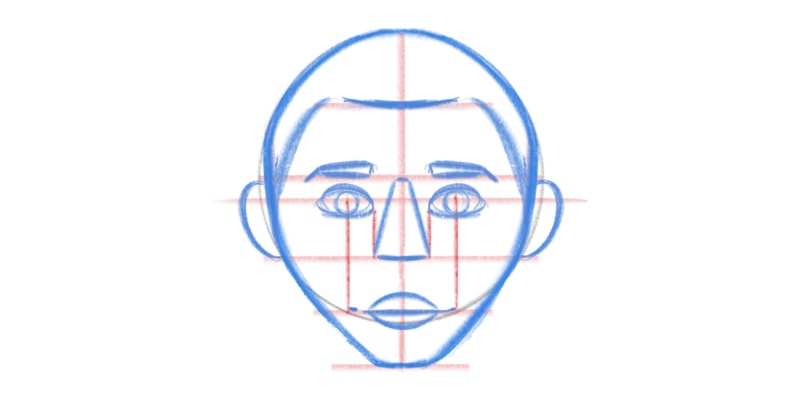
And with very basic forms, you can now easily place each facial feature in the head.
Even if you’re not focusing on drawing these in detail, it’s good to start practicing their placement and creating muscle memory!
Other Methods For Drawing The Head
There’s no one true method when drawing heads or any other subject. People find different solutions for the same problem.
So even though the way we draw the head here is very straightforward and easy to digest, you might find other solutions that fit you better.
For example, you can draw the head using boxes instead of a sphere if that makes more sense.
You can even mix several shapes like circles, triangles, and squares!
There are hundreds of ways to draw the head!
It’s good to learn the basics, but once you know those, it’s also good to experiment with different methods.
This way, you’ll understand better what’s the best method for you or even what isn’t.
If you prefer to have palpable and 3D objects to understand better how the head reacts to different angles and lights, that also works!
You can do so by using a tennis ball, buying an anatomical model (like these), or even using a figure you might have at home.
Take several photos of those objects or even of yourself. Experiment with different lights and angles and learn from those references you took!
It’s also a good idea to learn from professional artists and old masters who paved the way for every other artist.

As mentioned before, Andrew Loomis is an excellent example. Figure Drawing For All It’s Worth is an excellent book to learn from and to have at home.
Very often, I go through it whenever I have some doubts when it comes to human anatomy or even to brush up on Figure Drawing and do some studies from it!
Anatomy books are always good reference material at home, so if you’re curious about it and want to learn more, you can find our list of the 6 Best Anatomy Reference Books For Artists.
Related Questions
So what other questions do you have about drawing the Head? Let’s go over them!
What Is The Correct Proportion From Head To Body In Drawing?
The proportion from head to body is about 6 to 8 heads for a full-grown body.
You can tweak this length depending on how short or tall you want to draw someone. Everyone has a different height, so be sure to try different figure drawing methods!
How Big Should The Head Be On A Drawing?
When drawing the head, it should be 1/6 to 1/8 of the entire body length.
Also, the head is generally 3/4 wide compared to its height!
If you’d like a step by step into drawing the ENTIRE figure, check out my Complete Figure Drawing Course here!
Patricia Caldeira is the main writer here at Don Corgi. She's an art teacher with over 20.000 happy students across many platforms and courses!
Enjoy your stay and as always:
Keep on drawing!

")

