With all the overlapping members and clothing, sitting poses can be tricky to draw!
But if you break everything down into simple steps, you’ll be able to draw sitting poses quite easily.
It would be best to draw sitting poses by splitting the process into different parts. Start by getting a good reference image, simplify the shapes, clean your lineart, and color if you’d like!
But let’s go over this process of drawing sitting poses step by step!

Table Of Contents
1) Grab A Good Reference Image
It’s always important to find good reference images to draw any subject. Still, it’s especially helpful when it comes to sitting poses.
Sitting poses are notably hard to draw. The reason for that is that a lot of the body tends to be hidden by other parts.
Most limbs end up folded, and some parts of the body bend over. When you learn how to draw the human body, you learn it in its most natural pose: standing still.
It’s only natural that the task becomes even more challenging when we move the body into other, more complex positions.
When choosing a good reference image, the photo should be as clear as possible so you can understand the pose.

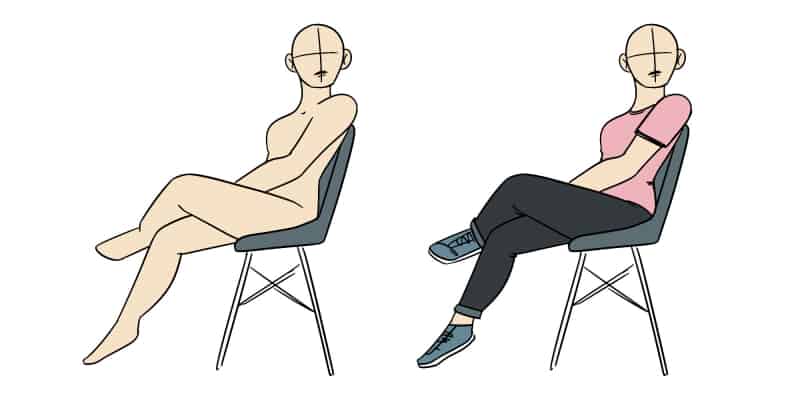
Something like this is a good start, for example. If you want, you can use this sitting pose as a reference, so you can practice as you go through each step!
There are many places you can find good references for your studies, like Pinterest or Unsplash.
Even if not used right away, save as many reference images as possible if not used right away. This way, whenever you want to draw something, you’ll have a good collection of reference images to learn from!
If you are looking for specific angles and variations, you can also explore this massive library of different sitting poses over at PoseMy.Art.
They have a fantastic, interactive collection of 3D scenes, ranging from casual couch lounging to sitting cross-legged on the floor. The best part is that you can click on any of these poses to open them in a free web app, allowing you to rotate the camera, adjust the lighting, and tweak the limbs to get the exact reference you need for your drawing.
We’ve mentioned this many times, but using a good reference image is essential to improve at drawing quickly!
This is why we’ve created several articles on where you can find suitable reference poses, including this one on the best sitting reference poses!
Look around it for nice sitting poses; whenever you’re ready, it’s time for the next step.
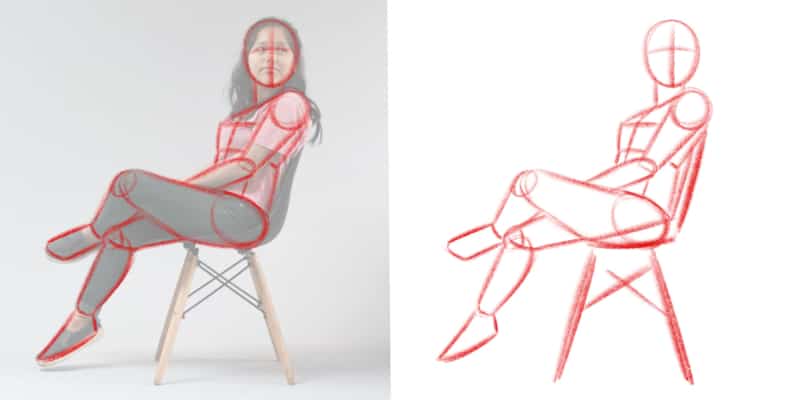
2) Draw The Base Shapes
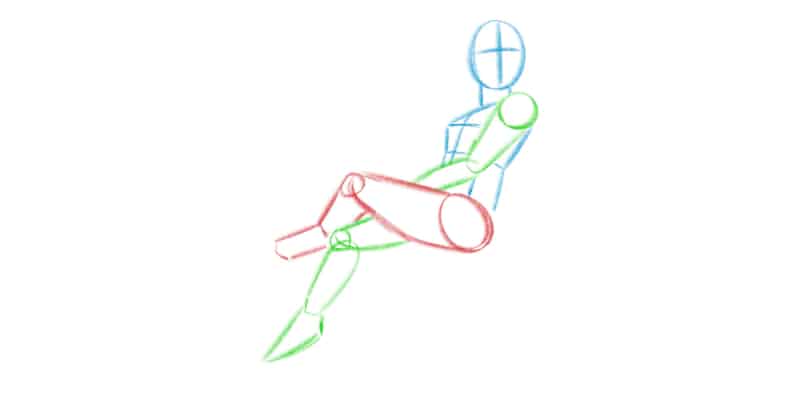
One thing that makes anatomy and any other subject easier to learn is by breaking it down into simple shapes.
The human body is intricate and full of details, but if you look closely enough, you’ll see that you can start drawing by first finding simple and basic shapes.
Think of it as a schematic of the human body. I like to call this phase: Finding the Base Shapes.
If it’s hard for you to find those shapes, here’s something I always recommend and show my students in our drawing courses:
- Lower the opacity of your reference image;
- Find and draw basic shapes on top of it;
- Practice those shapes in your sketchbook.
There’s nothing wrong with drawing on top of your references. If it helps you, then don’t be afraid to do it.
Go through each part of the body and find simple shapes. For example, it can be a circle for the head, a rectangle for the torso, and lemon wedges for the legs!
These can have any shape and can be as regular or irregular as you want. What matters is that it makes sense to you.
Using the reference image from above, I’d go with something like this:
You can also start with some Gesture Drawing if you wish (here’s a complete guide).
These shapes help me build the body and make the most sense. But it could be something entirely different for you.
I recommend having different copies of the same image, with their opacity lowered, so you can try other methods and shapes.
You can even print these and draw on top of them with a pen. It’s totally up to you!
Try different things and experiment with those base shapes. Once you’re done, it’s time to practice!
Open up your sketchbook and start drawing the base shapes you just found on your reference.
Practice them several times to gain muscle memory and get used to them.
If, for some reason, those shapes aren’t making sense to you or are too challenging to draw, then try other shapes!
What’s important is that you can understand and, after some practice, draw them intuitively.
You can take as long as you want in this phase. In fact, you don’t need to have a finished, rendered drawing of the pose.
Sketching and understanding the human body is as important as having a finished drawing.
So keep practicing the base shapes until you’re comfortable with them!
3) Sketch The Details Of The Sitting Pose
After figuring out the base shapes, it’s time to refine your drawing. This is still a sketching phase, but now you’ll add some details, so it resembles a human body.
Instead of shapes, you’ll go through the outline of your shapes, adding curves and details where needed.
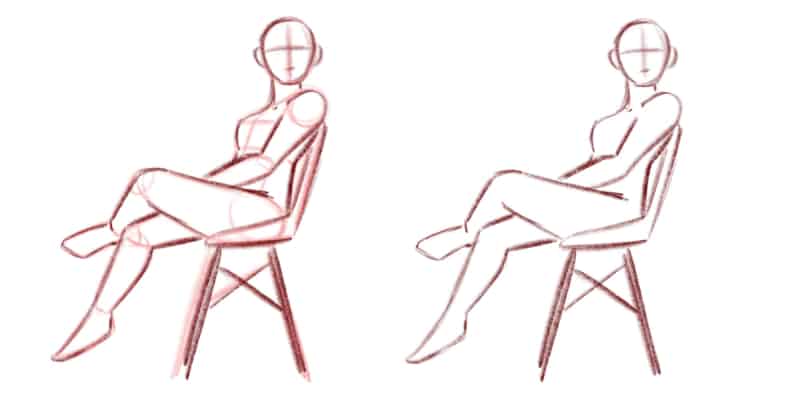
Keep your reference image nearby, so you can look at it as you go. If you have any doubt, you can check your reference.
This is still a sketching phase, so don’t be afraid to be messy and try different things.
You don’t need to stop at one sketch. If you’re not happy with it, try again!
Try as many times as you want until you’re satisfied with your drawing. Don’t overthink how clean and perfect your picture is.
It’s a sketch, so they’re not supposed to look clean and finished.
Even though my drawings always look very clean and organized, the truth is my sketches are always really messy and chaotic.
As long as you understand what’s happening there, it’s perfectly fine.
If you’re not planning on giving this sketch to someone else to continue the drawing, then all it matters is that you understand your own sketch!
Again, keep some time practicing these detailed sketches. The more times you do it, the more you learn from it.
With each sketch, you’ll learn something new. You might also realize that the way you drew that pose didn’t make much sense, but now you’re trying something different that works much better!
Sketching is a very underrated phase that can be very helpful in growing and improving your drawing skills.
It’s also an entertaining activity since you don’t need to worry about how good those drawings look.
Take your time and have fun until you feel you have a good, solid sketch that you’re proud of!
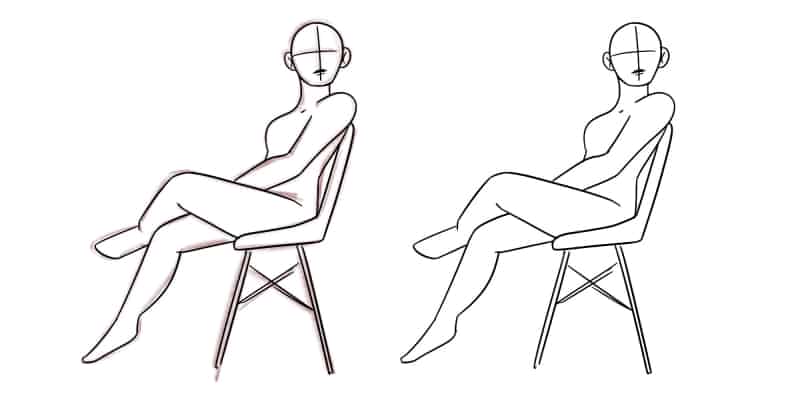
4) Clean The Lineart Of The Pose
We are reaching the final line of drawing a sitting pose. After all the sketches, it’s time to choose the one you’re happy with and clean it up!

This is my usual process when drawing any subject:
- Find the base shapes;
- Make a detailed sketch;
- Clean everything with some lineart of the pose.
When learning something new, I recommend ignoring this last step until you feel you got the hang of it.
If finding and drawing the basic shapes or making a more detailed sketch is still challenging, keep practicing those.
Having a clean and final drawing isn’t 100% necessary. It all depends on the situation.
However, if you’re already confident in your shapes and are happy with the sketch of your sitting pose, it’s time to clean and finish your drawing!
If you’re drawing digitally, you can lower the opacity of your sketch and create a new layer on top.
Then all you have to do is go over all your previous lines by drawing clean and fluid strokes.
If you’re drawing traditionally, you can erase your sketch lightly, so you can still see it. Then, using a pen or any other medium you might prefer, go over all your lines similarly.
Again, take your time doing this. Line art can be pretty challenging, especially if you’re not yet too used to it.
Make long and confident lines. If something goes wrong, it’s alright. You can undo that step or, if needed, redo your drawing.
I know this can be frustrating, especially if you’re drawing traditionally where you can’t easily erase your mistakes.
However, think of this as a learning opportunity. You can repeat your drawing if something goes wrong, avoiding the previous mistake and getting more practice!
If there’s a new mistake, then you’ll learn from it and avoid it in the next drawing.
It’s all part of the process. With time and practice, you’ll see you’ll be making fewer and fewer mistakes.
5) Bonus: Add Color To The Sitting Pose!
Your sitting pose is finished. However, if you want, you can add a color splash to make your drawing even more interesting.
Choose a lovely color palette and go over your drawing. You can choose your own colors or find a random palette online.

I always like going with a random palette and usually go to Coolors to find one. This website will generate different and random color palettes you can download and use in your drawings or paintings.
It is handy when you have no idea what color scheme to use.
On the other hand, you can also follow the colors of your reference image!
If you drew only the body, like me, instead of following the outfit on the reference image, you could still color it.
Choose a skin color and fill out your drawing with it. You can even pick a darker tone and add some shading as well.
Alternatively, if you want to go the extra mile, you can also go in and draw an outfit to your sitting pose drawing!
Make up a plain outfit or follow your reference image. Once you’re done, you can add colors, shading, and maybe even some highlights to make your drawing more colorful and vibrant.
Again, this is an extra step. You can leave your sitting pose as line art if you want.
You don’t even need to draw the line art!
If your goal right now is to get better at drawing sitting poses and understanding how to draw them, then you can keep on doing studies of them.
These studies can be messy sketches instead of having a clean and rendered look.
Take your time and do what feels the most comfortable to you. Go through each step at your own pace.
There’s no need to rush the process, so sit down, relax and have fun with your sitting poses!
Tips On Drawing Sitting Poses
We’ve just gone through the whole process of drawing a sitting pose. In fact, you can use this process to learn how to draw almost any subject!
Still, there are some tips I’d like to leave to make the whole process easier.
Sometimes we overthink or get frustrated with our drawings over little things. So, to avoid that, here are a few tips and tricks to keep in mind when drawing your sitting pose:
Be Loose With Your Sketches
Try to be as loose with the pencil as possible during the sketching phases. This way, it’s easier to see previous sketching lines.
Not only that, but it allows you to go over the same line without making it too confusing.
You’ll create more fluid and dynamic poses by making loose lines. It shows more confidence as well!
It’s not easy to focus on this at first, but with practice, you’ll get more relaxed and be able to draw looser sketches.
Finally, and most importantly, you’ll apply less pressure to your body if you draw loose lines.
While drawing, you’re sometimes so focused or scared of making a mistake that your whole body gets tense. Especially your arm and hand.
In the long run, this will be prejudicial to your body. So focusing on a more relaxed posture and lines is good for your art and body!
When Drawing From Reference, Avoid Drawing The Outline Of The Sitting Pose
This happens very often, especially as a beginner artist. We find an excellent reference and start tracing or imitating the outline of a pose.
Although an easy way of drawing a sitting pose, this will hardly help you in the future.
It’s tough to learn and understand the body by simply tracing the outline of a pose.
This fact is especially true regarding a sitting pose, which is already challenging to draw.

In the long run, it will be more advantageous for you to learn how to actually draw the human body.
You can use the Base Shapes Method that we used here or another drawing technique that makes more sense to you.
What matters is that you really understand how to draw a sitting pose.
Once you understand how the body works, you can draw it in any pose you want!
Use Different Colors For Different Parts Of The Body
As we mentioned before, part of the challenge of drawing a sitting pose is that several body parts overlap others.
So one thing that might help is to divide them into different colors. For example, you can use different colors for parts of the body that are hidden behind other body parts.
This way, you always know what will be visible at the end of your drawing and what isn’t.
Different colors for overlapping body parts also help avoid confusion about where each line or shape belongs.
It’s a visual way to organize your sketch more clearly, so as not to create mishaps while drawing.
Practice Your Shapes And Sketches… A Lot!
I know that finishing a drawing feels very good. However, that’s not the most important step.
Don’t rush yourself to get to the final line. When that happens, more often than not, we end up frustrated because things don’t look as good as we imagined they would.
So, to avoid that, when learning how to draw a sitting pose, take your time when you’re in the shapes and sketching phase.
This is the most crucial phase because you’re still trying to figure out what works for you.

Are these the right shapes? What if I try them this way or the other?
The same goes for the detailed sketch. Here is when you’ll be deciding on the final look of your drawing and you want to be sure everything is in the right place.
So, if you’re not 100% happy, comfortable, or confident in those results, practice and experiment more before going for the final drawing.
Divide The Body Into Different Parts
Again, instead of seeing the body as a whole, try dividing it into smaller parts. This way, drawing it will feel less overwhelming.
By dividing the body into different parts, you’ll work through them, one at a time.
So you can focus on finding shapes for the legs without worrying too much about the rest. Once those are done, you can go to another part.
Find a pace and a method that is right for you and work through it.
We’re all different and have different speeds and ways of working. What worked for one artist might not work for another.
So, it’s essential to find what works for you and make everything you can so the learning process is easy and fun.
For me, it’s breaking everything down into different and smaller parts. Hopefully, this method works for you as well!
Have Fun And Enjoy The Process!

Drawing a sitting pose is not an easy feat. For that reason, it’s easy to get frustrated while drawing it.
It happens and it’s very common with beginner artists.
You want to draw what’s in your head, but when it comes to drawing it, it’s not as easy as it seems.
It’s important to lower your expectations and accept that your first sitting pose drawing won’t be your best drawing.
It’s only natural if it’s something new for you!
The best thing you can do is find interesting drawing methods and tutorials and have fun with those.
Enjoy the whole process of learning how to draw a sitting pose.
Suppose you shift your mind to having fun with your entire drawing process. In that case, you’ll enjoy and love the final drawing even more!
By doing this, you’ll also start expecting less from your drawings. You’re more focused on learning and having fun with your art that you don’t care as much about the final result.
Now that you know everything you need to draw good sitting poses, it’s time to practice.
To help you out, don’t forget to check our Best Sitting Pose References article and our Best Free Reference Image Websites article to find even more reference images for your practices!
Patricia Caldeira is the main writer here at Don Corgi. She's an art teacher with over 20.000 happy students across many platforms and courses!
Enjoy your stay and as always:
Keep on drawing!
Patricia’s courses have enrolled 22 000+ students around the world, in platforms such as Udemy, Skillshare, Gumroad and more.


")
")