Two-point perspective drawing is one of the many ways to draw linear perspective. This method is more complex to use; however, it will be helpful if you plan to draw architectural elements.
The Two-Point Perspective method uses two vanishing points, and it’s often used when drawing buildings, monuments, or houses. It’s also a helpful perspective method to draw interior designs, such as rooms!
Perspective can be hard to understand. However, there’s nothing like breaking it down into smaller steps to make the whole process easier.
Throughout this article, we’ll not only talk about the Two-Point Perspective but go over a few examples to better understand it as well as simple exercises for you to follow!
Table Of Contents
What Is A Two-Point Perspective Drawing
Two-Point Perspective is a particular method to use in drawing. If you like or tend to draw buildings, there’s a chance you’ve worked with this perspective method.
If we use a single vanishing point in a One-Point Perspective (here’s a guide), here we use two vanishing points to create a different point of view!
This perspective is very often used in architectural drawings or interior designs. It’s also commonly used in comic books when portraying cities or other areas that show houses or similar structures.
In a Two-Point Perspective drawing, the subject is not facing the viewer directly; instead, you can easily see two sides!
Even though you can place your vanishing points anywhere you like, it’s good to keep them apart to avoid any kind of distortion.
In fact, the vanishing points can even leave your canvas if the situation asks for it.
Apart from exterior scenes, you can also use this perspective when drawing an interior set, such as a room.
Not only that, but even if this method is mainly used to draw buildings and very geometric subjects, you can add figures to the scene.
The more you add to an illustration, the more complex it becomes. Therefore, I recommend practicing a Two-Point Perspective with very few elements.
Start with just simple polygons first. Then maybe a scene with two buildings.
You can start creating livelier scenes as you become more familiar with this perspective method!
How To Draw In A Two-Point Perspective
Now that we understand a bit better what the Two-Point Perspective is, it’s time to put what we learned into action!
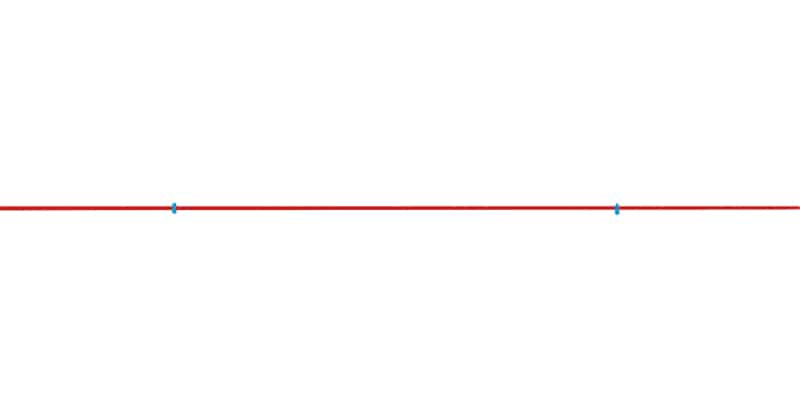
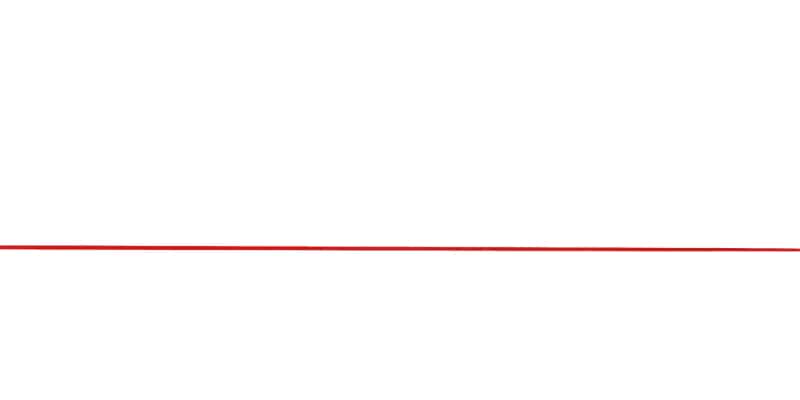
As with most perspective methods, the first thing we do is draw a horizon line. This line can be anywhere you want on the canvas.
Depending on where you draw it, it will change the whole view of your drawing. For example, if you draw your horizon line at the center of the paper, it’s right at the viewer’s eye level.
However, if you move that line downwards, the viewer will now be looking down on the artwork. If the horizon line moves upwards, then the viewer will look at your work from below.
It all depends on what you want to portray and the mood you want to create, so it’s something to think about when playing with perspective.
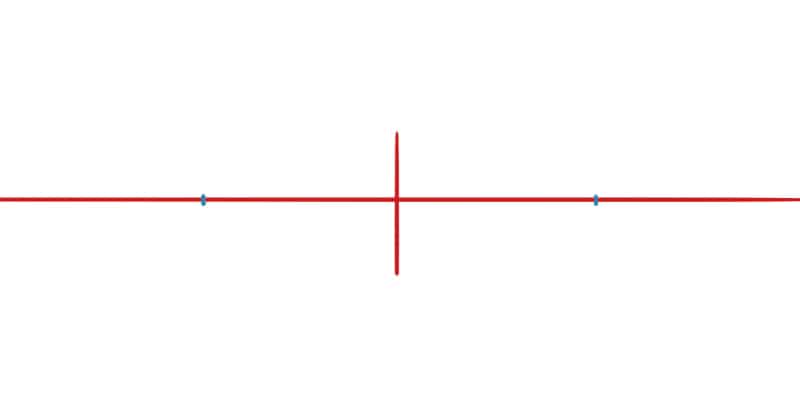
Let’s keep things simple and leave our horizon line in the middle of our canvas.
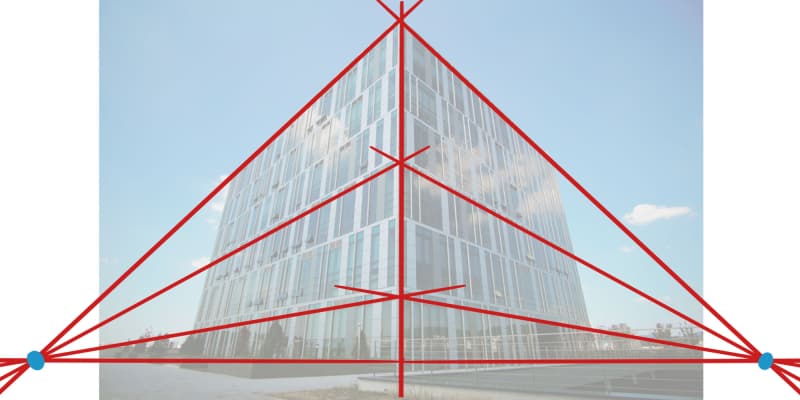
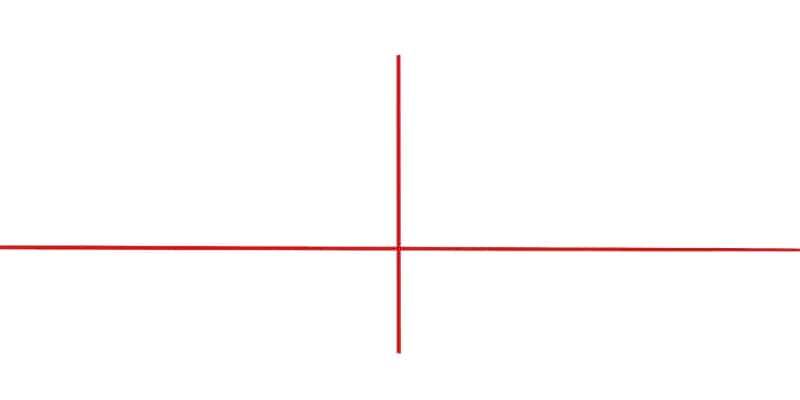
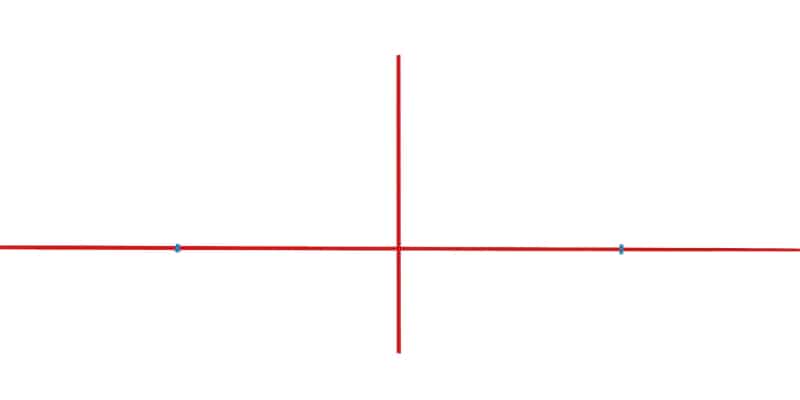
Once that’s done, it’s time to add our two vanishing points. You can place these anywhere, but as mentioned above, it’s good for them to be away from each other.
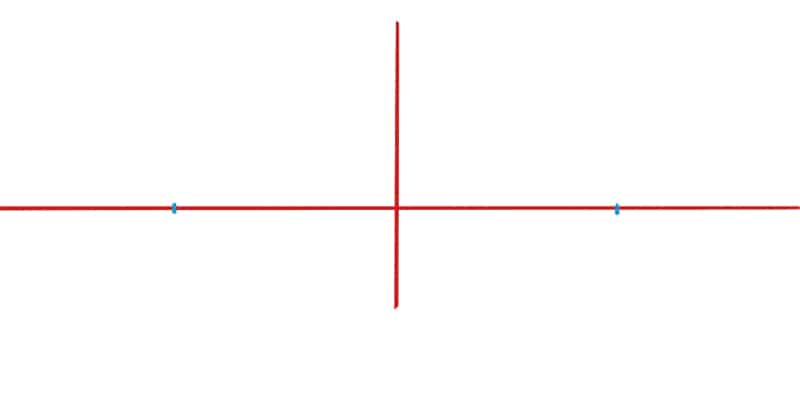
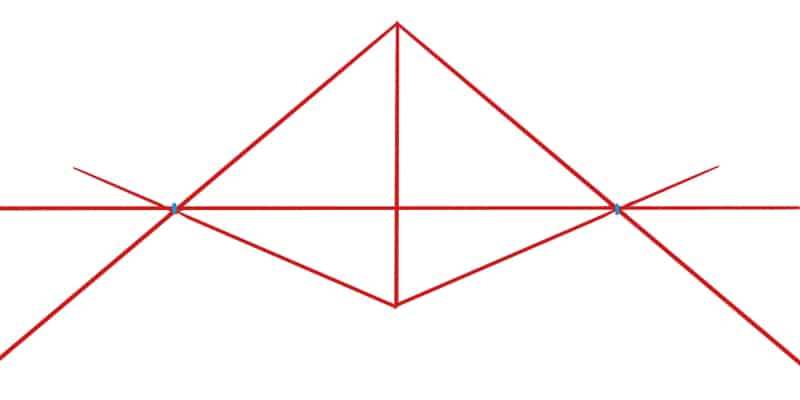
Before drawing anything, let’s create some guidelines. First, find the center of your horizon and draw a vertical line
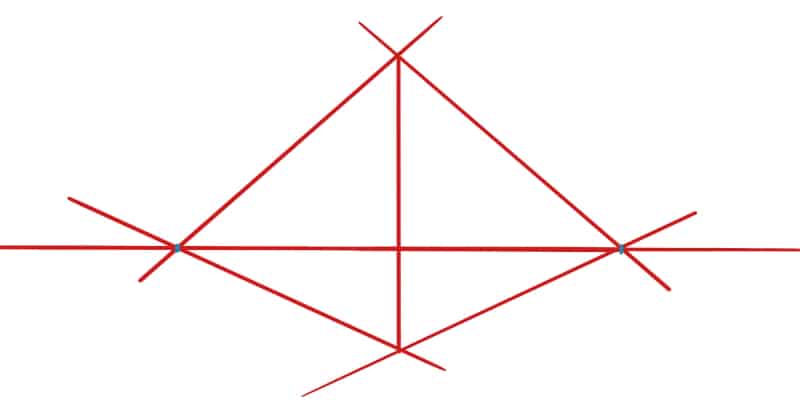
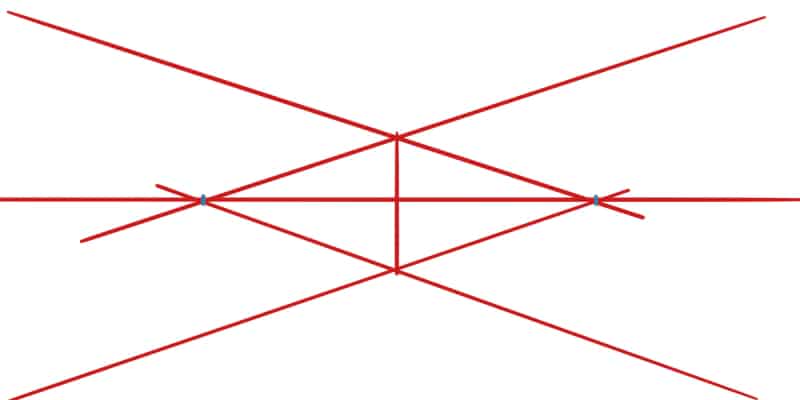
Now, draw a line that connects one vanishing point to one end of the line you just did. Again, draw another line connecting the vanishing point to the other end of your line.
Repeat this process with the second vanishing point. It should look similar to this:
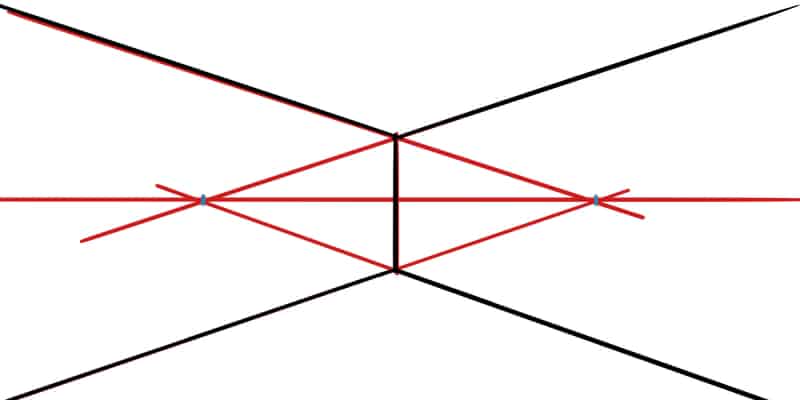
Now that we have a few lines to guide us, it’s time to draw something! We’ll keep things simple by simply drawing a box.
Decide how long you want your box to be, and draw vertical lines on each side of the first line you drew. Then, connect everything, following your guidelines!
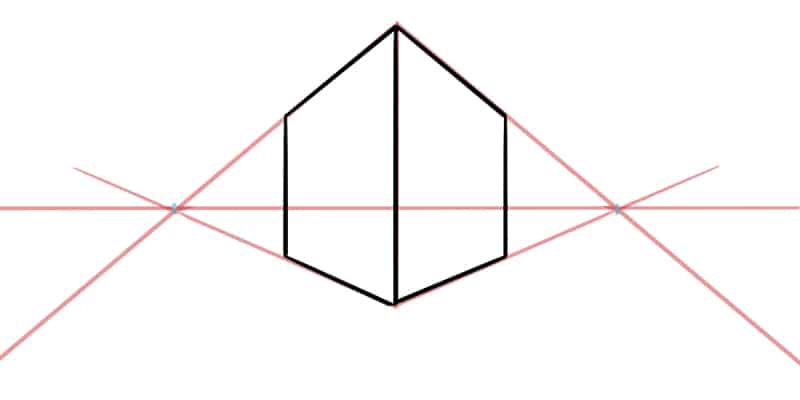
This is a straightforward exercise you can do when practicing the Two-Point Perspective. Just a simple box.
Take the opportunity to play with different dimensions and move your vanishing points around. Experimenting is crucial; this way, you can better understand how to use this perspective method.
We will go over more complex exercises at the end of this article, so for now, keep it simple!
Two-Point Perspective Drawing Examples
The Two-Point Perspective method is used mainly for particular situations: buildings and room interiors.
For that reason, it’s not as common to find throughout art as it is with One-Point Perspective. The latter tends to be easier to work with and creates exciting scenarios.
However, if you enjoy environments and follow other artists focusing more on environment design, you’ve probably seen many paintings using this perspective.
Here are a few examples of artworks that use the Two-Point Perspective:
A Storm, by Rene Magritte
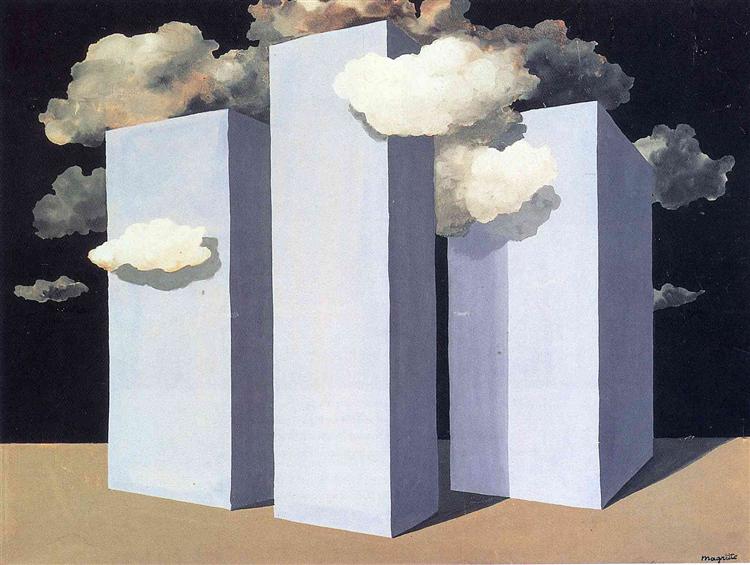
This painting is a perfect and easy-to-understand example of a Two-Point Perspective.
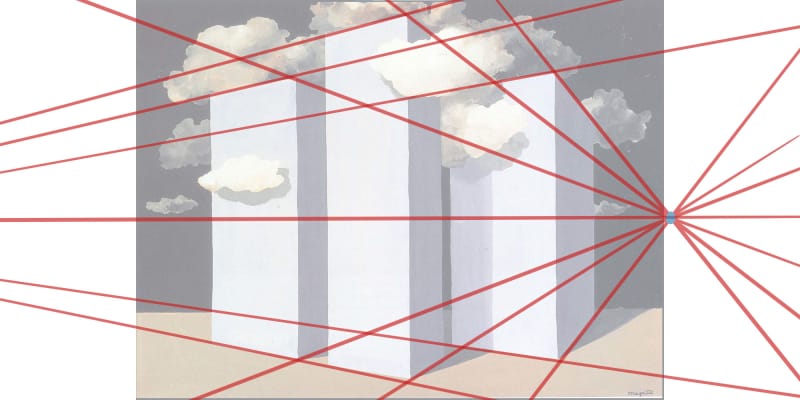
If you try to create a grid on top of this painting, you’ll find the two vanishing points that help make those buildings.
One interesting thing here is that you can find one of the vanishing points inside the canvas, but the other goes way beyond it!
You can’t see a lot of detail here, and most of the painting looks very geometric. However, the clouds break the homogeneity of the picture.
The clouds can have another goal: without them, the viewer would not give much significance to the blocky shapes.
However, given the situation, we can identify those shapes as something more: tall and strong buildings!
The Church at Auvers, by Vincent van Gogh
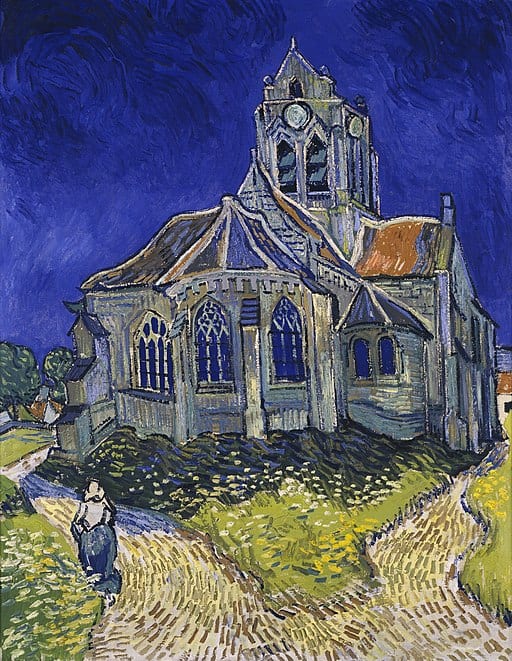
A more peculiar example. The Impressionism period is known for breaking the rules or, at least, transforming them.
Around this period, we start seeing more abstract and experimental art without worrying about balance and perfection.
We also start seeing experimentation with different styles of painting, such as Pointillism!
The Church at Auvers is an excellent example of the Two-Point Perspective.
The artist uses the method more loosely, but if you create a grid on top of the painting, you’ll find two vanishing points:
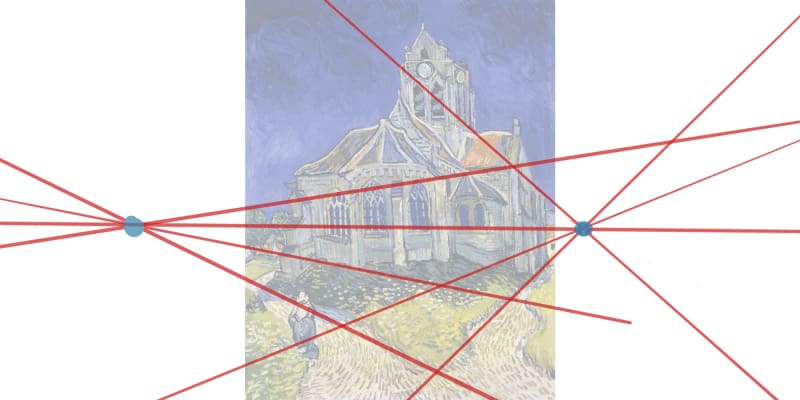
You’ll also notice that even though most lines appear wobbly, instead of straight and perfectly aligned, each line will converge into one of the vanishing points.
I like this example because it shows us that we can use any method to create excellent and exciting compositions while still being creative.
You don’t need to draw a perfect, realistic building. As long as it’s believable, you can be as creative as you want while following guidelines to support you as you work!
Sunset at Douarnenez, by Pierre Auguste Renoir
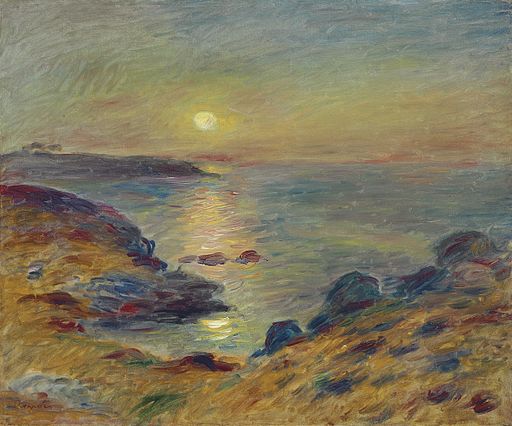
I did mention that the Two-Point Perspective is used mostly when drawing buildings or interiors. But I find this example a fascinating one.
Whether intentionally or not, this painting uses the Two-Point Perspective method. We have a horizon line at the top. We can also see that the farthest island follows that line.
However, as your eyes are guided through the rest of the painting, you’ll notice that each shape follows very peculiar lines.
If you try to draw a few lines on top of the painting, you’ll notice that most of these lines will converge into two specific points.
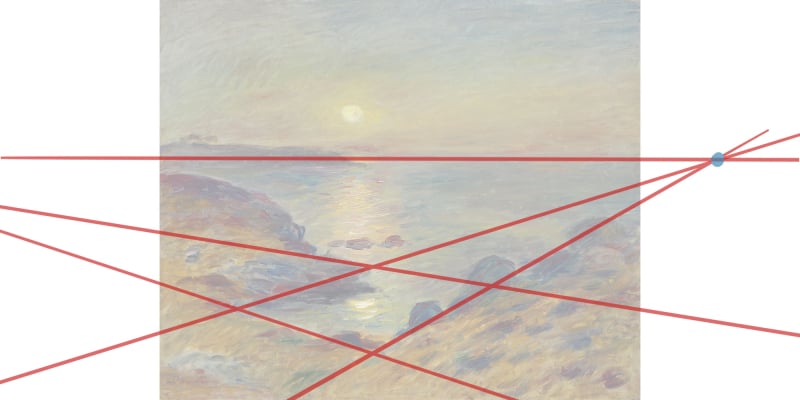
These vanishing points cannot be found inside the canvas; however, they exist!
This is something you can play with as well. Your vanishing points can be outside your canvas. It can be a bit more challenging to ensure everything is in the right place, but it’s possible.
Perspective can also be an intuitive and essential tool when planning your artwork and its composition.
Of course, we don’t need to go this far in History to find artworks using perspective.
Even though I tend to follow primarily artists that focus on Character Design, here are a few artists that I love and that work a lot with environments:
The Abbey, by Nathan Fowkes
If Environmental Design interests you, then I highly recommend you follow the work of Nathan Fowkes.
They’ve been working for years in the animation industry and specialize in beautiful backgrounds and other environmental pieces.
The compositions and colors are always fantastic to look at. Looking through Nathan Fowkes’ work, you’ll notice how perspective is used in each painting.
Even when the whole piece looks more loose and abstract, the perspective is there!
In this example, you can very clearly see the Two-Point Perspective being used. We can see two sides of the building and two imaginary vanishing points on each side.
Our horizon line is at the bottom of the canvas, making the building appear even taller and making us feel like we are looking at it in real life.
Endling Cover, by Toni Infante
More often than not, Toni Infante’s works focus mainly on characters. However, a lot of time, those characters belong in a particular scene.
In this beautiful piece for a magazine cover, you can see how the foxes occupy the center of the work and are highlighted to take most of the canvas.
Everything in this illustration guides us to look at the central characters. And that guidance is made by using perspective!
Here we can find different perspective methods: the background buildings use a Two-Point Perspective, while the sign-posts around the characters use One-Point Perspective.
When creating a new piece, you don’t need to restrict yourself to just one perspective.
In fact, if you’re creating a very complex and detailed composition, chances are you will use several perspective methods!
It’s good to first practice one method at a time. Once you feel confident, feel free to mix and match different perspectives to make even more exciting illustrations such as this one.
Our Lady, by Matt Cummings
Matt Cummings (eiffelart on social media) works extensively with markers and other traditional mediums.
A lot of times, they create lovely pieces inspired by characters and places from popular media.
This example shows a beautiful depiction of Notre Dame using the Two-Point Perspective method.
You can clearly see that one side of the monument converges into one vanishing point, and the other connects to another point on the opposite side of the canvas.
Again, both these points are outside of the canvas. It’s very common for this to happen when using this perspective method.
As we mentioned, having both your vanishing points too close together might result in distortion.
But it all depends on how you want to present your work! Experiment and try different things to become more familiar with the Two-Point perspective.
Two-Point Perspective Drawing Exercises
As mentioned before, we will perform a few exercises using the Two-Point Perspective.
I really recommend doing some drawing exercises whenever possible.
Reading about it helps; however, there’s nothing like actually practicing. Regarding drawing, I feel that practice is the most valuable study tool.
We might comprehend the theory, but it’s a whole other matter to actually do it. Perspective can be pretty complex and challenging to work with at times.
However, the best thing you can do is to break it into manageable and smaller steps.
For that reason, we’ll talk about 3 different exercises you can do, starting with something simple and adding more complexity as we go.
Draw A Simple Box
We did something similar at the beginning of this article. Still, let’s add some more personality to it and draw a box. For this exercise, you’ll need the following:
- A piece of paper;
- Pencil or pen;
- A ruler.
If you’re drawing digitally, you need a computer or similar device and a drawing tablet.
These exercises are very geometric, so you can even do them with your mouse and keyboard!
Now that we have everything we need, it’s time to start our box:
- Draw one line for the horizon. Instead of drawing it in the center, let’s draw it a bit lower this time. Just to make things a bit different!
- Find the center of the line; it doesn’t need to be perfect, just more or less in the center. Draw a vertical line crossing the horizon line.
- It’s time to add our vanishing points. Draw one to the left of the vertical line and another to the right. Try to keep the same distance between them, like so:
- Now, it’s time two draw some guidelines. These should start at one of the vanishing points and pass through each end of the vertical line you drew previously.
- All we need to do now is decide on the size of our box and connect everything. Draw two more vertical lines on each side of the first one. These lines shouldn’t go above your guidelines.
Once that’s done, connect everything to finish your box!
Our box is mainly done, but we can add something more to make it more unique. Add a lid by adding two more guidelines that go above your box.
Follow the same process as before and connect all your lines. It should look like this:
To add extra detail, draw a small label on your box. Don’t forget to draw different guidelines to ensure you have everything in the right place.
Don’t be afraid to draw guidelines for each element you add to your drawing. These will help you learn perspective.
With practice, you’ll gain muscle memory and more understanding of perspective. As you get more confident, you might forgo some guidelines.
However, when in doubt, add as many lines as you want!
Draw a Tall Building
Let’s go up a level and draw a tall building this time. You’ll need the exact same tools as in the previous exercise. The whole process will be pretty similar; we’ll just add a few more details:
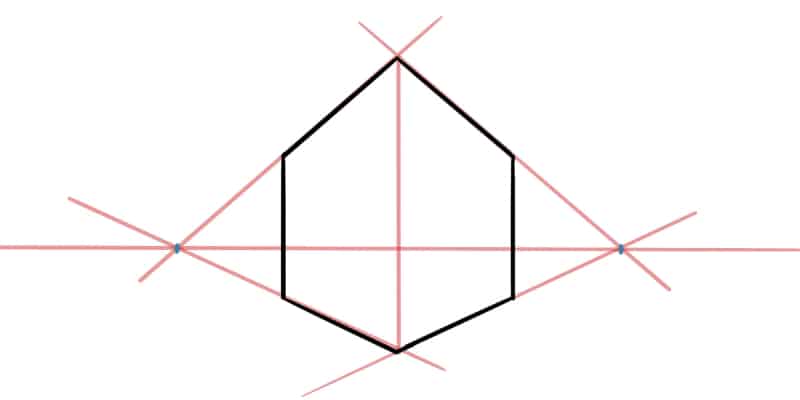
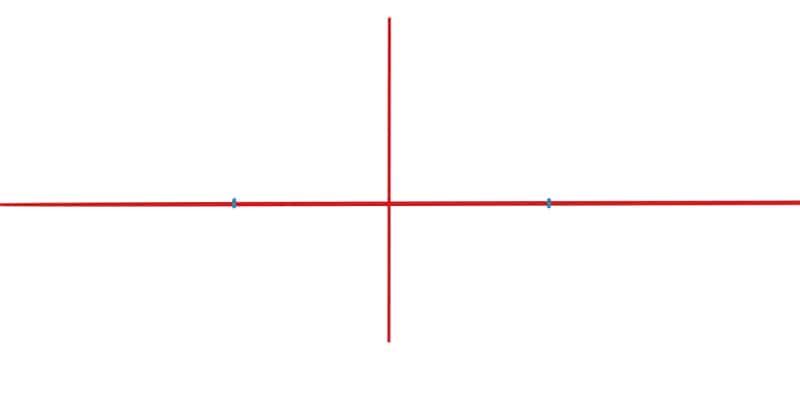
- Again, we start with the horizon line. Let’s leave in the center this time.
- Draw a vertical line and two vanishing points. One on each side of the line you just drew. I’m going to draw mine like this:
Experimentation is always crucial when it comes to drawing! Feel free to move things around and see what happens. You can follow my example or try something different to see a different result.
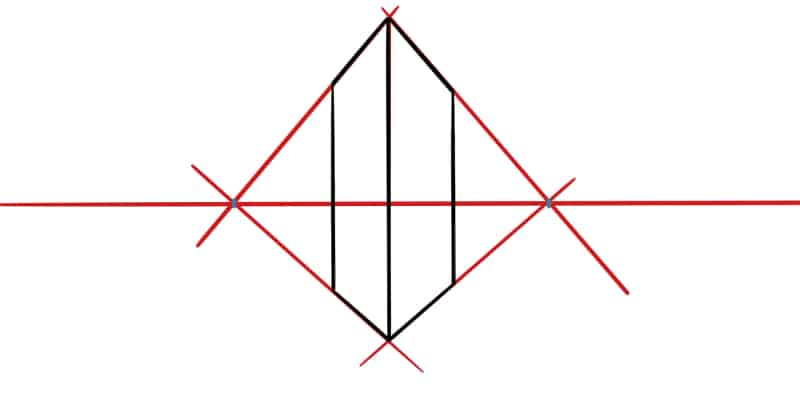
- As before, draw some guidelines and two more vertical lines, then connect everything. If you want a taller, leaner building, these lines should be closer to the central vertical line.
If, instead, you prefer a shorter and broader building, then draw them farther away.
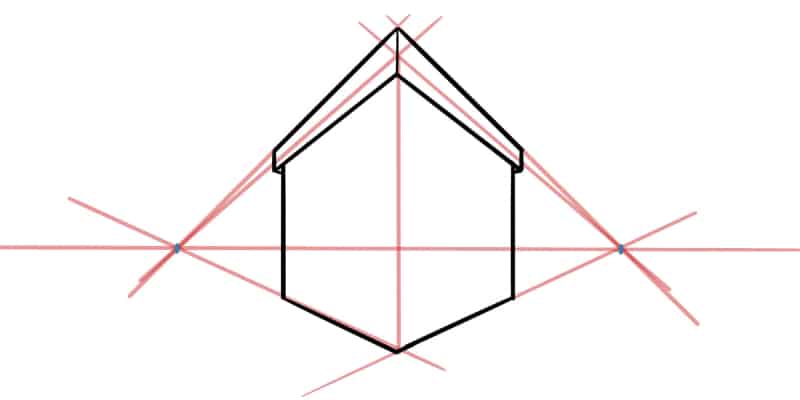
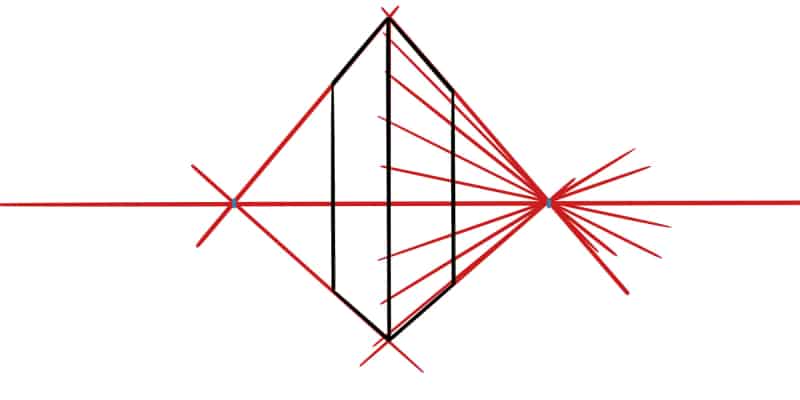
- Now that we have the main shape, it’s time to add a few details. The first thing we’re going to add is a few windows. For that we’ll have to add a few more guidelines, so they follow the same perspective.
Let’s start with the right side of our building. Draw a few guidelines so we have enough to work with, like this:
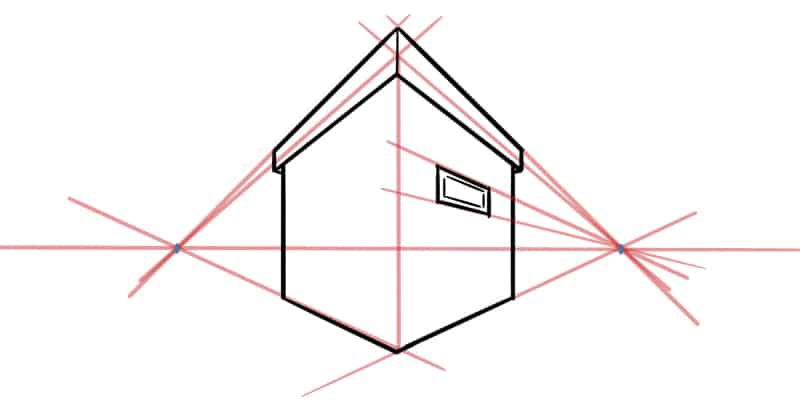
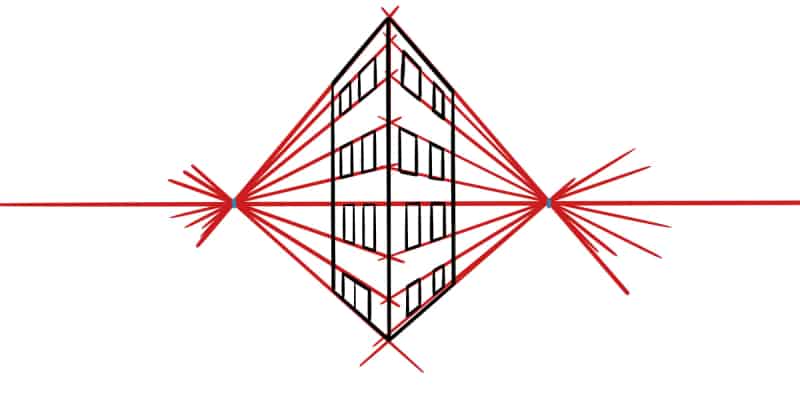
Now all you have to do is draw rectangles for the windows. These can be as many and as big as you want. You can draw them however you want, as long as they follow the guidelines.

- One side is done, so we’re missing the other side. Repeat this process on the opposite side of your building and draw a few windows.
Leave some space at the bottom of your building to draw a door instead of window, like so:
- If you want, you can now add a few more details, such as a sidewalk, a road, and maybe even another building!

You can leave the building as it is or add more elements. The choice is yours.
Remember to add more guidelines to your grid every time you add a new element, so everything matches the proper perspective!
Draw A Simple Room
This will be our most complex exercise, so I’ll keep everything very simple by using simple shapes.
We will draw a blueprint of a simple room with some furniture. Afterward, you can refine everything to look less geometric and similar to reality.
Let’s start with the following:
- As we did in the previous exercises, draw your horizon line, along with two vanishing points. Somewhere along the horizon line, draw a vertical line.
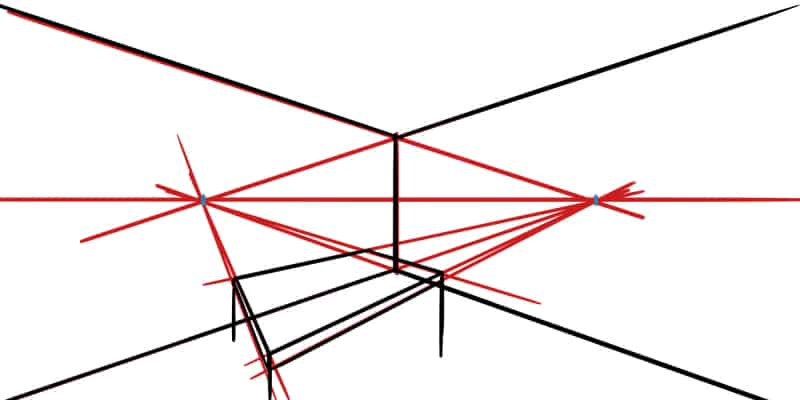
- Before drawing anything else, let’s draw a few guidelines first: something between 4 or 6 should be enough for now:
- We are now inside the room instead of facing a building. So, instead of drawing a line that goes from the vertical line to each vanishing point, we’ll move on the opposite direction, following the guidelines:
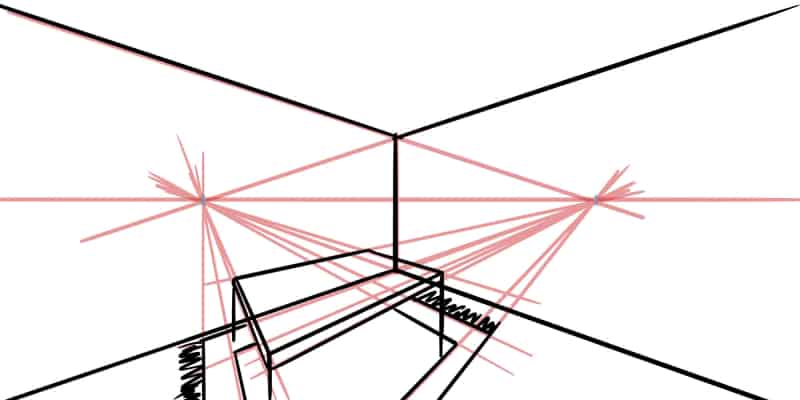
Our room is done, so we have to add some furniture now.
- You can use some of the already existing guidelines. We can draw a table, for example. Draw a rectangle following the perspective grid you created, and add more lines if needed!
Once the rectangle is done, it’s time to add a few vertical rectangles for the legs of the table.
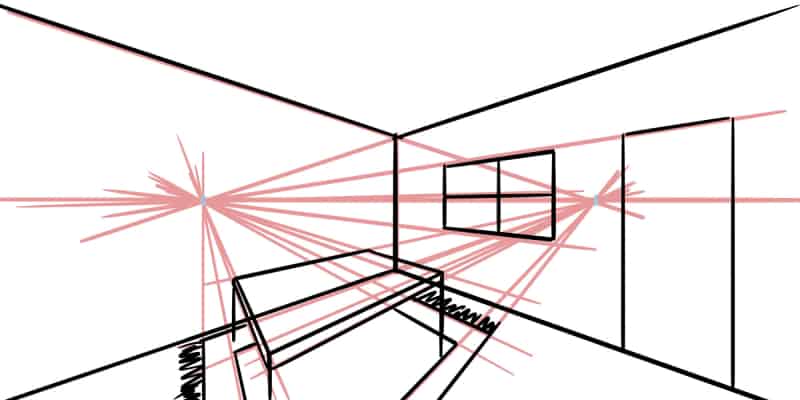
- Let’s go ahead and add a rug beneath the table. It will have the same shape as our table, but we’ll draw it below it this time!
- Another thing we can do is add a door or even a window to one of the walls. This one is relatively simple to do since you just need to follow the guidelines you already drew:
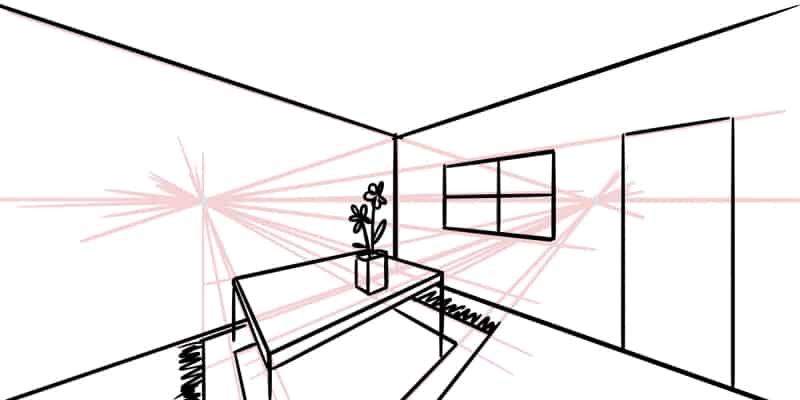
- To keep things simple, we’ll leave our room just like this; a very minimal approach. If you want to go to the next level, add more furniture!
Another thing you can do is add more elements to the table. Just go one element at a time and add any guidelines you might need. This way, you’ll never go wrong with placement and proportion.
The more you add to a piece, the more challenging it is, so I recommend starting with simple exercises like drawing a simple box.
Draw different variations of the same box. Move the horizon throughout your paper and do the same with your vanishing points.
Depending on where you draw these elements, your subject will behave differently. Experiment so you get more experience with perspective.
With time and practice, you’ll master the Two-Point Perspective. If you’re curious about other perspective drawing types, check out our article on the 4 Types of Perspective Drawing And When To Use Them!
And if you’re looking to learn more about One-Point Perspective, read our One-Point Perspective Drawing Guide (With Exercises and Examples)
Patricia Caldeira is the main writer here at Don Corgi. She's an art teacher with over 20.000 happy students across many platforms and courses!
Enjoy your stay and as always:
Keep on drawing!
")
")

