Learning perspective is one of the most challenging techniques to draw when it comes to drawing. Most of the time, the main problem is that it needs to be clarified and simplified.
You can break it into more uncomplicated steps and learn one concept at a time, such as the Vanishing Point.
But what is a Vanishing Point in perspective? The vanishing point is a dot you draw on an image’s horizon, where all objects eventually converge.
Of course, merely reading about it might not make things much clearer.
But keep reading so you can better understand vanishing points and different ways to use them with the help of several examples and drawings!
Table Of Contents
- 1 What Is A Vanishing Point?
- 2 How To Make A Vanishing Point In Art
- 3 Single Point Perspective Vanishing Point
- 4 Double Point Perspective Vanishing Point
- 5 Three-Point Perspective Vanishing Point
- 6 Related Questions
- 6.1 What is the difference between one vanishing point and two vanishing points perspectives?
- 6.2 Why do artists decide to use multiple vanishing points in their artwork?
- 6.3 How does the position of the vanishing point on the horizon line affect perspective?
- 6.4 Can a vanishing point be located outside of the artwork?
What Is A Vanishing Point?
The Vanishing Point is a dot in an image, where all objects eventually converge to. It appears as a point in the horizon line where parallel lines appear to meet!
This is one of the most important elements when using perspective since it’s the vanishing point, along with the horizon, that decides how all objects and elements will be presented throughout the picture.
Depending on where you set your vanishing point, the results of the perspective will vary.
Here are a few examples to understand this concept better:
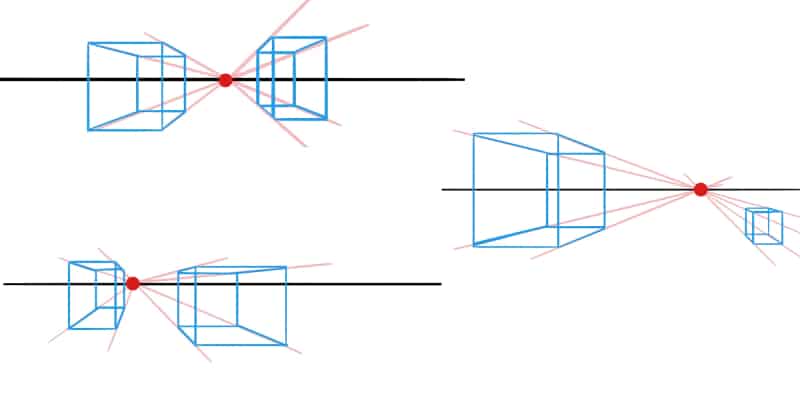
As you can see, moving the Vanishing Point along the horizon will change the direction and perspective of the objects.
Not only that, but if you add more than one vanishing point, you’ll also produce different results.
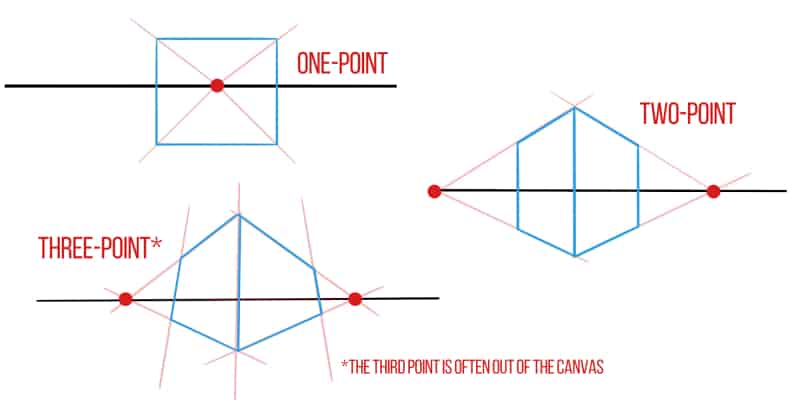
When drawing with perspective guides, you can create different points of view, such as:
- One-Point Perspective, where everything converges into one single vanishing point;
- Two-Point Perspective, where your objects converge into 2 vanishing points;
- Three-Point Perspective. Here you add a third vanishing point out of the horizon line.
The vanishing point was invented by Filippo Brunelleschi, born in 1377 in Florence. He was one of the pioneers of Renaissance architecture, so thanks to him, we can use a vanishing point effectively in our art!
We’ll discuss different perspectives in this article, but let’s keep things simple!
How To Make A Vanishing Point In Art
Making a vanishing point is relatively simple. But before that, we need a horizon line.
Grab a piece of paper, a pencil, and a ruler. You can even grab pencils of different colors for each separate element!
If you’re doing this digitally, open your drawing software and a new canvas.
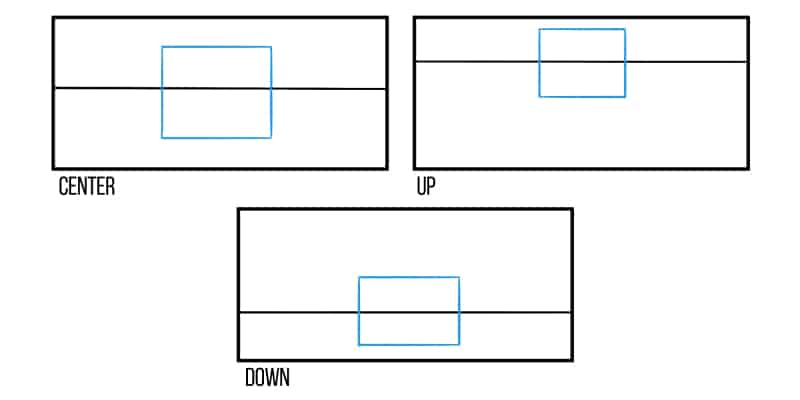
Now, draw a horizontal line on your canvas. This line can be placed anywhere. However, the view will be different depending on where you draw it.
For example, if you draw the horizon line in the center of the paper, it’s as if we’re looking straight at it at eye level.
On the other hand, drawing the line at the top of the paper, we’ll look at every element from below.
Finally, by drawing your horizon line at the bottom of the canvas, make it so we are looking at the drawing from the top!
So, before drawing your horizon, decide what view makes the most sense for the drawing you’re making.
When that’s done, all you have to do now is choose where your Vanishing Point will be.
Again, depending on where you’re drawing that point, the view changes, just like we’ve seen previously.
Create a vanishing point anywhere on the horizon line.
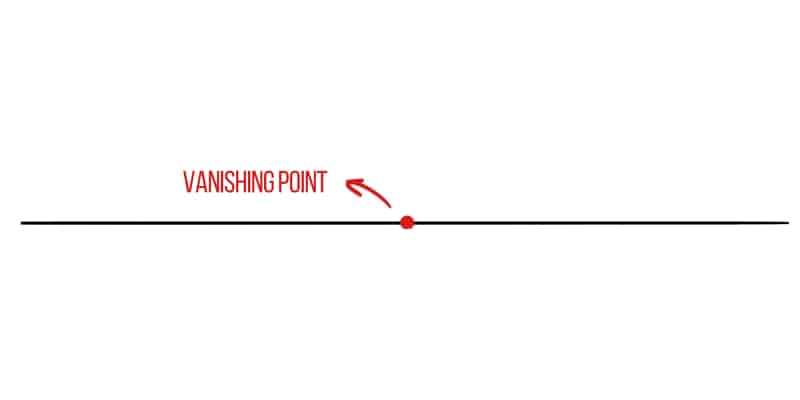
And that’s mostly it. The Vanishing Point is a single dot along the horizon, where every single guideline and element of your drawing will converge!
That’s why the horizon line and the vanishing points need to be the first things you do before drawing anything else.
Of course, you don’t always need to create a perspective guide whenever you’re drawing something.
However, suppose you’re planning on creating an illustration with several different objects and elements. In that case, a perspective guide will be handy.
Single Point Perspective Vanishing Point
As we mentioned before, there are different perspectives you can work with. Using a single-point perspective, all you need is one Vanishing Point.
This is the most common linear perspective guide to use and the easiest.
So, if you’re just starting to learn perspective, a single-point perspective is the one you should start with!
To start practicing, you must draw a horizon line and add a vanishing point anywhere along that line. Use that vanishing point on the horizon line as a point of convergence.
Create guidelines that converge with your vanishing point, and then draw whatever you want, following the guides.
You can include a vertical line as well, right in the middle. Something like this:
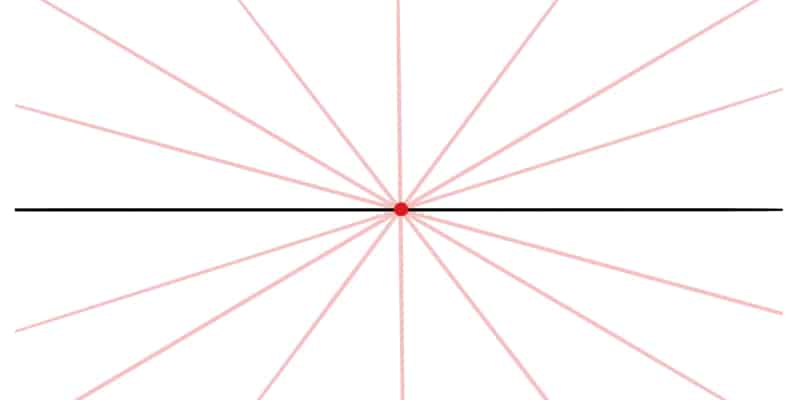
See how all those lines meet in the middle? That’s where you can find the vanishing point.
This provides a base for the artist to work in, adding an optical illusion of depth on a flat surface. And this is done by creating lines that appear to move towards the vanishing point, where they intersect.
Since this is a very common perspective, you’ll find it throughout several paintings and illustrations of your favorite artists.
During the Renaissance, perspective was essential in art due to the ideal of perfect balance. So you can find a one-point perspective in most paintings.
The Last Supper, by Leonardo Da Vinci, is an excellent example of that:
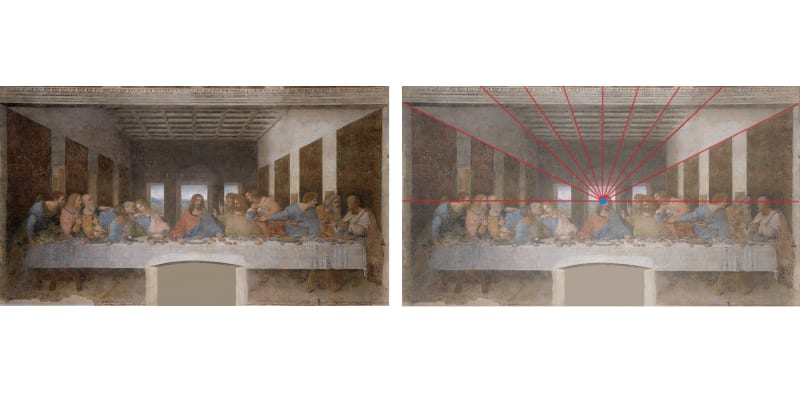
Looking at more modern art, many professional artists often use this perspective in their own pieces and studies. A good example is these beautiful sunset studies by Loish:
See how the elements that are far away look smaller and closer together? That’s all thanks to this form of perspective.
If you’d like to learn more about One-Point Perspective, click here to read my guide!
This one-point perspective drawing creates perspective (duh), giving some depth and realism to artwork.
Double Point Perspective Vanishing Point
When artists want to draw buildings or cityscapes, more commonly than not, they’ll use the Double Point Perspective (also called Two-Point Perspective).
This perspective technique offers a unique view, where instead of seeing just one side of a building, you can see two sides.
A double-point perspective tends to be a bit more complex since it uses 2 vanishing points (sometimes called convergence points). This also means creating even more guidelines.
Depending on how many details you want to add to your drawing, this might make the whole ordeal a bit more confusing.
Still, this technique will be your best friend if you plan to draw buildings! You add multiple vanishing points to your horizon line (in this case, two).
To start, you need, again, a horizon line. Then, all you have to do is draw two vanishing points somewhere along that line.
Two things to consider here:
- Your vanishing points are always opposite to each other. If you draw one point to the right of the horizon, the other will be to the left.
- Keeping a significant distance between both vanishing points will avoid some distortion. But this all depends on what you’re going for, of course!
Although not as commonly used, if you follow environmental artists, you’ll notice they use this perspective quite often. You can see all those orthogonal lines, which help the artist give an illusion of depth and dimension to the art piece.
You also don’t need to be super precise with this perspective. I like to use The Church At Auvers by Vincent Van Gogh as an example.
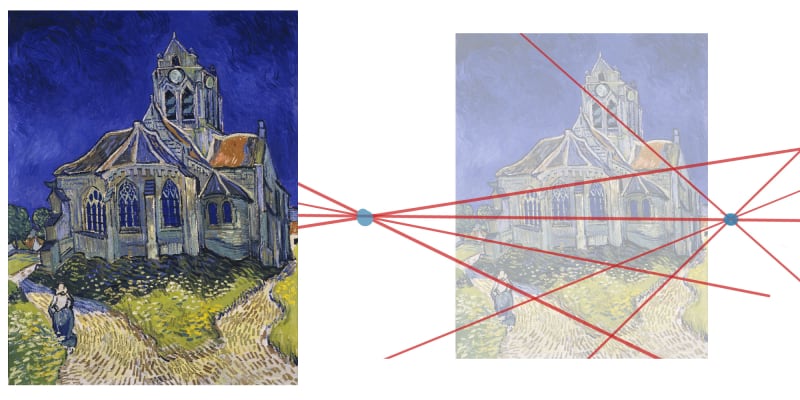
Even though a very impressionist style, where some rules tend to be broken, you can still clearly see the use of a two-point perspective!
When looking for modern artists, I can’t recommend Nathan Fowkes enough. This artist works and teaches mostly environments and produces the most beautiful drawings.
If you’d like to learn more about the Two-Point Perspective, here’s a complete guide with examples!
Three-Point Perspective Vanishing Point
As the name indicates, a Three-Point perspective uses 3 vanishing points.
This perspective is often used to draw buildings and interiors with an isometric view.
Using a three-point perspective also helps create depth in your artwork, making it more three-dimensional. However, if two vanishing points complicate things, three points make it even more complex!
Using this perspective, you’ll have to draw two vanishing points along the horizon line. And then a 3rd point, above or below the horizon, depending on the kind of view you’re going for.
That means you’ll have to work with three vanishing points at the same time!
Here are a few tips to help make things easier for you:
- The third vanishing point is always on the opposite side of the horizon line. For example, if your horizon line is at the top of the canvas, the vanishing point will be below that line. If the horizon line is at the bottom, your vanishing point is above the horizon line.
- The third vanishing point is always at the center.
Having these two concepts in mind is going to be very helpful when drawing a three-point perspective!
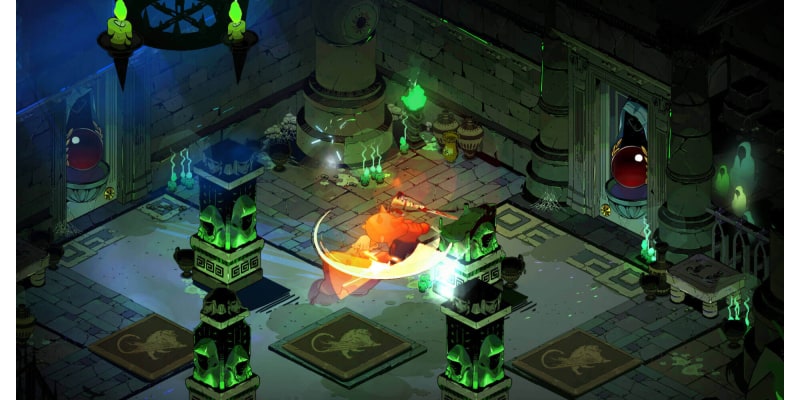
You can create fascinating drawings using this perspective. You’ll also find this perspective a lot in isometric games, such as the roguelike game Hades by Supergiant Games, or role-playing games like Baldur’s Gate.
Another great example is these beautiful isometric rooms by Yoshi Yoshitani.
Related Questions
So now that we’ve covered the different use vanishing points have, and how vanishing point may help you create better art, let’s go over some related questions you might have!
What is the difference between one vanishing point and two vanishing points perspectives?
The difference between one vanishing point and two vanishing point perspectives is that in one vanishing point perspective, the parallel lines all appear to converge to a single vanishing point.
While in two point perspective, you make use of vanishing points in two different places. In this case, there will be different sets of parallel lines converging to different vanishing points!
Why do artists decide to use multiple vanishing points in their artwork?
Artists may decide to use multiple vanishing points in their artwork to create more dynamic compositions with different points of view.
This way, they can portray objects and elements from points of view, such as a bird’s eye view or worm’s eye view, for example.
It also allows you to create depth and realism using the correct principles of art that you wouldn’t in any other way.
How does the position of the vanishing point on the horizon line affect perspective?
The position of the vanishing point on the horizon line determines the point of view of the viewer in the composition!
As we mentioned in the first section of this article, a vanishing point at the center of the picture represents a straight-on view! Where the different objects and elements feel like they’re receding from the viewer.
If you add the orthogonal lines to such a drawing, you’ll see the receding parallel lines converging to the center.
Placing the vanishing point more to the left or right, gives the perception of viewing the scene from an angle. This alters how the objects appear and creates a quite different point of view!
You should try to practice with different positions of the vanishing point in the horizon line. Simply mark your vanishing point at different places and try to create your art in another perspective!
Can a vanishing point be located outside of the artwork?
Yes, a vanishing point may not be visible within the artwork itself but can still be used to reference and create perspective!
This can be helpful when drawing objects that appear very far apart or when the artist wants to maintain a consistent perspective throughout a series of connected scenes, even if the vanishing point isn’t directly visible.
When the vanishing point is a location that is outside of the art piece, it can be used to create a very interesting perspective.
I hope this has helped you analyze your drawings to make them more dynamic and to create an illusion of depth so they don’t look flat!
This is a skill that takes time to improve, but if you learn how this small spot (vanishing point) works, you’ll become a much better artist in no time!
And if you’d like to learn more about perspective drawing, here are 4 types of perspective drawing and when to use them (with examples)
Patricia Caldeira is the main writer here at Don Corgi. She's an art teacher with over 20.000 happy students across many platforms and courses!
Enjoy your stay and as always:
Keep on drawing!
")

")
