One-Point Perspective drawing is a fun way to draw linear perspectives. Whether you realize it or not, you’ve probably already used it in your drawings! It’s the most basic perspective method that exists.
As the name indicates, this perspective method focuses on just one vanishing point on the horizon line.
In this perspective, everything you draw appears to get smaller as they get further away, converging towards a single point, the vanishing point.
There are many ways you can use this method.
Even though it sounds pretty complicated, we’ll show you many examples and exercises in the article to better understand the One-Point Perspective!
Table Of Contents
What Is One-Point Perspective Drawing
The one-Point Perspective is one of art’s most accessible and popular perspectives.
Even if you’re not an experienced artist, you’ve probably drawn something using this perspective method at one point or another!
In a One-Point Perspective, you draw the subjects so that they appear to get smaller as they get further away.
Everything in your drawing converges into a single Vanishing Point.
To make things easier, imagine you’re standing in the middle of a road. If you look into the horizon, you’ll notice that the road appears to get thinner and smaller as it gets farther away from you.
The same goes for the trees, buildings, and even cars on each side of the road!
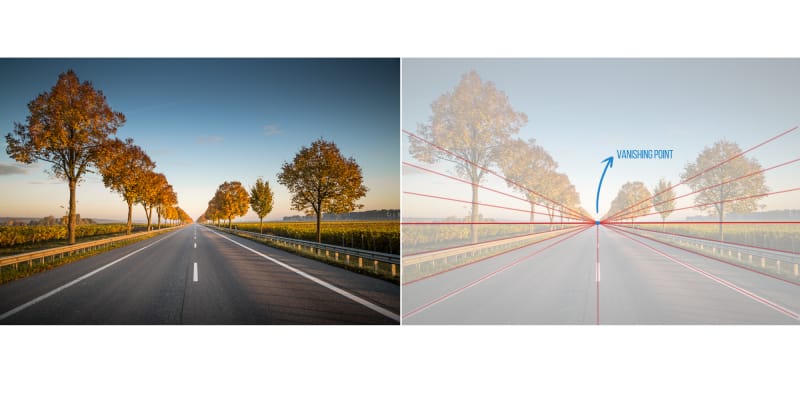
Your Vanishing Point here stays right at the center of the horizon, in front of you. Everything is converging into that point, getting smaller and smaller.
Of course, this is primarily an optical illusion since the objects aren’t getting smaller or the road is getting thinner. It’s just our perspective that makes us see it that way!
Most of your drawings will probably make use of this perspective. Since it’s a straightforward one and all you have to do is focus on one vanishing point, it is pretty easy to execute it.
All you need is one line for the horizon and one vanishing point. These don’t need to always be in the middle of your canvas.
The horizon can be farther up or down your paper. The vanishing point can be more to the left or the right.
It’s all up to you and the scene you want to portray. You just need to imagine where the viewer is standing.
How do you want the viewer to perceive your piece?
At first, keeping everything right in the middle will be easier, so you can get used to perspective and this specific method.
However, as you understand it better and feel more confident, it’s time to start thinking about these things.
Move your scene, horizon, and vanishing point around to make your composition and mood more interesting!
How To Draw In One-Point Perspective
Now that we better understand a One-Point Perspective in drawing, it’s time to learn how to do it.
If you’re doing this traditionally, here’s what you need:
- 1 Piece of Paper (any size will do, just use what feels more comfortable to you);
- 1 Pencil;
- 1 Ruler.
On the other hand, if you’re working digitally, there’s not a lot you need, just:
- Computer+Drawing Tablet or a Tablet/Smartphone (iPad, iPhone, Surface Pro Tablet or any other Android device such as a Simbans PicassoTab);
- Drawing Software of your choice (Clip Studio Paint, Photoshop, Procreate, Krita, etc.)
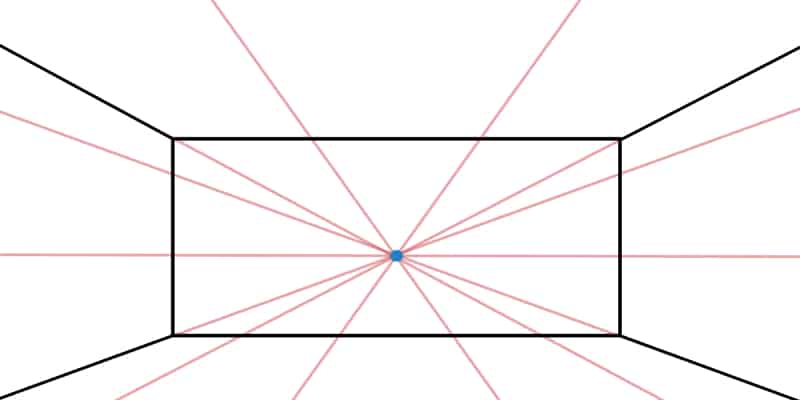
Now that everything’s ready, it’s time to draw our grid! We’ll keep it simple for now:
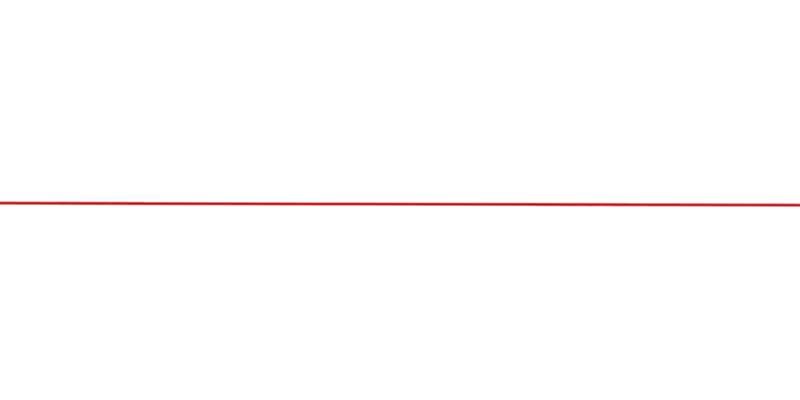
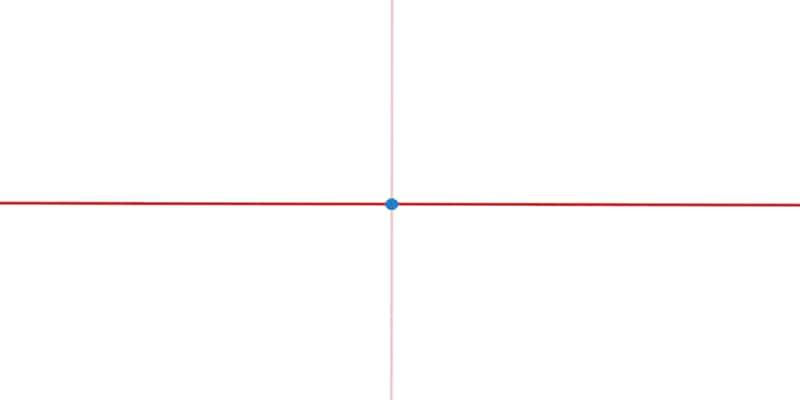
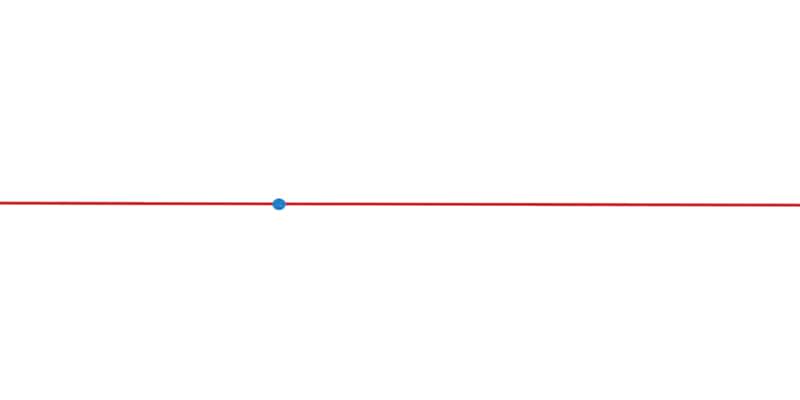
- Draw a horizontal line at the center of your paper. You don’t need to find the exact center of your canvas. As long as it feels like it’s more or less there, it’s good!
If you really want to find the center, you can do it using your ruler.
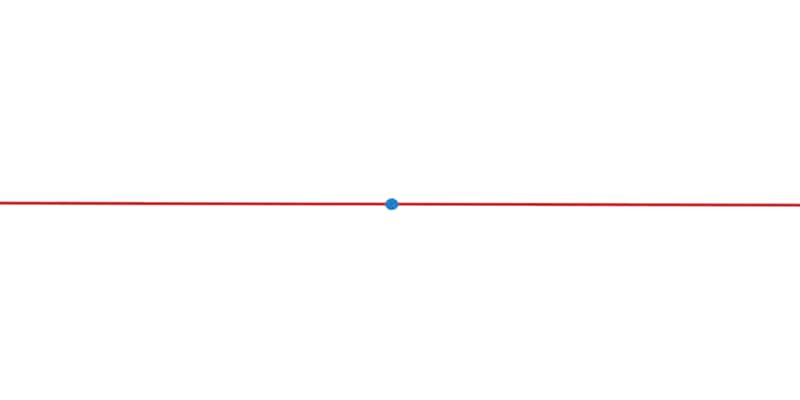
- With our horizon line done, it’s time to add our vanishing point. Find the center of your line and draw a small dot on it.
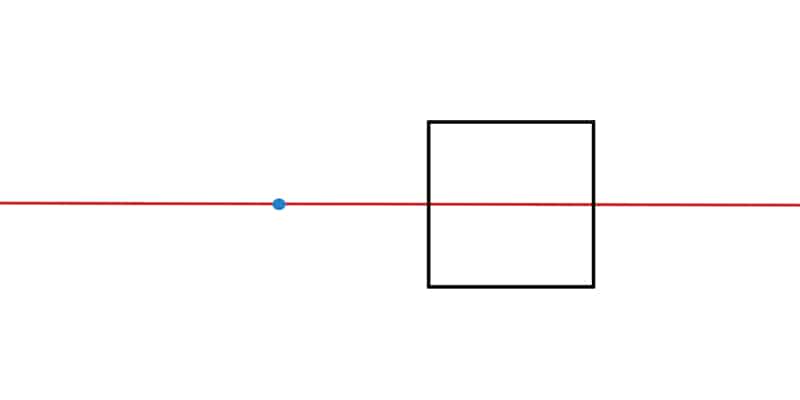
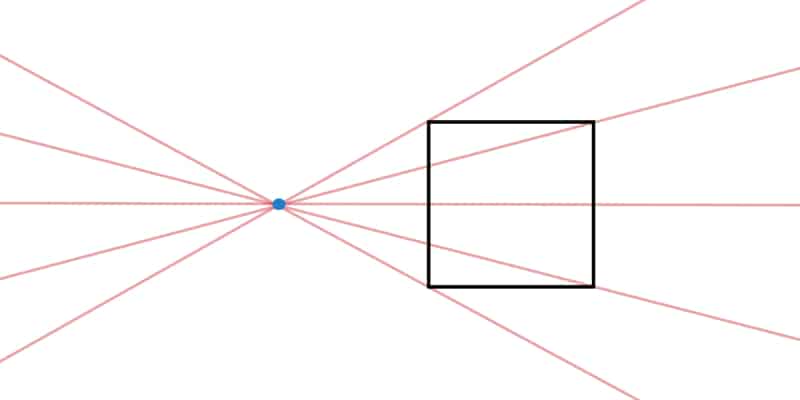
- It’s time to build our grid. First, draw a vertical line where the vanishing point converges with the horizon line.
- All you have to do now is draw lines all around the paper that converge with that point! You should end up with something that looks like this:
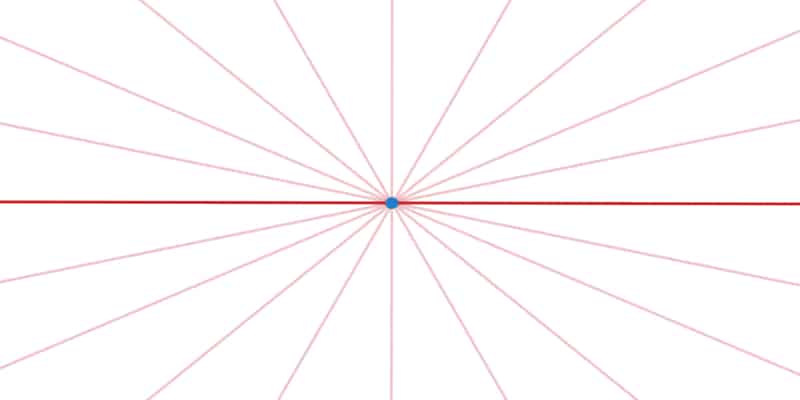
Depending on the complexity of your illustration, you’ll want to add more or fewer lines to your grid. It also all depends on your own preferences.
Some artists are very detailed and want to be sure everything is in the right place, while others just need a simple grid to act as a loose guide.
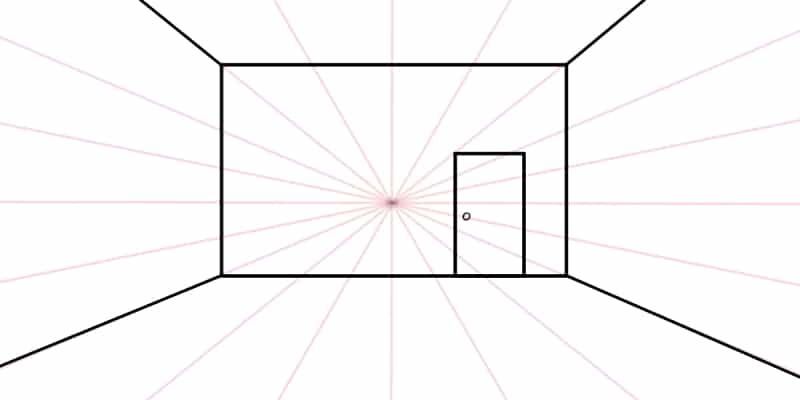
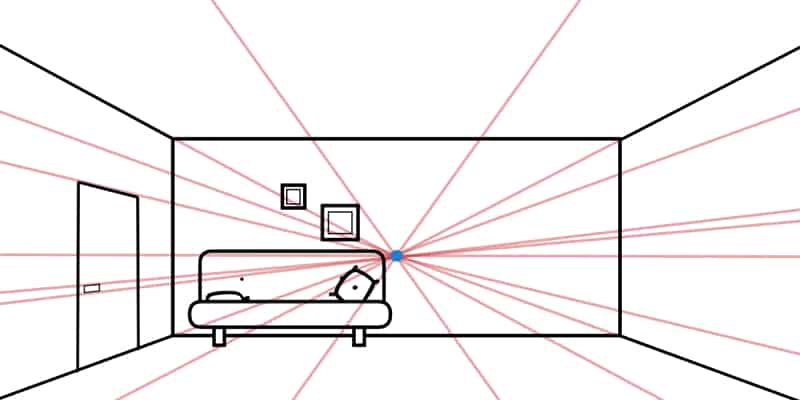
Now that our One-Point Perspective Grid is finished, let’s draw something in it to ensure it’s working: a simple room!
- Draw a rectangle at the center of your canvas. It can be as big or as small as you want. Just be sure you leave some space around it to fit the actual room;
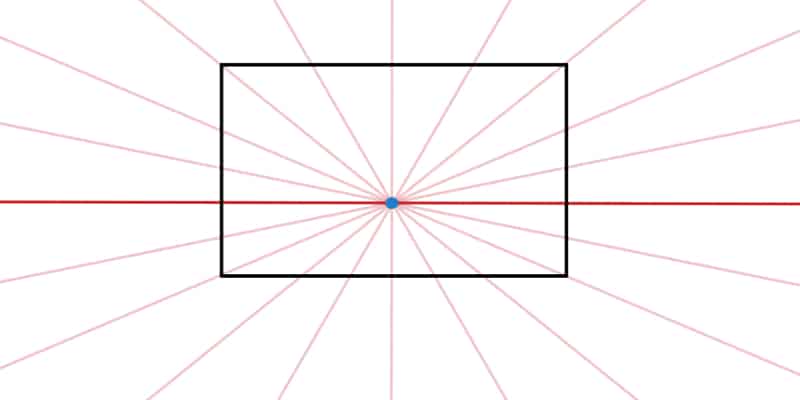
- By using the grid lines, create the rest of the room. In total, you should have 4 lines! Each starts at the corner of the rectangle and ends at the edge of your paper/canvas.
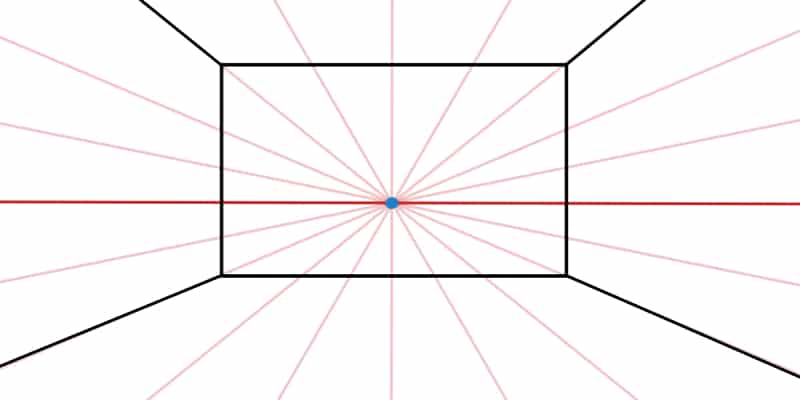
- You’ve just created an effortless room, go ahead and add a door at the far wall, just so it isn’t so empty.
We’ll have a few exercises, some more complex than others, at the end of this article, so for now, you can leave your drawing as simple as it is.
One-Point Perspective Drawing Examples
Throughout time, artists have been using perspective in their works. During the Renaissance period, specifically, centered and balanced paintings were prominent.
During this time, perspective started to be studied and applied more consistently.
The School of Athens, by Raphael
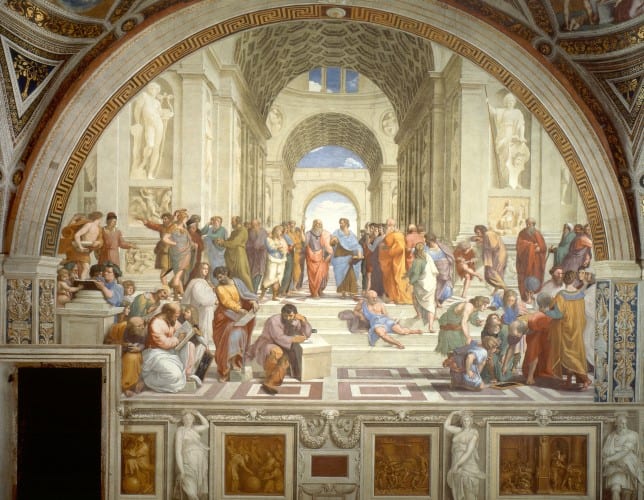
The School of Athens by Raphael is one great example from that time!
As you can see, the whole composition is organized, so the viewer focus on the center of the piece, specifically the two men at the end of the building.
Even though the painting is populated with several people and elements, everything guides our eyes to the center. The colors and light also help in that guidance!
If you draw a grid on top of the painting, you’ll notice that everything converges into a single point in the center of the picture.
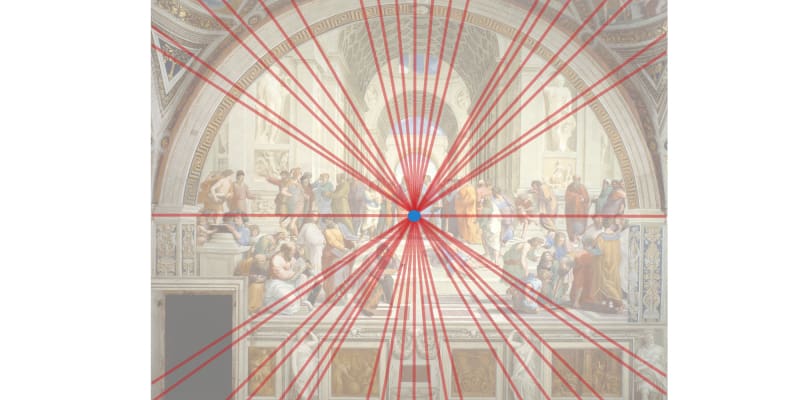
Here, One-Point Perspective is applied in its simplest way while still adding lots of detail to the whole piece!
The Last Supper, by Leonardo Da Vinci
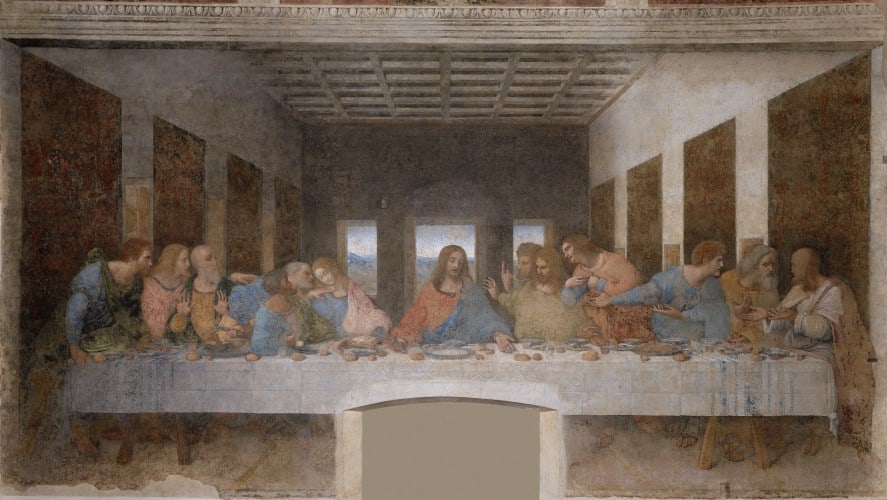
Another excellent example of a One-Point Perspective from the Renaissance period. Da Vinci is quite famous for their intellectual art and focused much on perspective in his paintings.
Again, we can see that perspective, color, and light are used to enhance the main subject of the piece.
Everything in The Last Supper guides our eyes to the central figure in the painting.
It’s also interesting to notice how geometric the building and decoration are.
Around this time, not only perspective but shapes were starting to be more closely studied, so painting them very clean and organized was quite familiar!
The Scream, by Edvard Munch
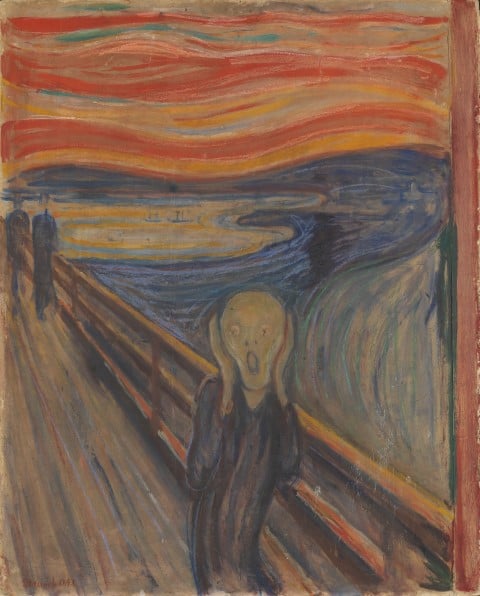
Let’s go forward a few years with Edvard Munch’s ‘The Scream.’ This is another very famous painting due to its raw emotion.
It’s hard to not look at this painting and not feel some sort of anxiety.
The pose and expression of the figure leave us a bit disturbed, but the whole feeling is maximized by the use of solid colors and raw strokes in the background.
Here we can see perspective being used: the figure in the front is closer to us than the other two dark figures in the back.
We can quickly figure this out by seeing their size.
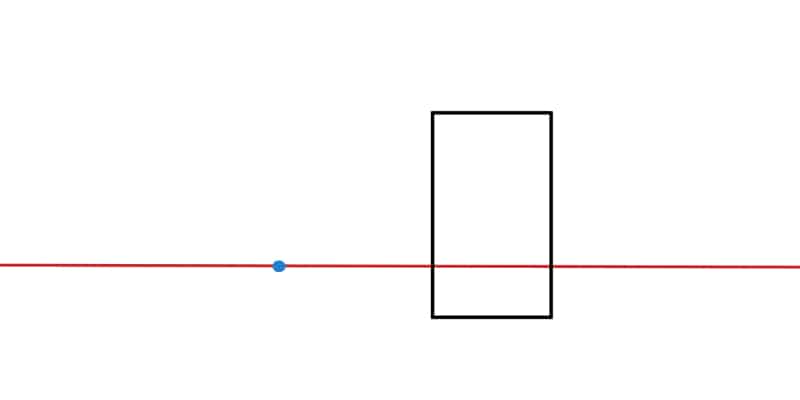
However, something interesting happens here: although we see the horizon line, we cannot find the vanishing point.
This is because that point is out of the painting!
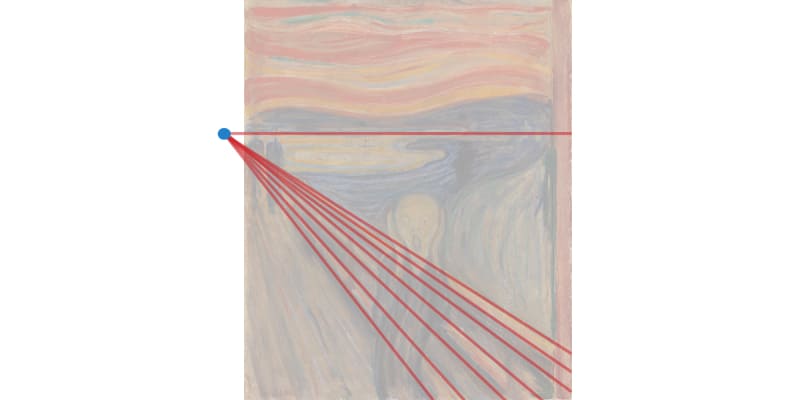
Perspective is very flexible, and you don’t need to restrict yourself to the canvas. Sometimes your vanishing point might be farther away, and you’ll have to work around that.
These are just a few examples, and you’ll find many One-Point Perspective examples throughout art history.
Nowadays, artists use perspective to their advantage when creating their illustrations. Whether you do it consciously or not, you’ll always be using perspective in your art.
Even if it’s just a figure standing in a solid background!
Let’s see a few examples of One-Point perspective with the help of more modern artists, some you might even be following on social media already.
Colourless Streets, by Djamila Knopf
You’ll notice that a lot of times, One-Point Perspective is used when there are buildings in the composition.
They can make exciting arrangements!
One thing I find interesting in this painting is that our horizon line is not at the center of the canvas.
This line goes towards the bottom of the paper, allowing us to look up at the sky and the immensity of the buildings surrounding the line figure.
The perspective, colors, detailed buildings, and signs accentuate the loneliness of the only human figure at the center.
Waiting, by Guweiz
Guweiz is another master of creating paintings filled with narrative.
The way they use color and lighting to create the perfect mood, along with the necessary elements and subjects, speaks volumes!
Here we can see the main subject taking a big part of the canvas. You’ll also notice that most of the light is around our character.
The right of the painting is primarily dark while full of light on the right. These almost unnoticeable details guide our eyes to the main subject.
As artists, it’s our job to guide the viewer throughout the story we’re trying to tell.
It’s also an excellent example of how you can subtly use perspective without taking up much space in the painting.
The vanishing point is far away from us but helps build the whole composition!
Sunset Studies, by Loish
Loish is probably one of the most famous artists, inspiring numerous young artists.
She is known mainly for her portraits. However, she also excels when painting landscapes!
Here we have a few reference studies, all of which use a One-Point Perspective.
If you draw a grid on top of these, you’ll see the horizon line and, at times, the vanishing point.
In the last example, we can again see how the vanishing point leaves the canvas. However, you can see how well is the whole scene executed.
It’s also important to point out that you do not always need to create a grid or guide when drawing perspective.
In the beginning, it will be beneficial for you. If you’re drawing buildings or other very synthetic subjects, having a guide will make things easier.
However, when drawing from reference or even in certain situations, you can be more intuitive.
Art is not an exact science; what matters is that what you draw is believable.
It also really depends on your preferences. For example, some artists like to be very exact with their works and compositions, while others prefer to be loose with it!
One-Point Perspective Drawing Exercises
Even though you can just start creating some perspective on your work, it’s good to first start with simple exercises.
This way, you focus only on perspective instead of the numerous elements in your artwork!
Here’s a list of a few exercises, from the most simple to something more complex, that you can do to practice your One-Point Perspective:
Drawing A Cube
This is one of the most simple exercises you can do. Cubes or other similar shapes are pretty straightforward and clear.
Therefore, depending on its perspective, you can easily understand how an object behaves!
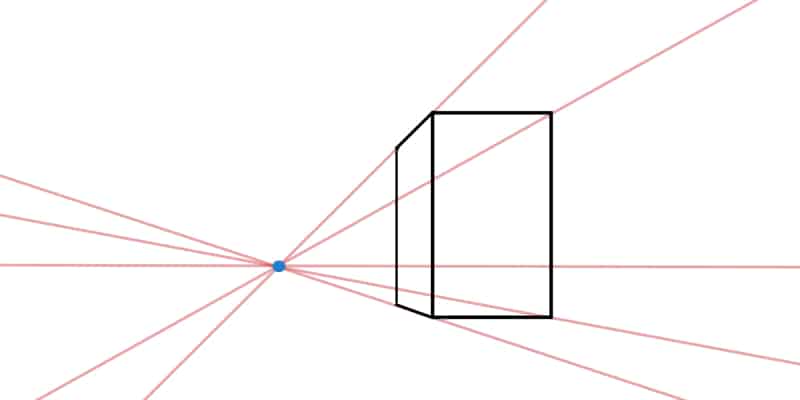
Let’s start by drawing our horizon line. Once that’s done, add a vanishing point.
You can add it wherever you want, but since we have already seen an example, let’s draw this point more to one side.
Whether it’s to the left or right is up to you.
It’s time to start our cube. Draw a square.
Let’s draw our square on our horizon line to keep things simple.
Now, all we have to do is create some guidelines from our vanishing point to each corner of our square.
Decide how long you want your polygon to be, and draw another square somewhere along the guidelines you created. Once that’s done, our cube is almost finished. Like this:
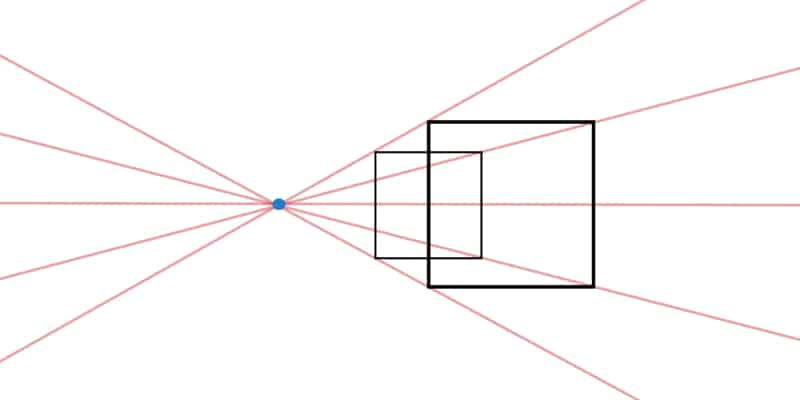
Connect everything, and you just drew a cube/polygon using One-Point Perspective!
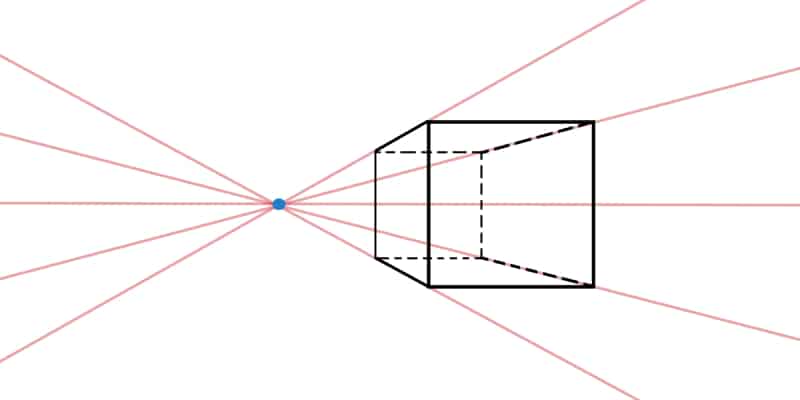
You can now play with angles and points of view. For example, if you want the viewer to look up to your cube, you’ll want to draw it above the horizon line.
On the other hand, if you want the cube to be below our line of sight, you’ll draw it below the horizon line.
You can also try and draw your vanishing point in different places or even draw your cube close or farther away from the vanishing point. Try other things and see the results you get!
Drawing A Building
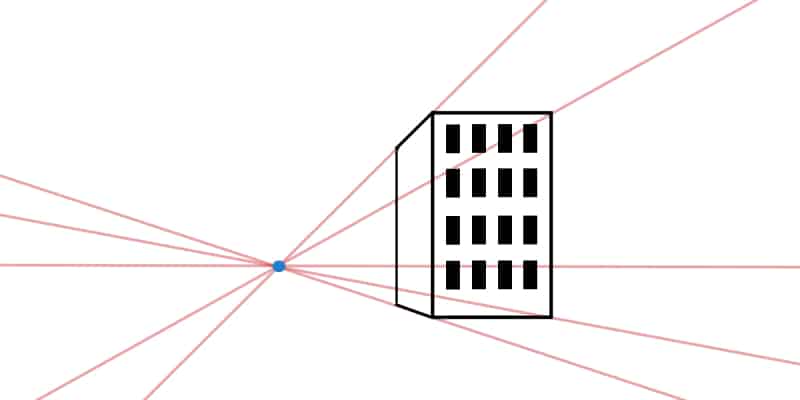
Now that we learned to draw a cube, it’s time to go to the next level: drawing a building! The process here will be very similar, but now we’ll add a few more details.
Again, start by drawing your horizon. Let’s draw that line below the center of our canvas to make things a bit different.
We’ll draw our vanishing point and a rectangle along the horizon line for the next step.
Like before, it’s time to draw 4 guidelines that go from the vanishing point and connect with each corner of your rectangle.
Decide how long you want your building to be and draw another rectangle between the original one and the vanishing point.
Connect everything, and you now have the main shape for your building.
So far, all the steps were pretty similar to the exercise above. However, now we’ll add some details!
Let’s go ahead and add a few windows to the front of our building. If you’re working digitally, you can use the rectangle tool.
Also, be sure you’re drawing these windows in a new layer so it’s easy to edit and move them around.
Once you’re done, duplicate that layer. Now use the Transform tool and choose ‘Perspective.’
Move your layer to the side wall of your building and tweak it until the windows are in line with your guidelines. If necessary, add a few more windows by duplicating them!
All we’re missing now is a door. Again, draw a taller rectangle at the base of your building using the rectangle tool.
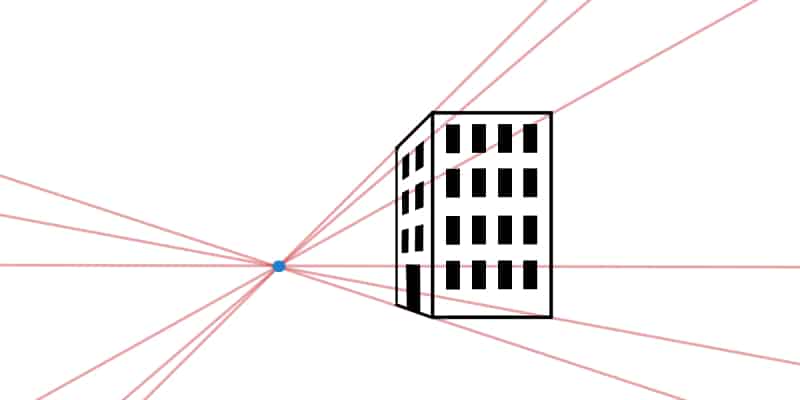
If you’re drawing traditionally, you’ll take a few more steps, but it’s still reasonably doable. Draw each window on the front wall.
These have no specific angle, so they’re easy to draw. However, you’ll need a few more guidelines for the side wall: one for each row of windows.
Once those guidelines are in place, you must draw each window, following your grid!
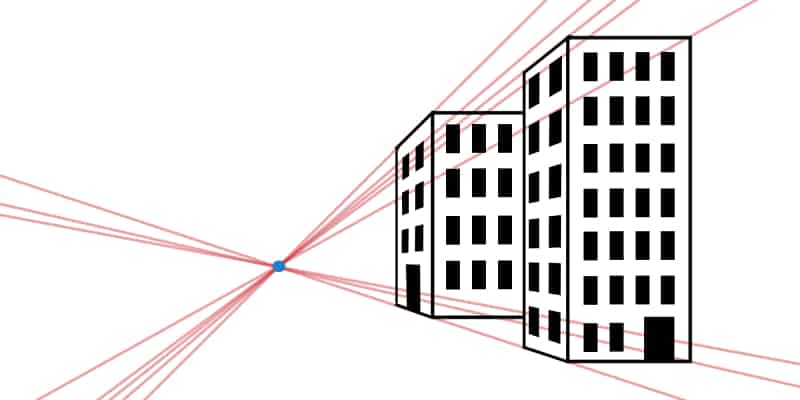
Drawing A Street View
A street view is always challenging to draw since so many elements exist.
But we’ll do this in parts to make it less overwhelming. The secret is to constantly break everything down into smaller and simpler parts!
Go one element at a time instead of focusing on the bigger picture. You’ll see things appear much more accessible.
We can even use our previous exercise for this one. There’s already one building and some guidelines, so we can use those.
Let’s go ahead and fill our canvas with some more lines, parting from the vanishing point. This way, it’s ready to start filling our street with more items.
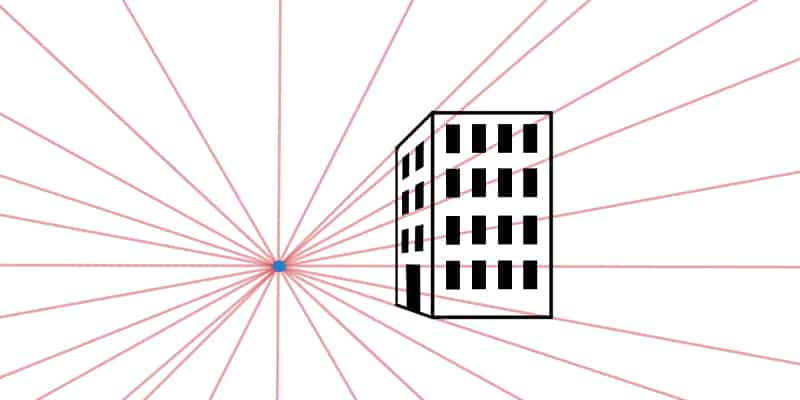
Since we already have one building on one side, let’s take the opportunity and make a few more. You can even play with their height.
It’s time to decide where the road and sidewalk go. This part is relatively simple since all we need is to go over some lines that already exist.
Why not even add another road converging with the main one? This street looks like it could belong to a city, so adding connecting streets makes it more believable and exciting!
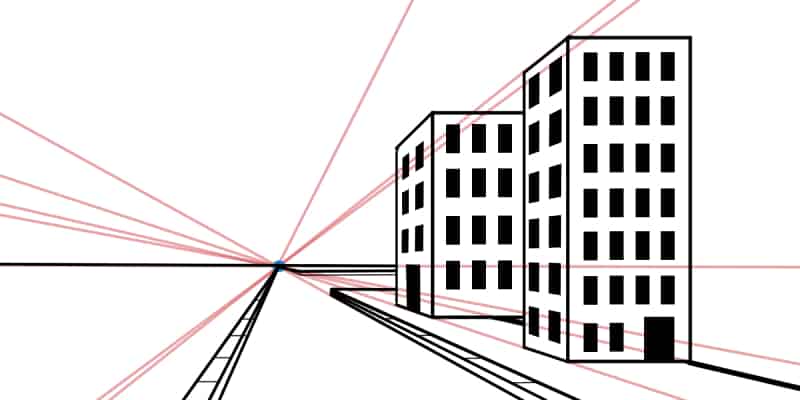
Alright, one side is done. Let’s move to the other. We can also fill it with buildings. But keep it simple. You don’t need to draw too many buildings.
You can even draw a regular house here just so you don’t get bored of buildings!
Everything is done by following the grid you created. If you draw a particular element it needs more guidelines, don’t hesitate to draw those.
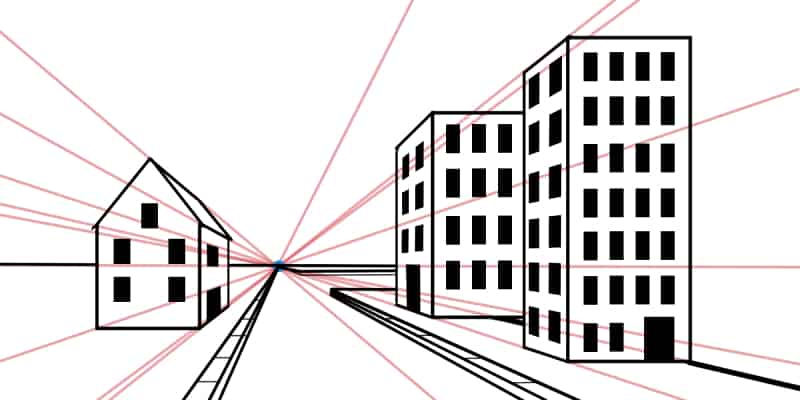
We’re mostly done with our street view. Now, you can add just a few more items to break the monotony. Try drawing a signpost or two, along with some trees.
Suppose you want to make this street busier and add a human element. In that case, you can add a few silhouettes of random people or even a car or two!
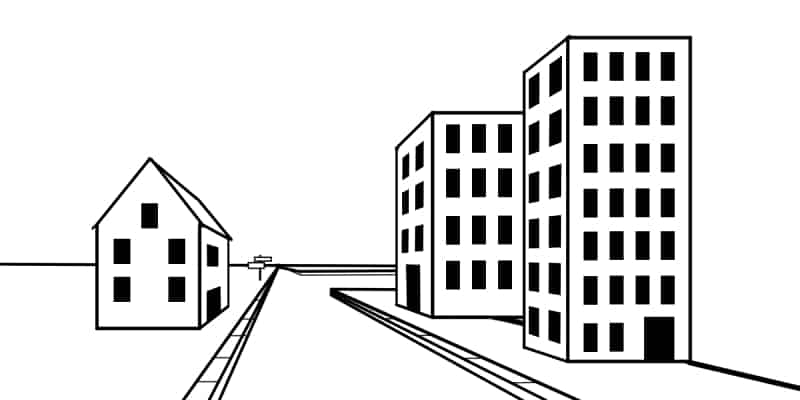
We created a relatively simple scenery with some mild details and elements here. It’s good to keep things simple and easy on the first try to get more familiar with perspective.
As you feel more confident, you can go in and start adding more details. It’s all up to you!
Drawing a Living Room
It’s time for our final exercise, and this one is almost a continuation of our first-ever example of One-Point Perspective, right at the beginning!
Again, let’s start by drawing our horizon line. Make it a bit below the center of the paper. Now, find the middle of that line and draw your vanishing point right there.
You can go ahead and add some guidelines throughout the canvas. Using those, you can now draw a rectangle or even a square. Then add some lines that part from each corner.
It should look similar to this:
Now that our room is drawn, we can add some furniture and other important elements! Let’s start with deciding where the door is going to be.
I’m thinking of drawing it on one of the side walls!
How about our furniture? Again, I will keep things simple while creating a lovely living room.
Against the farthest wall, we can draw a simple sofa and a hanging picture or two, like this:
A bookcase on the wall to our right could make things more interesting. Take your time with this; if you’re working digitally, feel free to duplicate elements to make the process easier and faster.
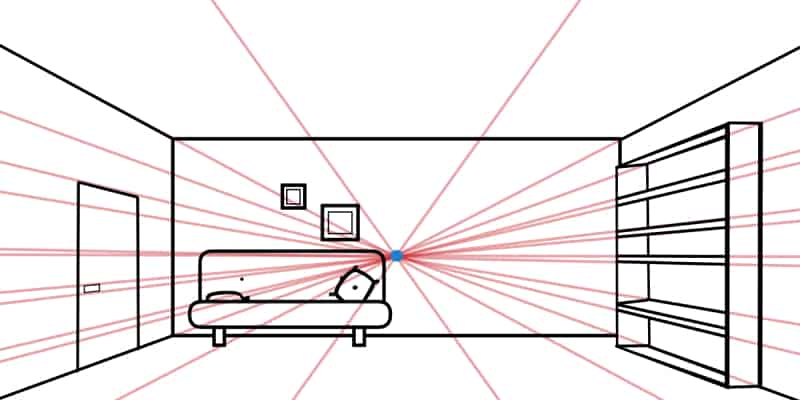
Alright, we could leave things as they are, but at the same time, this room feels a bit too empty. So we can draw a modest coffee table right in front of the sofa.
Above that table, we can add a small vase with a flower or two and a rug below it.
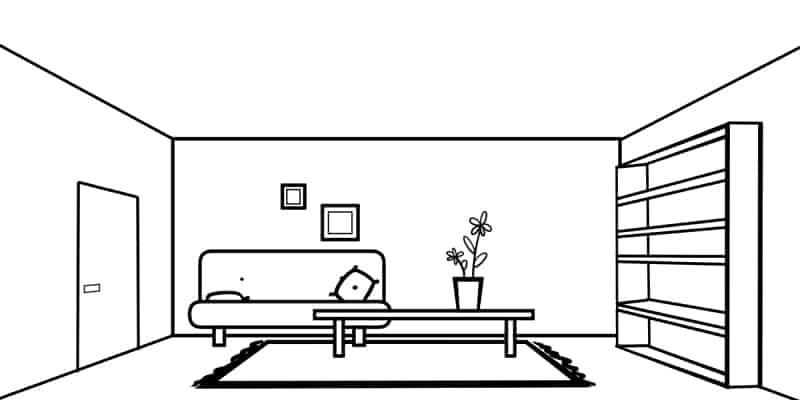
Now our living room looks even more enjoyable! You can keep on adding details or leave it as it is.
Experiment with different elements and have fun with this process.
Perspective can be challenging when it comes to drawing, but what matters is that you go step-by-step and enjoy the whole process!
It’s all a matter of practicing. We have a list of 20 simple drawing ideas for you, so you can use them as inspiration when drawing One-Point Perspective.
Patricia Caldeira is the main writer here at Don Corgi. She's an art teacher with over 20.000 happy students across many platforms and courses!
Enjoy your stay and as always:
Keep on drawing!
")

")
")