When drawing the human body, there are many ways to start drawing. It can be drawing a quick rough of the entire body or drawing one part at a time.
But should you draw the body first or one body part at a time?
If you want to improve at drawing the human body, starting to learn one body part at a time is good. This way, you’ll break a big subject into smaller parts, which are easier to digest and understand.
Pick a body part you find interesting and learn it. Then go for the next until you can connect everything to an entire body!
It is a complex subject that might leave you with questions about drawing the body, so let’s sort those out!
Table Of Contents
What Part Of A Body Should You Draw First?
The body is a very vertical subject to draw. For that reason, starting from one of its edges is good.
It can be either the head or the feet. I like to go from top to bottom, so starting by drawing the head makes things easier for me.
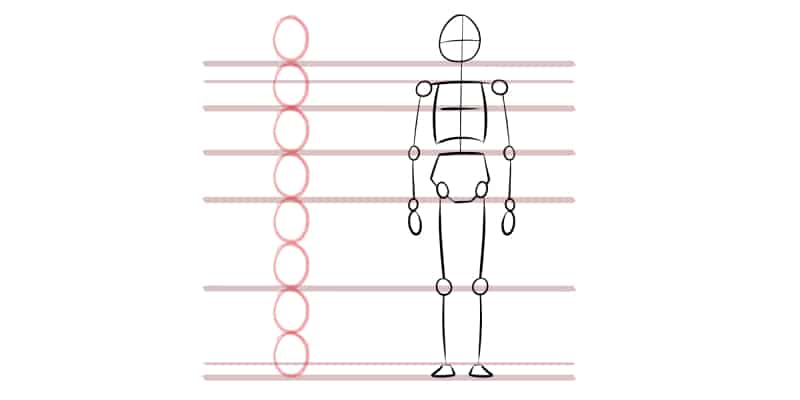
Starting with the head makes sense because it’s the highest part of the body, and you can use it as a measurement for the rest of the body!
When drawing the human body, you can start by drawing an ellipse for the head. This ellipse can be any size you want.
Once you have that decided, you can draw several heads of the same size along your canvas until it reaches the height of a human person.
Generally, you’ll need about 7 to 8 heads for the right proportions, like this:

If you want to draw a shorter person, draw less than that and change the proportions of the body. If you’re going to draw a taller person, just add more heads!
As you can see, starting with the head first is very beneficial since it will help you figure out the proportions of the whole body.
Of course, you can draw everything freehand, and some people might prefer to start with any other body part.
But this method is very helpful if you like to use guidelines and a systematic process!
Your body will start memorizing proportions, sizes, and where everything goes as you learn. For that reason, you won’t need to use as many guidelines.
For that reason, this is an excellent way to learn and draw the human body.
Another thing I’d like to point out is that you don’t need to add details immediately. You do not need to draw hair, eyes, or mouth immediately when starting with the head.
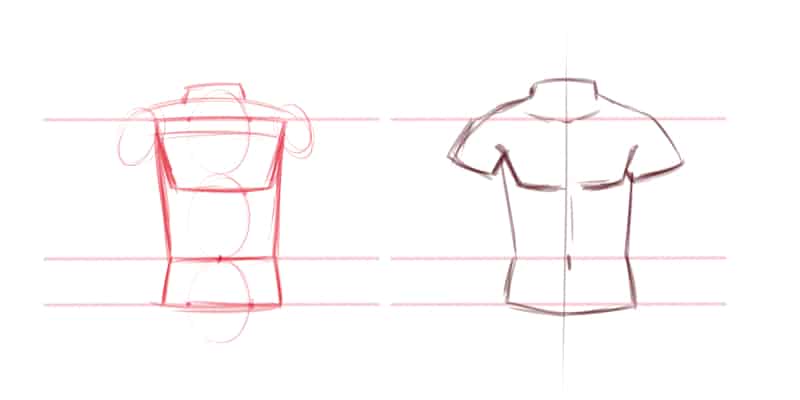
Simply draw an exact shape for the head: the ellipse. Then move onto the neck and torso by using squares and rectangles.
Go through the whole body by drawing simple shapes such as circles, triangles, rectangles, or squares.
You’re creating the ‘skeleton’ of your drawing first. Doing this allows you to easily erase and change your shapes until they feel right.
If you start adding too many details immediately, it will become harder to understand where you’ve gone wrong. Not only that, but it’s not as easy to modify and fix your mistakes.
Start by drawing the head; use the shape to resolve the height of the body of your drawing.
Then, draw the most basic shapes to quickly scribble where each body part goes and their proportions.
These are the first steps of drawing a human body! When that’s all done, you can add more details and personality to the body.
The Easiest Body Part To Draw
The most effortless body part to draw is usually the one with fewer details. For that reason, I’d say that the torso or legs might be the easiest ones to tackle.
You can draw a torso by using very minimal shapes. You can use rectangles for it or even be more creative with the shapes.
But overall, the torso uses very regular shapes. Not only that, but it’s primarily bare when it comes to details, and sometimes you can even omit them!
You don’t need to draw nipples or a belly button if you’re drawing a clothed body. You can omit these elements even if you’re drawing a nude body.
Even if you decide to add them, they can be done by simply drawing a few dots!
The same goes for the legs or even arms. These shapes you use for them are straightforward. A few rectangles, and you’re done.
Of course, to make the shape more interesting, we tend to draw a curve here and there, but still, it’s all very regular.
There are no extra details for both the arms and legs. The only other thing you can draw is hair, and it’s optional!
And while we’re on subject, I recommend you to grab some anatomy reference books (here are my favorites) to study.
As with everything, however, it all depends on the person and their preferences. For example, for many people, the easiest part of the body to draw is their favorite!
That means that even if it’s a body part known to be challenging, it feels easy for them since they like it so much.
Not only that, but since it’s their favorite body part to draw, it’s probably the one they’ve drawn the most.
The more you practice, the better you’ll be at it. So it’s only natural that with time and practice, that specific body part becomes easier to draw!
I always like to draw faces, which I would draw the most when picking up a pencil. Even if I was doodling on the margins of a school book or notebook, I would draw a face sooner or later.
Of course, in the beginning, I can’t say I was good at drawing them, for the contrary.
However, with tutorials, inspiration from other artists, and lots of practice, I reached a point where I’m pleased with the faces I draw.
Since I focused so much on faces and the head, it’s no surprise that drawing a torso or other limbs felt so hard for me.
In short, it’s a matter of choice. You might prefer to start with something simple to draw or draw the body part you think is the most interesting!
Why Is Drawing Faces So Hard?
Although a fun part to draw, faces can be challenging since there are so many features to focus on!
The head is simple enough. You can do it with a circle, mostly. But then comes the rest:
- Eyes;
- Eyebrows;
- Ears;
- Nose;
- Mouth;
- Hair.
Sure, this is something you look at every day. However, everyone is different, meaning their features change from person to person.
So, even if you’re generally familiar with faces, it’s another matter of being able to draw them.
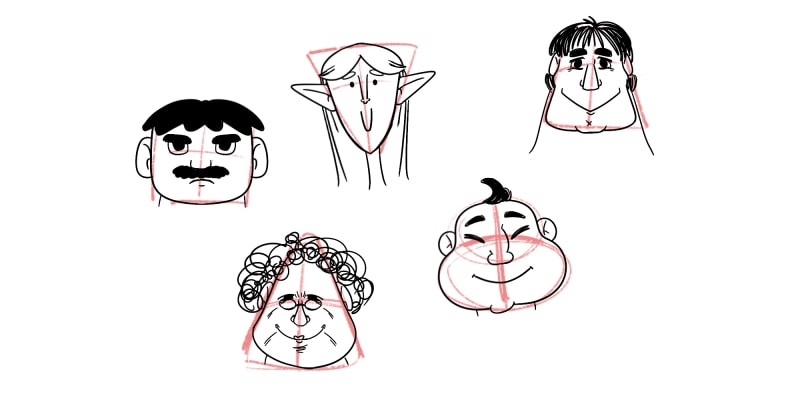
The first issue you’ll probably struggle with is symmetry.
Faces appear to be very symmetrical. This isn’t true; if you draw a line dividing someone’s face in the middle, you’ll notice that one side of the face is somewhat different from the other.
This difference is almost invisible, and that actually makes things even harder! You’re trying to achieve a perfection that doesn’t even exist, so something always feels wrong.
That’s the first thing you have to internalize: faces aren’t perfect nor symmetrical!
Then, we arrive at the second problem: proportions and placing. Since we are so familiar with faces, we know where everything goes.
First, the eyebrows, and right below it, the eyes. Here’s a complete illustrated guide to help you draw the eyes step by step.
After, in the center of the face, we have our nose and then the mouth.
The ears stand on each side of our face.

Ok, seems easy enough. Up until the point we actually start to draw things!
When you don’t have a lot of experience, you’ll notice that it’s tough to draw each feature of the face in the right place.
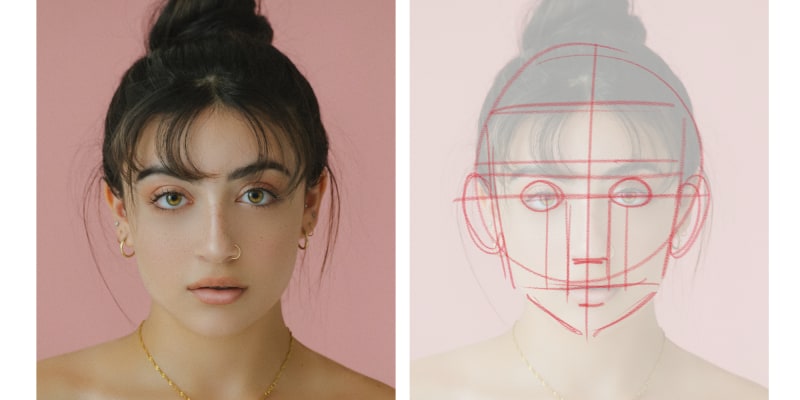
When it comes to drawing, there’s something I like to do before drawing anything new: find lots of references and find shapes and guidelines in them.
Before trying to draw the faces, consider this exercise:
- Find some nice photo references. Portraits work better since they have a nice close-up of the face. Here, you can find a list of 11 websites where you can find free portrait reference photos.
- Open each image on any drawing software of your choice and lower their opacity. You should be able to still see your photo clearly, while also seeing what you’ll be drawing on top of it. You can print your images if you prefer to draw with a pencil. However, before doing that, I recommend you lower the photos’ opacity a bit, so it’s easier to see what you draw later.
- Ok, it’s time to actually draw something. Go into one of the references you saved and make several guidelines you feel are essential:
- Circle for the head;
- Square or even triangle shape for the chin area;
- One vertical line marks the center of the face;
- A line that marks where the eyebrows stand;
- Another line for the eyes, nose, and mouth;
This is just one example, but you can add more guidelines if they make sense!
- Do this with several references. What’s important is that you understand these guidelines and start memorizing them.
- Once you feel you have a nice guideline that you can work with, it’s time to actually practice. Don’t focus on drawing each detail of the face yet. Just guidelines and basic shapes for each feature of the face.
- Practice these shapes and grids as much as you want until you feel confident refining each facial feature!
First, learn the schematic of the face. Knowing the basics is as important as knowing how to draw a full, clean face. So don’t worry about that part yet.
It can be messy and not your most beautiful work, but it’s not supposed to be pretty. The goal is for you to understand where everything goes and what are the best proportions to use.
Then, when you’re confident in drawing a face, you can start styling things a bit more to fit your preferences!
Even though we have guidelines to follow, you can bend things a little to fit your style.
For example, I draw ears that are way too big, considering the usual human proportions. However, that’s how I like to draw them; it makes sense with my overall style.
Once you understand the human face, you can start deconstructing them and create your own thing!
Why Is Human Anatomy So Hard To Draw?
Just like with the face, there are a lot of elements to consider when drawing human anatomy. This is why human anatomy can be very hard to draw. Not only that, but there are so many body types, and everyone is so different.
Even if you know the general proportions, you’ll have to tweak them depending on how tall the person you’re drawing is, for example.
The same goes for their weight. If you’re drawing a very thin person, you’ll use more elongated and thinner shapes. However, as their weight increases, their forms start to become rounder.
So, even if you’ve learned to draw the most regular body type, you’ll find that it’s different to draw other body types, even if you know the basics.
Also, each part of the body has different proportions and behaves differently.

It’s good to learn each part of the body individually. That’s how I tackle everything when it comes to drawing: break everything down into smaller steps.
So, if the whole body is too difficult to draw right now, then break it into different parts.
First, practice drawing the head and face. When you feel good about those, go for the torso, arms, hands, etc.
Don’t forget to use reference photos though! Here are some helpful photos for drawing the hands.
Once you feel more confident about these, you can learn how to connect each body part.
This is not an easy task either. You need quite some practice and observation skills to do it effortlessly.
Again, I recommend using lots of photo references and drawing on top to better understand the body.
You can even take pictures of yourself!
And you can also find some excellent anatomy drawing exercises to do. Here are 5 anatomy drawing exercises to improve quickly!
Start small, choose a body part you want to learn, and practice it. Once you’ve got the hang of it, go to the next.
Don’t go for particular poses like sitting, dancing, or jumping. Find the plainest photos of people just standing.
Another thing that helps is finding references where the model is nude, wearing underwear or fitted clothing.
This way, you don’t have fabric in the way that impedes you from seeing the body clearly.
Another good exercise you can do when it comes to focusing on the whole body and its pose is Gesture Drawing.
Here, you won’t be able to focus or draw the details of the human body. You’ll capture the whole pose with quick strokes.
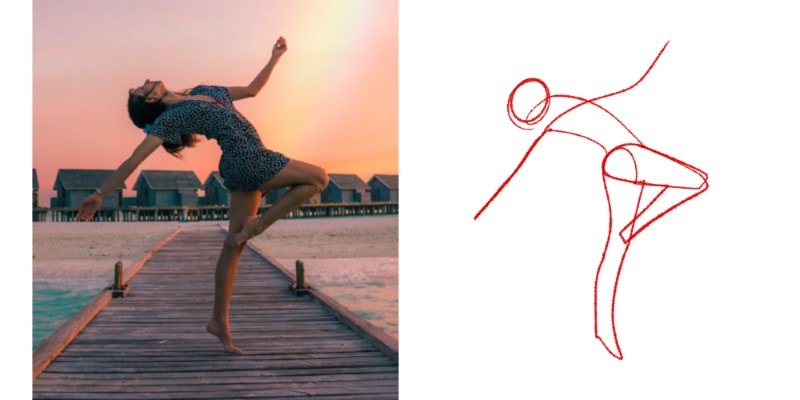
This will help you better understand how the body moves and how each part connects.
Take things slowly. Instead of focusing on the final goal and how good you want to be at drawing the human body, enjoy the whole process as well.
It’s only natural that your first drawing won’t be up to your expectations. But with time and patience, you’ll get there.
Start small, choose a body part you want to learn, and practice it. Once you’ve got the hang of it, go to the next.
Sooner or later, you’ll be able to draw the whole body!
And if you’re ready to take the next step and learn figure drawing from the very start to become a pro, check out my Complete Figure Drawing Course (with a discount!)
Other articles you might be interested on:
Patricia Caldeira is the main writer here at Don Corgi. She's an art teacher with over 20.000 happy students across many platforms and courses!
Enjoy your stay and as always:
Keep on drawing!
")


")