If you want to really improve your art and your character poses, gesture drawing is the solution for you. This is why I’ve created this big article on drawing poses using gesture drawing.
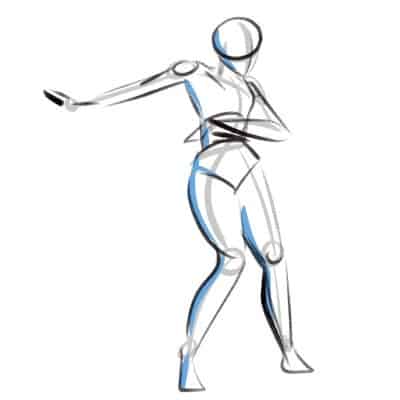
So, what is gesture drawing? Gesture drawing is capturing the motion of your reference image or character in as few strokes as possible. By using gesture drawing you improve your own artwork by focusing on the general figure, instead of the details.
With Gesture Drawing, I learned that first, there’s no wrong way to do art and to learn it. And second, that it doesn’t need to be perfect.
You can’t spend an hour on that one line that you’re not happy with.
Focus on the entire movement of the pose, and then you can worry about details later.

This exercise helped me move forward with my work, and that’s why I’m doing this post for you. Hopefully, it will help you as much as it helped me!
This is how you draw better and more dynamic poses, one step at a time:
- Choose Reference Images/Tools
- Start With The Line Of Action
- Draw the Shapes
- Keep Your Lines Loose!
- Time Your Gestures
We’ll go through each of these steps and talk about them in detail, but first, let’s talk about what exactly is Gesture Drawing!
I also have everything in video format with assignments and a bunch more info on each body part in my online drawing course: Introduction to Figure Drawing: Create a Dynamic Character.
Table Of Contents
What is Gesture Drawing in Art?
Gesture Drawing is capturing the form, movement (action), and pose of the subject.
So, if you’re drawing from a reference photo, you want to capture the whole figure in as few strokes as possible, with basic shapes and simple lines.
Usually, when doing this you set a timer of a few minutes (or even seconds) and draw the entire figure and pose in that time limit!
Doing this will make it much easier for you to draw the figure, as long as you keep practicing it constantly.
I go over what exactly is Gesture Drawing and Its 7 Benefits here!
Just as an aside, Gesture Drawing isn’t the same as Figure Drawing, you can read about the differences between them here!
It will also help you create more dynamic characters.
So if you really want to improve your art and create better and more expressive characters, this is the way to go.
But how do you exactly do gesture drawing?
How To Draw Gesture Step By Step
Alright, let’s now go over some gesture practice.
Here’s how you can draw gestures step by step:
- Choose Reference Images/Tools
- Start With The Line Of Action
- Draw the Shapes
Below let’s talk about each step more in-depth.
1) Choose Reference Images/Tools
Choosing reference images for gesture drawing is pretty easy! You can go with general photos that you can find online or in magazines, or just go through one of the tools we mention here!
There are several ways for you to choose your references:
- Magazines: grab some magazines you might still have at home and choose some that you find interesting. Fashion magazines or Catalogs from your favorite stores are usually perfect for this! Cut out the ones you like or mark the pages if you don’t want to ruin your magazine. Sit down on your sofa, desk or any place you feel more comfortable and scribble away!
- Go out: grab your sketchbook and pen or pencils and go out for a cup of coffee or for a walk in the park. Sit down and watch the people around you. This one is really good because you can’t force someone to stop so you can finish drawing their pose. If you want to practice how quick you are and perfect your gesture drawing abilities, this is the exercise for you.
- Pinterest and Stock Photos: the internet is full of material for you! You can go through Pinterest or Stock Photos, type in models or a specific action you want to draw and you’ll have tons of options to go through!
- Gesture Drawing Websites: like the ones we just mentioned above, go to one of them, set up the options you want and you’re ready to go. I recommend this article with the best free pose reference websites here.
2) Start With The Line Of Action
Start with the Line of Action by focusing on the Longest Axis of the character’s movement.
If you don’t feel comfortable doing the entire gesture drawing exercise, you can stop your Gesture exercise right here with the line of action.
Pick up your references and focus only on the Line of Action!
Fill up 10 pages if needed. Once you feel you got the hang of it, you can go to the next step.
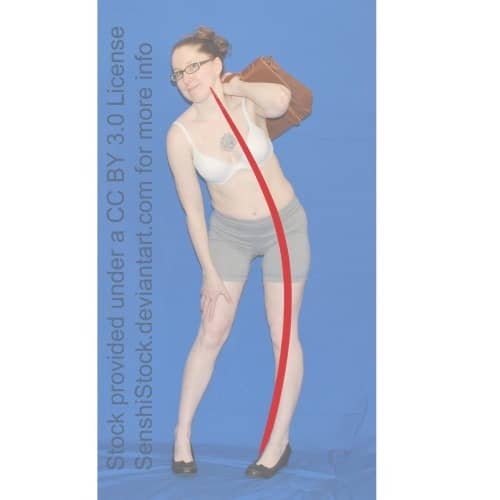
It’s one of the most important steps in gesture drawing, in my opinion, so really try to nail it and practice a lot!
And remember, a gesture line is not the same as contour a line!
Contour focuses on the outer details, gesture captures the movement and expression.
3) Draw the Base Shapes
Draw the overall shapes for each part of the body.
Keep them very simple for now. Just the general idea and shape.
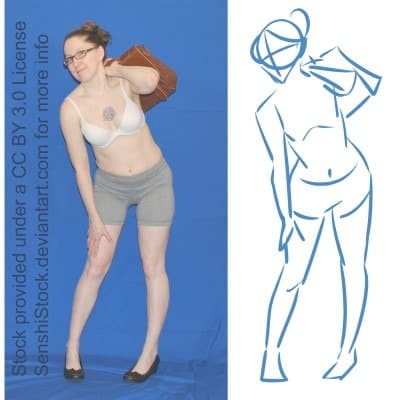
I like to start with the Torso, then the head, followed by the arms and the rest of the body.
Sometimes I trade places, I start with the head and then the torso. It all depends on what I’m feeling like drawing or what I’m comfortable with at the moment.
It’s totally up to you what works best, try different ways to approach it!
You don’t need to fill the drawing anymore! (unless you really want to)
To practice gesture drawing you just need to focus on these 3 steps and you’re good to go.
You can worry about adding details later!
Gesture Drawing Tips
As I mentioned, there’s no wrong way to go about art, and that applies to gesture drawing.
But there are always some guidelines and tips for you to follow and don’t feel too lost. Drawing can be very intuitive, but at times, it isn’t.
And that’s when you need these guidelines.
I’ve gone over some great and in-depth Gesture Drawing Tips here.
But I’ll also include a few quick ones in this article.
So, let’s go over some tips for drawing gesture!
- Start with the line of action. Focus on drawing the entire line that evokes the whole movement of the pose. This is essential to drawing a good gesture. Before jumping into drawing the whole human figure, take some time and fill a bunch of pages with lines of action based on reference images (such as the ones from these free websites)!
- Exaggerate your poses. You don’t need to copy the reference images as they are. Exaggerate parts of the movement, the torso, the legs, and have fun with it! You can dial back and tweak everything later on.
- Keep your lines loose. Beginner artists tend to be too stiff with their lines, and that shows in their artwork! Relax and focus on drawing long loose lines, it will make your art look much more confident.
- Time your gesture drawing practice! Resist the urge to keep working on your gestures for a long period of time. Gestures are meant to be done quickly, so time your practice. Start with 5 minutes, and then keep going down until you hit 30 seconds.
These are just a few gesture drawing tips, if you’d like to see more, check my article here!
Gesture Drawing Exercises
Ok, so we went over Gesture Drawing, step by step, but let’s try to spice things up!
Here are some specific gesture drawing exercises, that you can use if you’re feeling like doing something different or even do some silly exercises to relax and have some fun.
Just go to one of the gesture drawing sites we talked about before or pick other reference images, and try some of these exercises:
- Draw Each Photo In 30 Seconds
- Use A Single Line For The Entire Gesture
- Blind Contour Drawing Of A Model
- Gesture Drawing Of Hand Photos
- Draw The Gesture Of An Animal In Motion
These are just a few, if you’d like to learn more (with examples) check my complete article on the best Gesture Drawing Exercises For Artists here!
Famous Gesture Drawing Artists
Gesture drawing practice has been around for a long time. And so, there are many examples of famous artists that have used this exact technique to improve their own artwork.
I’ve included a few gesture drawing artists here, but you can see a bigger list of gesture drawing examples in this article!
So let’s go on with some examples of famous gesture drawing artists!
Leonardo DaVinci Studies
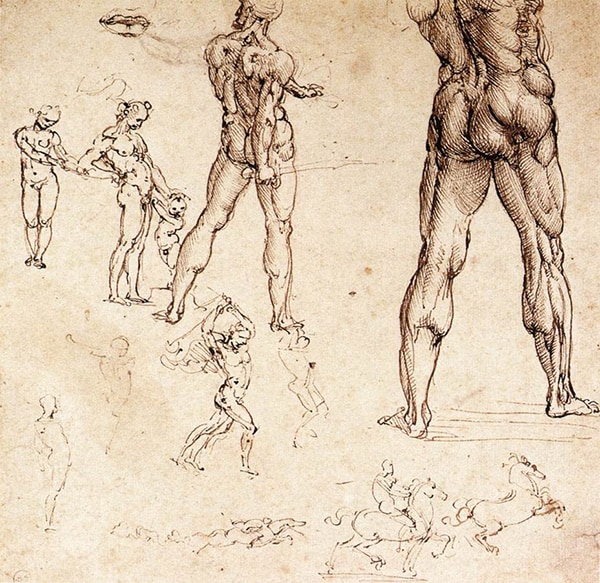
As you can see in these famous gesture drawing studies and exercises, Leonardo DaVinci focuses on the main shapes of the person and the horse.
These are very well done lines that simplify the main shapes.
Of course, there are also two drawings there that you can see he took way more time to do, but you get the idea!
Rembrandt Harmenszoon van Rijn
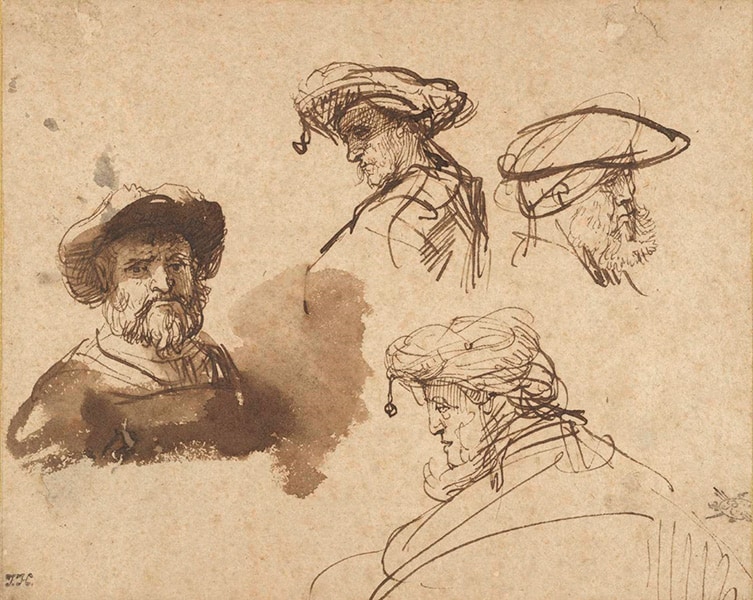
These gesture drawing studies by the famous artist Rembrandt capture the main shapes of the head and hat of the person.
Remember that even if you’re doing gesture drawing exercises, it doesn’t mean that you have to draw the whole figure! If you’re interested in practicing just the head, the arms, the legs or anything else that you’re having difficulties with, go ahead and do gesture drawings!
The important thing is to just practice your gesture drawings.
Michelangelo di Lodovico Buonarroti Simoni
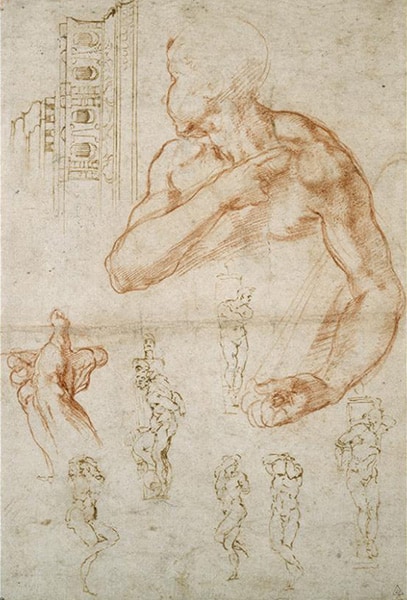
You probably know Michelangelo’s work and have seen them several times before, but have you watched carefully the gesture drawings of this famous artist?
In these gesture drawing studies, he captures the form perfectly with just a few lines.
You can see the layout of each muscle in the body and understand it perfectly even from a distance. I’m sure he has done MANY of these gesture drawing studies over the course of his life.
That’s why he was so great at art: he studied a lot and did a bunch of practice!
Alex Woo
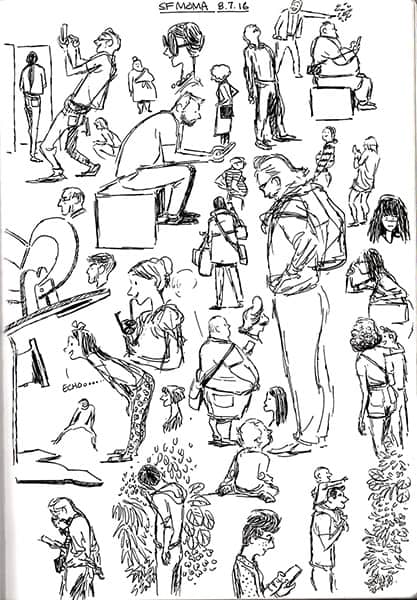
Alex Woo is a famous story artist at Pixar that has done countless gesture drawing studies and believes that it’s a very important practice to improve your artwork.
From the example, you can see how he just focuses on the lines and the directions of the lines in the gesture drawing studies to capture the moment and movement.
Through simple shapes, he can capture the whole figure in a flash!
This is what you’re trying to master when studying gesture drawing.
Materials For Gesture Drawing
In general, you can use any drawing or painting medium for gesture drawing! With that said, I find that it’s best to use a dry medium or a medium that dries quickly.
The reason is that you want to draw quick lines, shapes, and forms without waiting for the medium you’re using to dry.
For this reason, I recommend you use mediums such as:
- Pencil
- Pen
- Markers
If you’re looking for some recommendations, check out my article on the best art materials here!
With that said, you don’t have to worry too much about what exact medium you should be using for gesture drawing.
Simply pick up a pencil or pen and a piece of paper, and you’re good to go!
In Summary
Gesture Drawing is fun and very easy to do.
In fact, it’s one of the best ways to improve your artwork quickly.
Set a timer, sit down for 10 to 20 minutes or more if you wish to, and relax. Keep your lines loose and focus on the line of action.
This is where Gesture begins.
If you’re interested in really applying this knowledge and drawing better and more Dynamic Characters, check out my course on Figure Drawing (with a discount pre-applied!)
Now you just need to have fun! Practice as much as you can and you’ll see yourself progressing in your artwork in no time.
Patricia Caldeira is the main writer here at Don Corgi. She's an art teacher with over 20.000 happy students across many platforms and courses!
Enjoy your stay and as always:
Keep on drawing!

