Using the Clip Studio Paint Screentone option can be very fun and easy to use!
The use of tones is very common in manga books and illustrations, especially in black and white. It can also be something that an artist can adopt into their own style. With it, you can even help shade your drawings and give different effects to them.
How can you create screentones on Clip Studio Paint? To create a screentone, simply make a selection of where you want it to be, then go to ‘Layer -> New Layer -> Tone…’. Set everything as you wish and click ok.
There’s actually another way to create a tone layer, and you can make a lot of edits to these layers.
Including creating tone gradients, different effects to them, and changing the kind of screentone pattern you’re using.
We’re going to go through all of this, so at the end of this article, you can be a pro at creating tones and halftones for your drawings!
Table Of Contents
Clip Studio Paint Screentone Tutorial
Using Screentones is something very popular and you see it a lot in Manga!
You can also apply it to your own illustrations though.
Although it’s something I don’t use or explore a lot, I still use it from time to time, even if it’s just to have some fun with it or learn a bit more of Clip Studio!
There are two ways to apply screentone to your drawings. It all depends on how you prefer to work and how you like to organize your layers.
Both work exactly the same way!
Method 1 – Applying a tone from the Material Palette
Once you’re done with your lines, you can make a selection of where you want to add tones. Note that you need to make a selection of where you want the tone to be, otherwise it will just add a tone to the whole canvas.
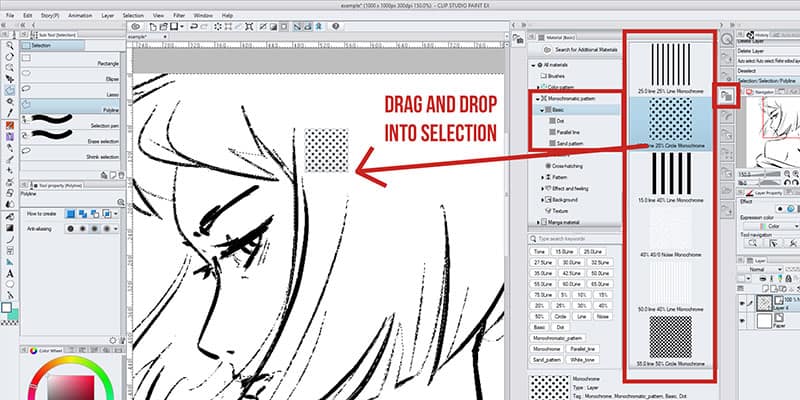
Now once you’re happy with your selection, go to the material tab. It stands to the right of your screen. Choose Monochromatic patterns and then pick one that you like and want to use. Click and drag it to the canvas.
Notice that a new layer has been created with the tone you chose.
Clip Studio applied the tone you chose to your selection, but it also created a tone layer, so you can go back to anytime you need and edit it!
If you want to learn more about materials, how to use and install them, I recommend checking my Clip Studio Paint Material Guide.
I really like using their Asset App to get new materials and to experiment with different styles. You might even find some other possibilities for your tones!
Method 2 – Using The Clip Studio Paint Tone Layer
Instead of dragging and dropping, you can also create a tone layer right off the bat.
First, make a selection. It’s always preferable to make a selection of where you want your screentone to go.
If you want to add more here and there, it’s rather easy to do later.
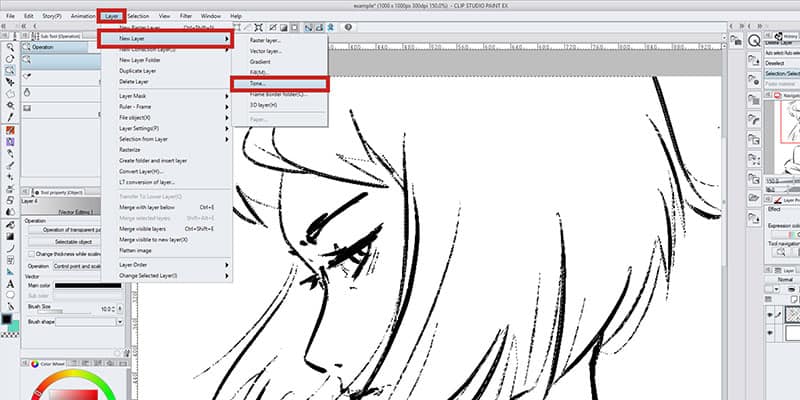
Now, with the selection done, go to ‘Layer -> New Layer -> Tone…’. Note that here you can edit your tone right off the bat.
You can change the number of screen frequency and its density, meaning how dark or light the tone will look like.
It is also possible to change the shape! You can change the type of shape you want your tone to have. As you can see there are quite a lot of options to use and experiment.
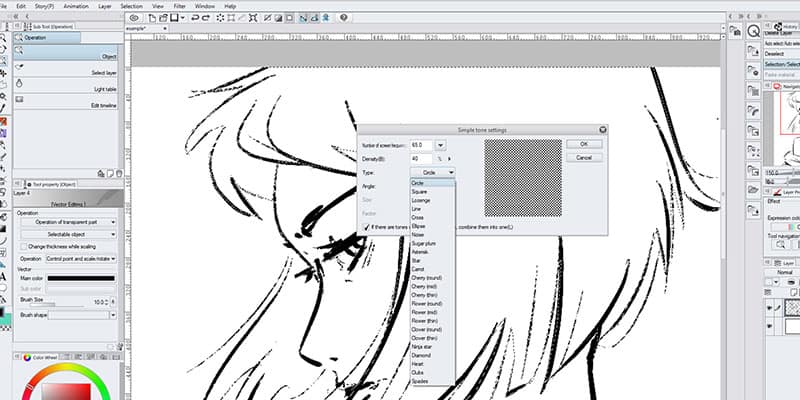
Finally, you can change the angle of the shape. If you choose a square, for example, the angle will change how the whole tone will look like.
When you click ‘Ok’, the tone will be created on the selection you just made and, again, a new tone layer will appear among your other layers.
Using the first method or the second is all up to you and how you prefer to work.
Personally, I prefer to drag a tone from the material tab and then edit it to my liking. But other people might prefer to set everything beforehand.
Try both methods and see what you prefer. Both work and there’s no wrong way to go about it!
Editing Your Tone Layer
Note that you can always edit your tone layer! For example, if you wish to change the shape of the tone, density, frequency, and others, you can go to the ‘Layer Property’ window, right above your layers window.
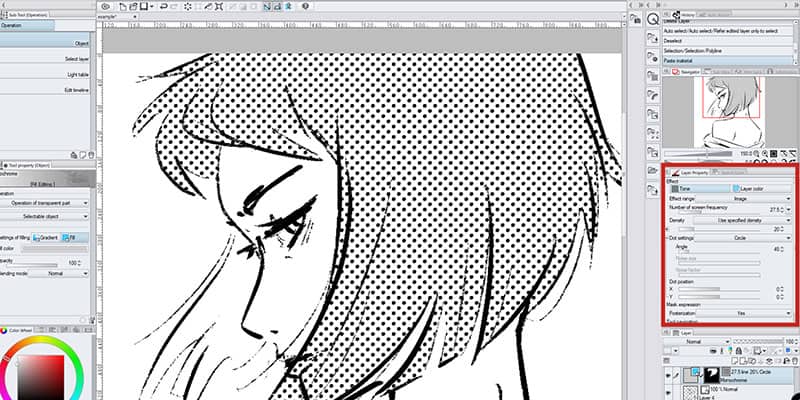
In here, you can edit how your tone will behave and you can see the changes in real time.
This is mostly why I prefer to create my tone by dragging the material. The tone will be created and then I can go edit and change it and see the changes as I tinker with the options.
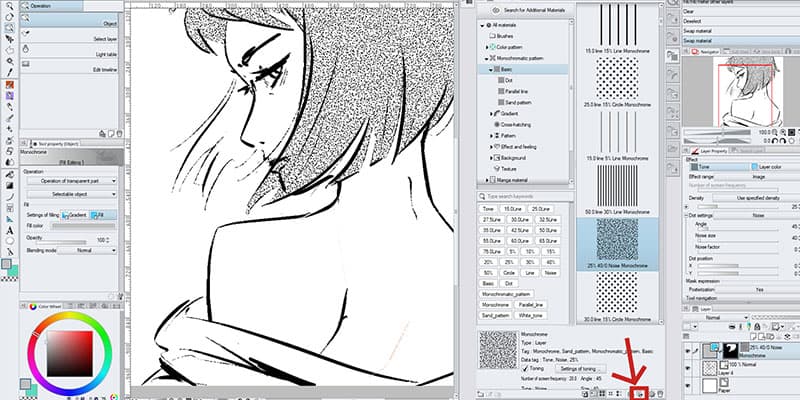
- Number of screen frequency: just like when creating a tone layer, you can set the number of halftone dots. The smaller the number, the bigger the dots and the bigger the number, the smaller they’ll be. If you click the arrow, a pull-down menu appears and you can choose among several numbers, that are often used in manga! Play with the bar and numbers and see they’re differences. When you find something you like, keep it!
- Density: by moving the slider, or typing a number, this will change how dark the tone will look. The bigger the number, the darker your tone will be.
- Dot Settings: apart from dots, there are quite a lot of other shapes that you can use for your pattern. If you click the pull-down menu, you’ll notice you have quite a lot of possibilities, like lines, squares, start and even flowers!
- Angle: if you’re using other shapes than circles, you’ll notice that changing the angle of the pattern will make a difference. It is usually set to 45º, but feel free to play with it and see how you prefer your tone to look like.
- Noise Size and Factor: if you chose, as your pattern shape, the noise option, you can also make some edits to it. Basically, these options let you change its size, how rough it looks and even distort it.
- Dot Position: you can change the position of your dots, use ‘X’ to move the dots horizontally and ‘Y’ to move them vertically. If you’re using only one halftone, this setting doesn’t change much to you. But if you’re using more than one, it might be useful to move the dots around, so the tones don’t overlap too much.
- Mask Expression: you can see more the changes when erasing parts of your halftone. But basically, when having it set to ‘Yes’, it will create some blurriness to each dot, giving it a bit of a gradient effect. When set to ‘None’ the software won’t make these changes. Usually, for printing, it is set to ‘None’, since it might print weirdly, so do pay attention to that!
Now, these are all the settings and options that you have available on the Layer Property window.
But there’s another kind of editing that you can do on your tones.
For example, you might want to add more tones to your drawing.
You can do so on the same layer. It is also possible to erase parts of the tone you just applied. Finally, you can even apply the tone with different effects!
Adding to a tone
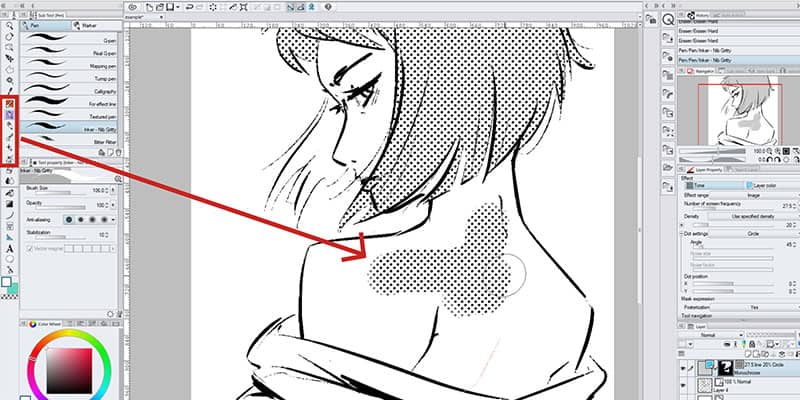
You’ve made a selection and applied a tone to it. Now that you have a tone layer you can still add the tone to other parts of your drawing!
To do so be sure to select the mask of your tone layer. Now choose a brush.
Anything from your pen or brush selection will do.
Now paint where you want to add tone. As you paint, the tone pattern should appear.
It also doesn’t matter what color do you have at the moment, since the layer is already monochrome.
Notice that I mentioned that you can actually have different effects on your tone.
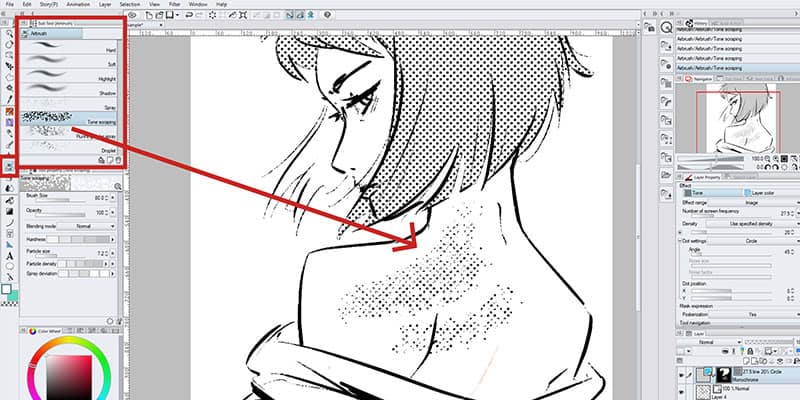
Try to pick a very textured brush.
For example, go to ‘Airbrush’ and choose ‘Tone Scrapping’. Now paint with it. The tone is painted more irregularly now. This can be very interesting to use if you want to give a fading or scrapped look to your tone!
If you need to apply the tone to bigger regions of your drawing, you can also use the ‘Fill’ option. Either pick the ‘Paint Bucket’ tool on the toolbar and then click on where you want the tone to be added.

Or, you can make a selection, then go to ‘Edit ->Fill’ and it’s done!
Erasing parts of the tone
Similar to adding, you can also erase parts where you don’t want the tone to be.
Let’s say the selection went beyond your lines. You can pick up the eraser and then erase what you don’t want.
The same can be done if you pick a brush and select transparent as the color. When painting through the tone, it will erase it!
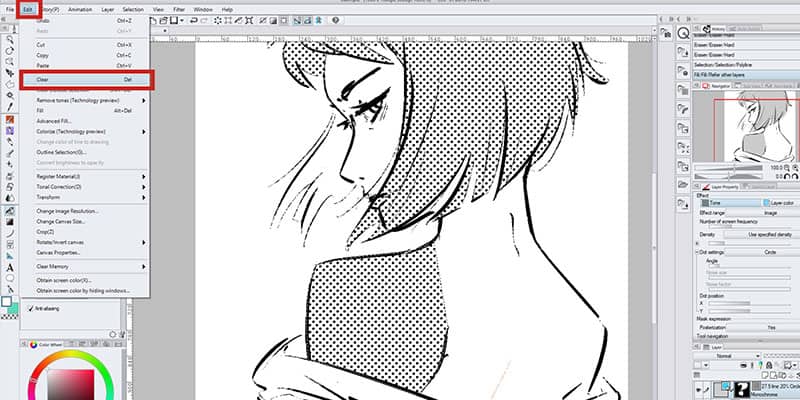
Finally, it is also possible to make a selection and simply press ‘Delete’ on your keyboard or go to ‘Edit ->Clear’ and that selection will be erased.
This one is very useful when you want to erase a big chunk of tone from your drawing!
Replacing tones
After choosing a tone from the Material Tab, you can actually replace it, if you think the one you chose isn’t right for the drawing.
To do so, simply scroll through the patterns available, then pick one and click it.
Now with the right tone layer selected, click the ‘Replace editing layer with selected material’ button on the bottom of the material tab.
Clip Studio will automatically replace everything in that layer with the new tone.
Using A Gradient Tone In Clip Studio Paint
Creating a gradient tone can result in very interesting effects.
You can even shade a drawing using gradient tones and it will help give depth and the idea of the direction of light to your drawings. Again, this is a very common effect to see in manga books and illustrations!
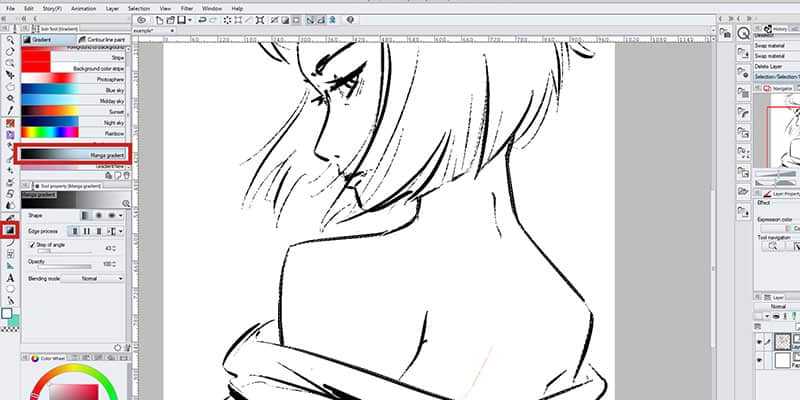
To create a gradient tone, simply go to the gradient tool on the toolbar. Now choose ‘Manga Gradient’ on the presets.
Just like before, you should make a selection of where you want the tone and gradient to be applied.
Then you just need to drag a line in the selection to create a gradient.
How big the line you drag and from where you drew it, will change how much dark or light will the gradient be. When you create your gradient a gradient layer will be created!
With it, you can actually change how the gradient looks and its angle, so I recommend moving it a bit until you’re sure you like how the gradient looks.
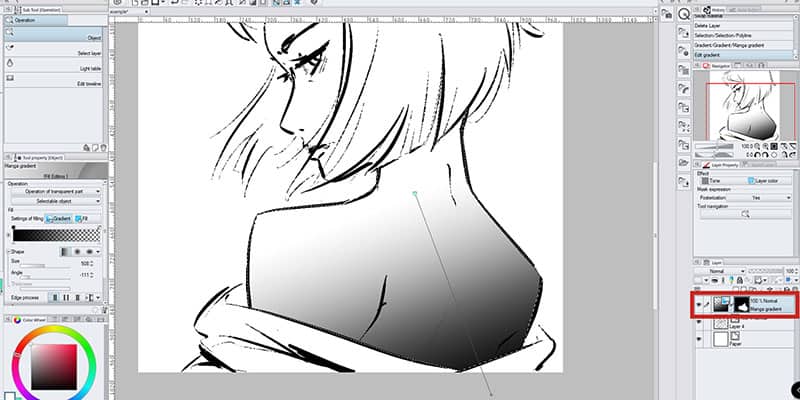
Now notice that for now, you only have a gradient. The tone is still missing!
To add a tone to your gradient, go to the ‘Layer Property’ window above the layers and select ‘Tone’. The gradient will immediately show as a tone, full of dots!
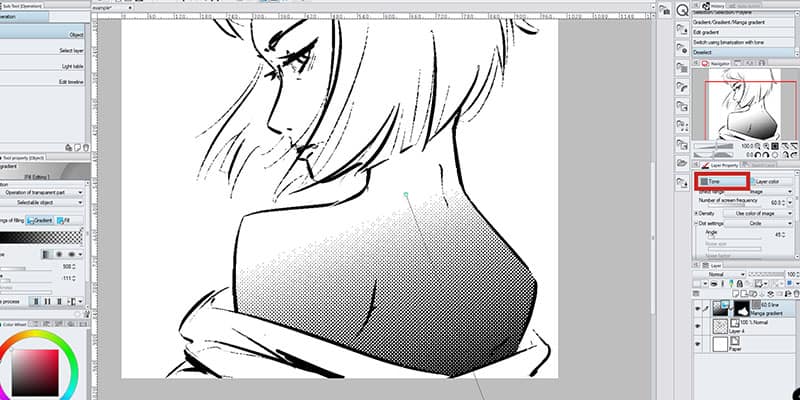
The dots should be more frequent where the gradient is at its darkest and less frequent as it goes lighter until they disappear if it goes to white.
You can now edit your tone as you wish, just like we mentioned above.
Using A Halftone In Clip Studio Paint
Creating a Halftone effect is all about how you use your tones.
As we just saw, the tone can be applied differently but it can also be heavily modified.
For example, applying a gradient and turning it into a tone, you’ll have a halftone effect. Going from very dark and dissipating as it gets to white until it disappears.
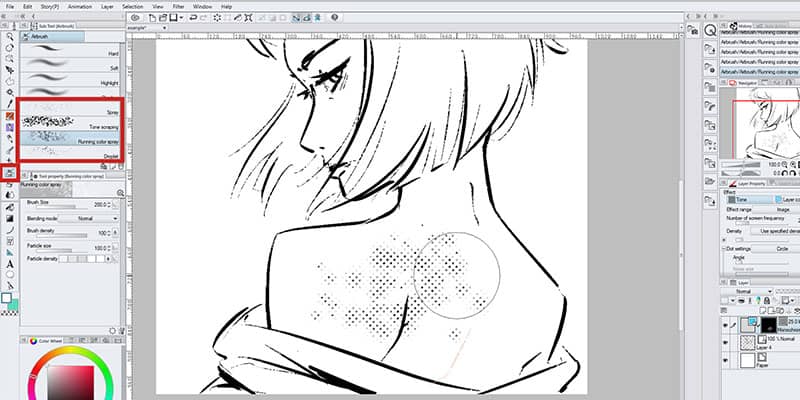
You can also apply a tone to an image or selection by using the Airbrush tool on a tone layer! Simply select the mask of the tone layer, then go to ‘Airbrush’ on your toolbar and choose one of the options.
To create this idea of halftone, I’d recommend using the Spray, Tone Scraping, Running Color Spray or Droplet brushes.
These will create very different effects among them, so try them out and see what you prefer!
Additional Questions
Can I find halftone brushes for Clip Studio Paint? There are no specific brushes to add halftones. However, as I mentioned above, you can add tones to your drawing with different brushes, to have different effects, as long as you’re drawing on a tone layer.
Can I add color to a tone? Yes, you can! Although, the whole layer tone will adopt the color you choose. To change the color of your tone, click the ‘Layer Color’ button on the Layer Property window, scroll down a bit and you can change the layer color as many times as you need.
And if you’re wondering, here’s how you can Import Brushes into Clip Studio Paint.
An alternative is to also just Make Your Own Brush like this.

Patricia Caldeira is the main writer here at Don Corgi. She's an art teacher with over 20.000 happy students across many platforms and courses!
Enjoy your stay and as always:
Keep on drawing!

")

")