Making your own custom brushes is part of your journey as a digital artist. Sometimes the brushes you have available just won’t work for you nor for the effect you want. Others you just want to have a bit of fun and try out different and new things.
You can even use your already created Photoshop Brushes in Clip Studio Paint in a couple of steps!
So, how can you make your own custom brushes on Clip Studio Paint? To put it very simply, you’ll need to create an image. This image you draw will then be set to use as a brush tip!
This is a simple process, but with quite a few steps. Below you can find a detailed guide, with images to help you on how to make your own brushes and how to share them with other people later on!
Table Of Contents
How To Make A Custom Brush In Clip Studio Paint
To make a custom brush in Clip Studio Paint, you’ll essentially be creating an image.
This image you create will then be set to use as a brush. It takes several steps to create your own brush, but it’s fairly easy and you’ll have some pretty nice personalized brushes to use on your drawings.
Here’s how to make a brush in clip studio paint:
- Make a new canvas in Clip Studio Paint
- Create your brush tip shape
- Save the material with the Register Material option
- Name your new brush material
- Create your brush
That might sound like a lot, but let’s break it down into steps!
Setting the Canvas
The first thing you need to do is open a new file on Clip Studio Paint. Go to File -> New… just like you would when starting a new drawing on the software.
Now there are some important steps to take here.
Choose the size of your canvas, let’s say 2000 x 2000 px at 300 dpi.
It’s important to have a big canvas since this will let you use your brush with bigger sizes as well as smaller ones. If you create a small brush, it might show pixelated, and you won’t be able to use it at a very large scale.
This next step is very important! Change the Basic Expression Color to Gray. Doing so will let you use different colors when using the brush later on. If you do not set it to gray, you won’t be able to do so.
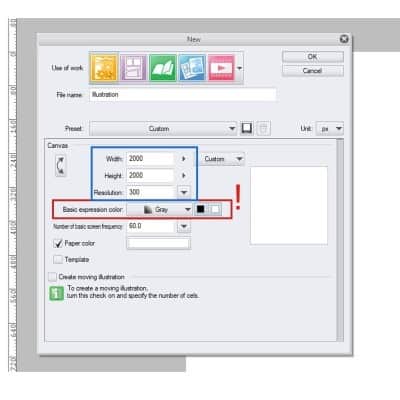
As for the paper color, you can change it if you wish and if it helps you, but it is not necessary. Especially if you’re not covering the whole document.
Creating the Brush Tip
Now that we have our canvas set, it’s time to create our brush. For that, we need to create our brush tip. This is basically an image.
A drawing of what we want our brush to look like.
For that, you just need to draw whatever you wish on the canvas. Notice that since we set up the basic expression color to gray, everything will show in gray tones.
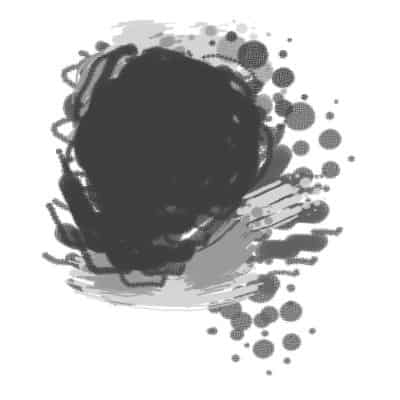
This means that even if you choose different colors, they will show as gray. Take advantage of this to have different effects and tones if that’s something you want on your brush.
Creating the brush tip is all about your creativity and what you’re looking for in a brush.
For example, you can either fill the whole canvas, or just a part of it. I recommend you use most of it at least, just so you don’t end up with a very small brush tip.
Once you’re done with it, it’s time to save it so you can use it as a brush!
Saving the Material
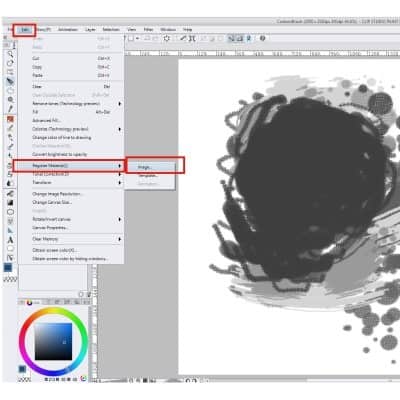
To use your image as a brush, you need to save it as a Material. For that, you just need to go to Edit -> Register Material -> Image…
Note that Clip Studio will register as Material the layer that is selected. So if you drew your brush tip in several layers, you should merge them all together. Just select all the layers, right click on them and choose Merge Selected Layers.
Also, if you do choose not to fill the whole canvas, delete the background layer or just don’t merge it with the rest. This way the background of your layer will be transparent which is what you probably want.
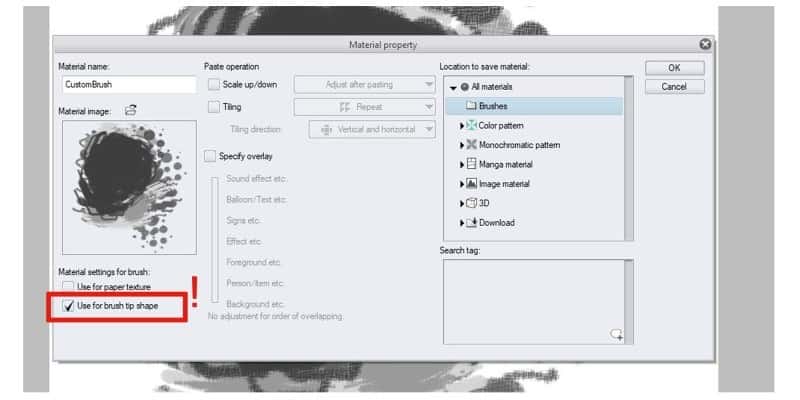
When registering the Material, a new window will appear. There are a few things you must do here.
First, you can change the name of the material. Doing this is advisable so you can find your brush tip easily.
Now, below the image, tick the Use for Brush Tip Shape option.
This is very important to do and easy to forget.
Next, you need to set the location where you want to save your material. Choose any of the folders or create a new one beforehand (see Related Questions at the end). Once you have everything set, just click Ok.
You just created your first material and a customized brush tip!
Creating the Brush
It’s time to create your new brush! You’ll need to create a copy of a brush that already exists. If you’re unsure how to do this, I explain how to do so in detail a bit further down.
Now with your Custom Brush selected, go to the Tool Property tab, usually underneath your brushes and click the Wrench Icon at the bottom of it. This will open a new window with a wide set of options.
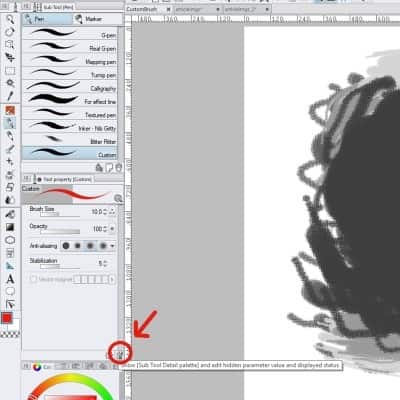
The most important option for us right now is the Brush Tip one.
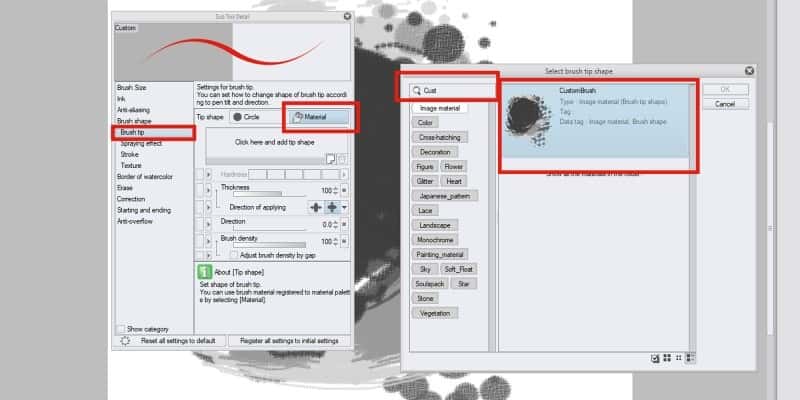
This is where we’re going to add the image we just created. To select a new one, click the Add Brush Tip Shape button. Now you just need to select your brush tip from the materials!
For it to be easier to find, just write the name you saved your brush as on the top bar and it should appear right away.
Once you select your brush tip, you can customize it further within all the options you have. Simply take some time to explore and try different options and settings, or you can leave the brush as it is.
This is a matter of experimenting and trying different things.
You never know when you’ll end up with new and different effects on your brush that you weren’t expecting.
Congratulations, you just created your first customized brush! Have fun with it!
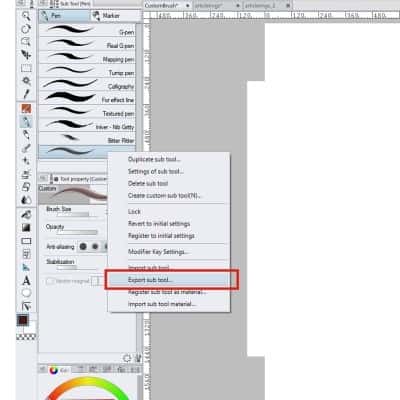
How To Export Brushes In Clip Studio Paint
You might want to share or even sell the brushes you create. To do so, you need to export them!
This is a very simple process and you need only to do it if you wish to share your brushes with other people. Or for the sake of having everything saved somewhere and well organized!
Simply select the brush you want to export, right click on it and click the Export Sub Tool… option. Name the file as you wish and select a location for it. Now Click the Save button and you’re done!
You can create a whole collection of themed brushes or just save individual brushes. However, you prefer or like. Some artists make a living from creating new and different brushes and then selling them.
This is something you can explore as well if you wish for other people to use and have fun with the brushes you created!
How To Copy Brushes In Clip Studio Paint
As I mentioned before, to create a new brush, you’ll need to make a copy of a brush that already exists.
For that, go to the brush panel and choose one of them.
Let’s say the G-Pen. It doesn’t really matter which you choose since you’ll be changing it. We’re going to need to create a copy of it. To do so, right click on the brush and choose Duplicate Sub Tool…
A small window will appear. I recommend you to change the name of it so you can easily find your new brush. So you can name it either Custom Brush or any other name you think will fit!
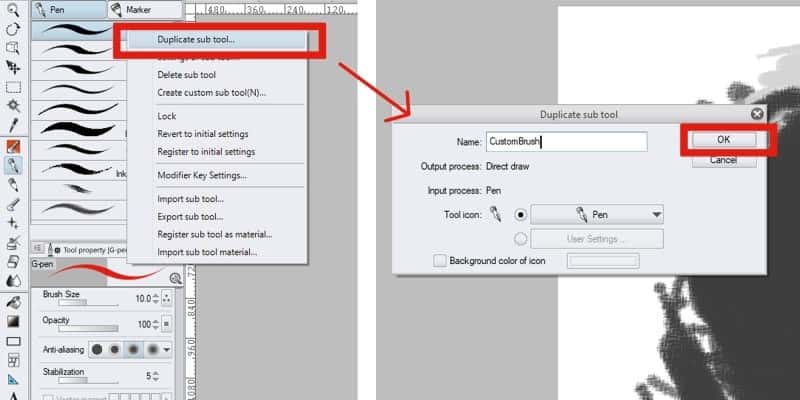
Leave the other options as they are and click Ok. You now should see the copy you just created in the brushes list. Now you can customize it with different brush tips and many other settings!
And that’s about it! I hope you’ve learned how to make a brush in clip studio, as well as how to export it and copy it.
Related Questions.
How can I import brushes? Just right-click any brush and select the Import Sub Too option. Look for its location and select the brush you want to import. It should appear among your other brushes now! I’ve created a step by step guide on how to import brushes in clip studio paint here!
How can I create a new folder in the Material Tab? When opening the material tab, on the left side of your screen, right-click on it and select ‘Create New’. Just name it however you want and that’s it!
Can I Use My Photoshop Brushes In Clip Studio Paint? Yes! It takes a few more steps but it can be done, I’ve even made a guide for it. Check the guide on how to use Photoshop Brushes in Clip Studio Paint here!
Patricia Caldeira is the main writer here at Don Corgi. She's an art teacher with over 20.000 happy students across many platforms and courses!
Enjoy your stay and as always:
Keep on drawing!
Patricia’s courses have enrolled 22 000+ students around the world, in platforms such as Udemy, Skillshare, Gumroad and more.

")

")