UPDATE: You can now easily import Photoshop Brushes in .abr format to Clip Studio Paint by just dragging and dropping the file into Clip Studio! I’ll leave this article unchanged below since some files might not work this way. Keep reading for a workaround to import Photoshop Brushes to Clip Studio Paint!
This might come as a surprise, but you can actually use Photoshop brushes in Clip Studio Paint and I’m going to explain how!
How can you use Photoshop Brushes in Clip Studio Paint? You have to convert the brushes into .png’s by using AbrMate. Then you can open these images in Clip Studio and register them as materials. Finally, duplicate an existing brush, and change its brush tip with the material you just registered.
I know this doesn’t make a whole lot of sense right now, especially if you’re not used to Clip Studio yet.
Follow the guide below and you’ll see how easy it is! I added a bunch of images, to help you better. You’ll see that in less than a minute, you have your favorite Photoshop brushes ready to use!
Table Of Contents
How To Use And Convert Photoshop Brushes In Clip Studio Paint

Going from Photoshop to Clip Studio means different files for brushes. A lot of people used Photoshop before Clip Studio. I know I did.
Naturally, wanting to work with the same brushes we did before is quite normal.
It’s the tools we’re used to. Besides, it’s not that common to find brushes made for Clip Studio, this is why you can make your own clip studio paintbrush from scratch (here’s how).
Today, we start to see more clip studio paint brushes around, but still, there’s a bigger amount of Photoshop brushes available.
Sadly, the type of file that clip studio paint brushes use is different.
Don’t feel discouraged though! It’s more than possible to use your favorite Photoshop Brushes on Clip Studio Paint as well. It only takes a few more steps.
Even though it can seem complex the first time, you’ll see that once you learn the process, it gets very easy and automatic for you, so let’s start:
1- Download abrMate
Photoshop brushes usually come compressed into one pack.
AbrMate is a free software that will let you open these packs and then save each individual brush into a file of your choice. Once you downloaded and installed abrMate, open it.
Now go to ‘Open Brush Set’ and select the brushes you want to convert. Wait for them to load on the software and once they’re ready, select ‘Export All Opened Brushes to .png’s’. Alternatively, if you want to convert only just one brush, select it and then choose the ‘Export Selected Brush to .png’.
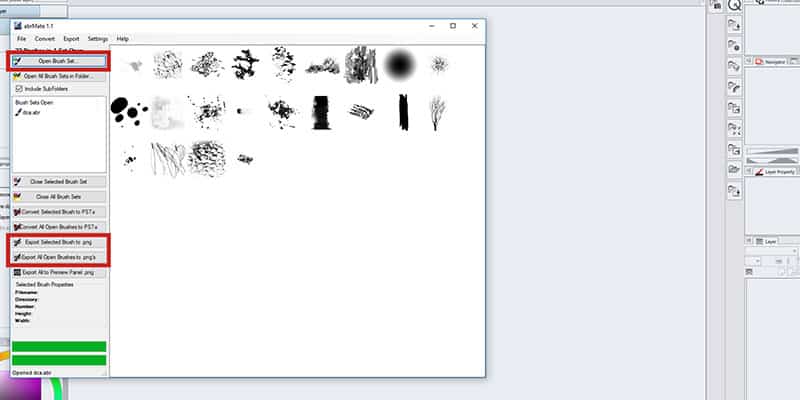
Choose a folder where you want your .png’s to go and click ok!
2- Open Clip Studio Paint
Go to Clip Studio and open one of the .png you have. Notice that you can’t convert all the brushes at the same time, so you’ll have to open each .png individually and convert it.
Right-click the layer and select ‘Convert Layer…’. A new window will appear. Here, go to the Expression Color’ option and select ‘Gray’. Now click ok.
It is important to change the mode of your image to grayscale or else when you convert it to a brush, it might not work properly. For example, you might not be able to change the color of the brush later on.
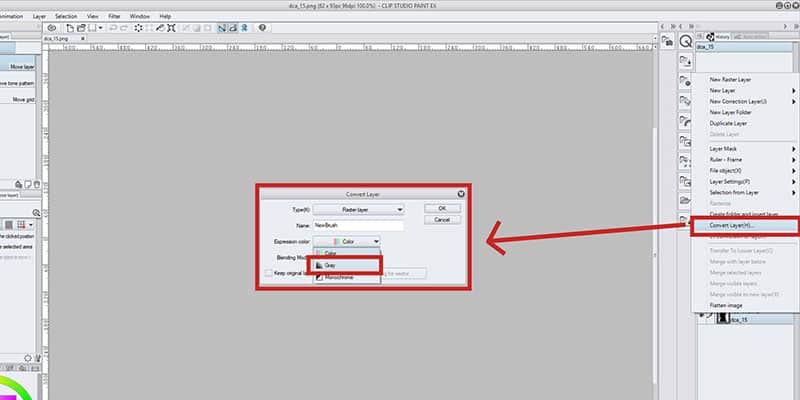
The image is now ready to be converted into a brush and that brings us to the next step!
3- Register the Material
In Clip Studio Paint, brushes, patterns, textures, and others are called materials. You can create your own or download them through their Asset app on the software. When creating your own brushes, for example, you need to register them as a material to be able to use later!
To do this, go to ‘Edit -> Register Material… -> Image’. A new window should appear. Here you can name your new material/brush, which I recommend so you can find it easily in a later step.
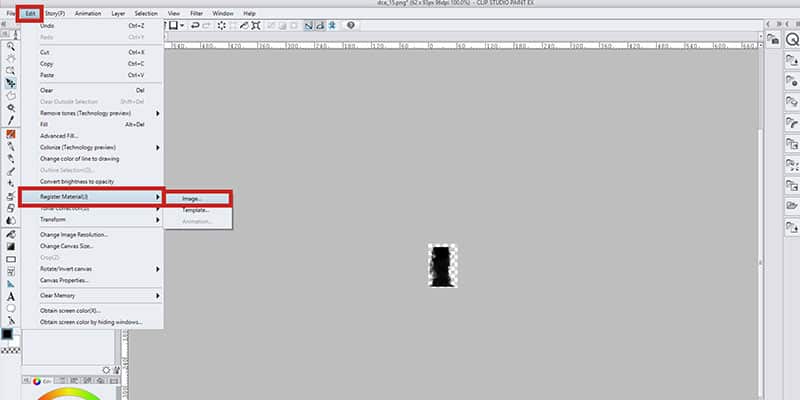
Now a very important step: enable the ‘Use for brush tip shape’ option! This is the most important thing to do here, the rest is very much optional, although I’d advise doing so for the sake of finding your brush more easily!
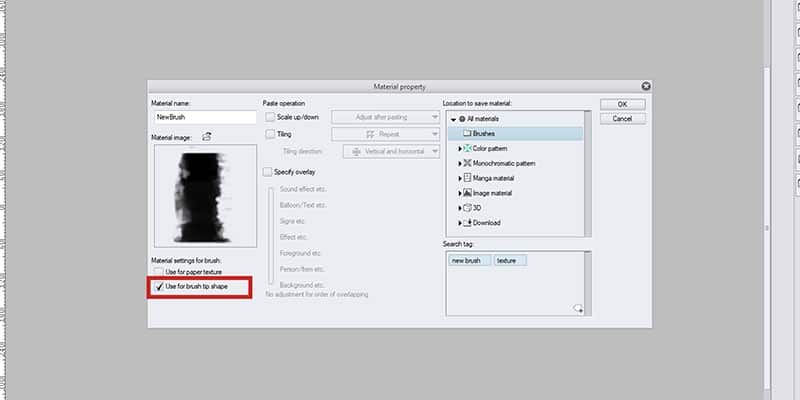
For example, you can choose where you want to save your material. Clip Studio has several material folders that you can choose from or you can create your own.
Finally, add a tag to your brush if you want. This can be whatever you want.
By adding tags to your materials, you can find them later on via the tags you chose for them.
Once you’re done, click ‘Ok’. Your new, converted brush is almost ready for use!
4- Import Your Photoshop Brush
Now it’s time to import your Photoshop brush into Clip Studio Paint.
Go to your toolbar and select one of your brush or pen tools. It doesn’t matter which, but it should be one where similar brushes are, for the sake of organization and for it to be easy to find when you want to use.
Now select one of the brushes.
Again, it doesn’t matter which, right-click on it and select ‘Duplicate sub tool…’. You can change its name, maybe for the name of the brush you’ll be importing or something that you might prefer.
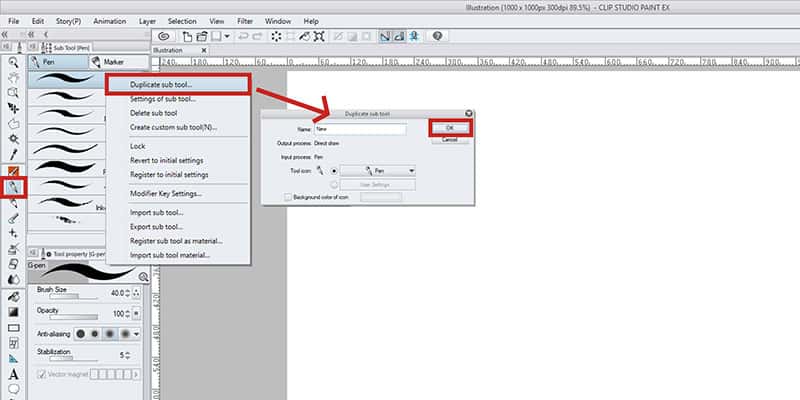
Now the duplicated sub tool should appear on your brushes tab. Select it and then click on the wrench icon on the Tool property window.
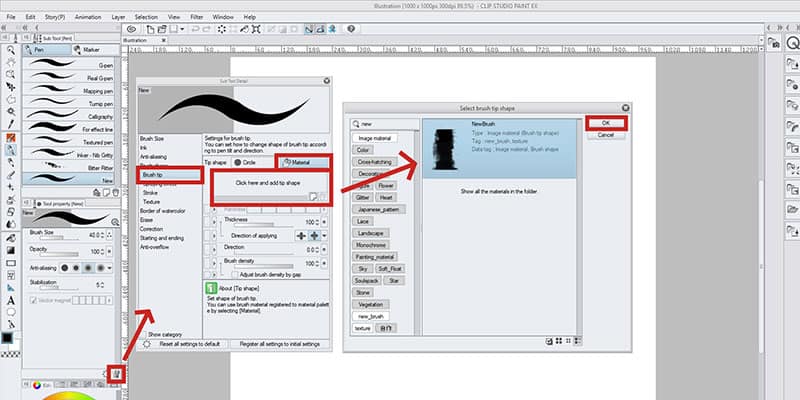
A new window will appear with a lot of options. Go to ‘Brush Tip’ and then select ‘Material’. Click on the frame and a new window will appear.
A window with several brush tips will appear. Simply select the one you just created and click ok.
To find your new brush more easily, type its name or tag on the search bar.
Enjoy your favorite Photoshop brush in Clip Studio Paint
Your brush is now ready to use. Open a new canvas and test it out.
If something seems off, you can always go to the brush settings again and customize it as you wish. Explore all the options and try them out until you feel the brush is exactly as you want.
Now, just repeat the same actions with all the other .png’s you created!
As I said, sadly you can’t convert all the brushes at once, so you’ll have to convert them individually until they’re all ready to use in Clip Studio.
On a good note, once you register these images to materials, they’re always ready to use in Clip Studio Paint.
And as another option, you can always import other clip studio paint brushes easily.
Patricia Caldeira is the main writer here at Don Corgi. She's an art teacher with over 20.000 happy students across many platforms and courses!
Enjoy your stay and as always:
Keep on drawing!


