Vector layers in Clip Studio Paint are very good to use, so I really recommend anyone to use them.
If you tend to draw line art, it is especially important to draw them in a vector layer, this way you can edit them easily and there are also settings that you can use to help you improve.
The most important reason to use vector layers is that your drawing won’t lose quality when editing and resizing the elements in these layers.
There’s a lot more to vector layers than this. With them, you can edit individual points and even create new ones on your lines, so you can edit and change them. You can use a vector eraser, that will help you erase lines faster, for example.
Here, you’ll learn everything you need about vectors in Clip Studio and how to use them, so let’s start!
Table Of Contents
- 1 Using Vector Layers In Clip Studio Paint To Draw Vector
- 2 Using The Vector Eraser In Vector Layers
- 3 Filling Vector Layers With Color
- 4 Changing The Brush Type Of A Vector Stroke
- 5 Connecting Vector Lines In Two Ways
- 6 Convert To Vector In Clip Studio Paint
- 7 Using The Figure Tool In Your Vector Drawing
- 8 Additional Questions
Using Vector Layers In Clip Studio Paint To Draw Vector
Using Vector Layers in Clip Studio can and will be very useful to you if you tend to resize your work a lot.
The main difference between a raster layer and a vector layer is that you can resize you drawings as many times as you wish in vector, without losing quality.

Usually, if you scale up and down something, the image will lose quality. This doesn’t happen if you draw your image in a vector layer.
I always draw my line art in vector layers… I can scale up the line art and it will keep the quality of the drawing.
As I got used to digital drawing, I started using these tools less and less, and now it’s very rare to do so. Use these helpers as much as you wish, because they’ll definitely make you a better artist.
Now, how to create a vector layer in Clip Studio.
Go to ‘Layer -> New Layer -> Vector Layer…’. A small window will appear. You don’t need to do much here though. Change its name if you wish to and like to have an organized workplace.
It is advisable to always name your layers, especially if you tend to work with a lot of them, so you can always find what you need easily!
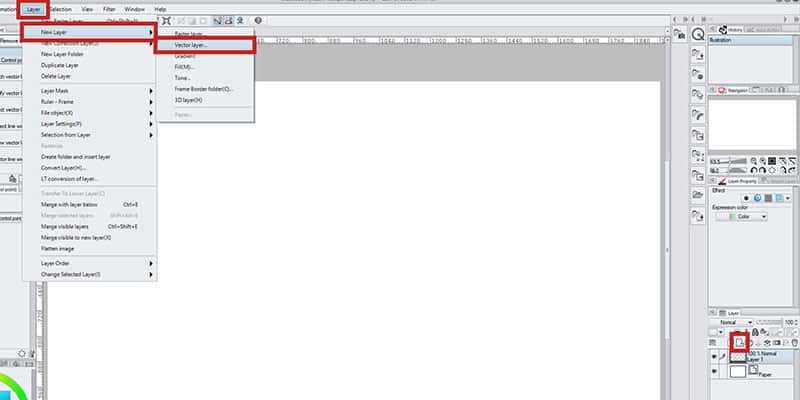
Alternatively, you can go to the layer tab, usually to your right and click on the ‘New Vector Layer’ button.
Using The Vector Eraser In Vector Layers
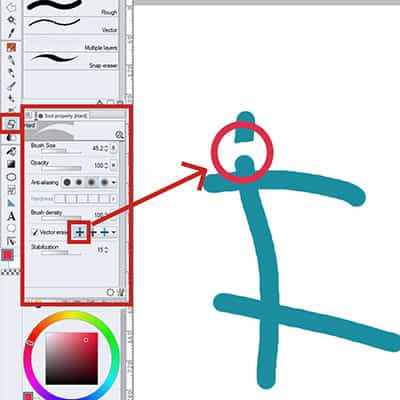
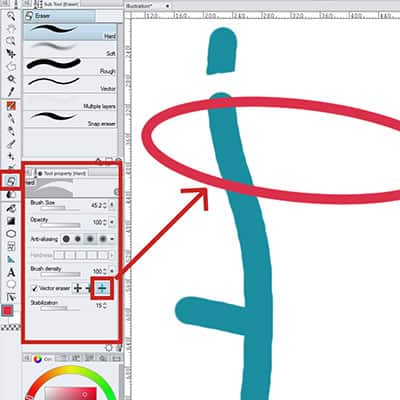
As I mentioned, there are tools and options to help you with your drawings. One of them is the vector eraser. You can only use this option if you have a vector layer selected.
So be sure that’s the case.
Now go to the toolbar and select the eraser tool.
You can also use the ‘E’ shortcut to quickly change your tool to an eraser. For more Clip Studio Paint Shortcuts, click here!
Now on the eraser property tab, to the left, there are quite a few options that you can customize to your liking.
Enable the vector eraser option. By using the vector eraser, you can erase a whole line with one simple stroke of the eraser.
Note that you have some options, ‘Erase touching part’, ‘Erase up to intersection’ and ‘Overall line’. Depending on which you choose, it will erase your line differently.
Here are some examples:
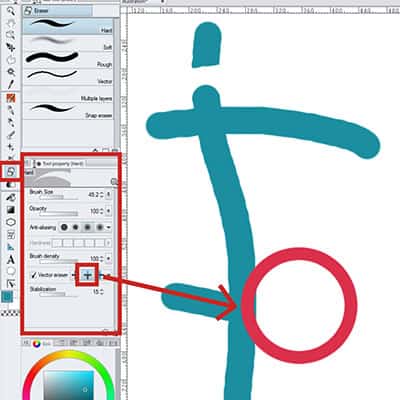
I usually use the middle option, but you might find others more useful.
As I said, this can be very helpful when you’re beginning your art journey and you don’t feel like you can control the tools perfectly.
But this is also very helpful if you want to erase a lot of lines or parts of it that you don’t need when drawing. It makes the process faster and easier for you.
Again, there’s no need to use it all the time if you prefer to erase by hand.
Filling Vector Layers With Color
This is another very useful tool and that will make you work quickly. I use this a lot when applying the base colors to my drawings.
This way, everything is set up faster and I can see the overall look.
But before you start, you can read more about which colors to use in this complete Color Theory guide right here!

When I need to change the colors because they’re not as balanced as I wished, I can do so very easily. Then, when I’m happy I just need to fill the gaps with a brush and onto the shadows we go!
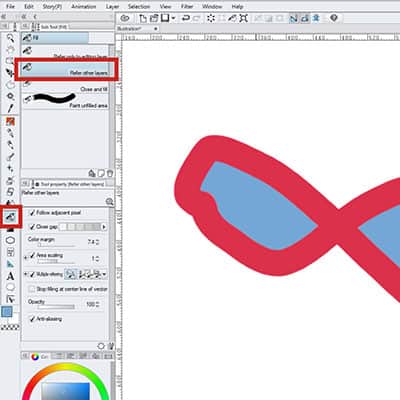
If you’re working with vector layers, it is worth warning you that you can’t use the fill or the paint bucket in them.
So, before adding color to our line art, create a new raster layer. Go to ‘Layer -> New Raster Layer’ or press the shortcut on your keyboard, which is ‘Ctrl+Shift+N’.
Now, this layer should be below the vector layer where your line art is.
The new layer you just created is where we’re adding our colors.
Now go on your toolbar and select the Paint Bucket Tool or press ‘G’ twice, for that’s the shortcut for it.
Notice that the fill property window has a few options. Choose the ‘Refer other layers’ option!
If you don’t activate this option, the fill tool won’t understand that you want only to paint inside the lines that you already have. If you use the paint bucket, it will fill the whole canvas with the color you chose.
However, with the ‘Refer other layers’ option active, the software will realize there are lines limiting the space and will only fill those shapes!
Easy as pie! There are other options here that can be helpful for you. As I said, I like to go with my brush and fill the gaps that the paint bucket missed.
But there’s actually another way to do it!
Choose the ‘Close and fill’ option.
Here, you need only to make a selection around the part you want it to color and the software will paint those gaps you’re selecting. It’s very easy and quick to use, and feel free to do so if you feel it helps you!
The same goes for the ‘Paint unfilled area’ option.
Instead of selecting, you’re using it as a brush. Paint the are that you want to be colored and the software will add color to the area selected.
Changing The Brush Type Of A Vector Stroke
Let’s say you want to change the brush you used on your lines. But, you don’t want to redo everything, all the work you just did and you even liked how the lines were looking!
Well, fear not. This is another reason why using vector layers for line art is so good and useful.
Go to the toolbar and select the ‘Operation’ tool. It’s the third icon on the toolbar, the one that looks like a cube with a small arrow in its corner.
Now on the tool property windows, you’ll notice you have quite some options. The last one is the ‘Brush Shape’! In here you can change the type of brush you have your lines into any other that is saved on Clip Studio!
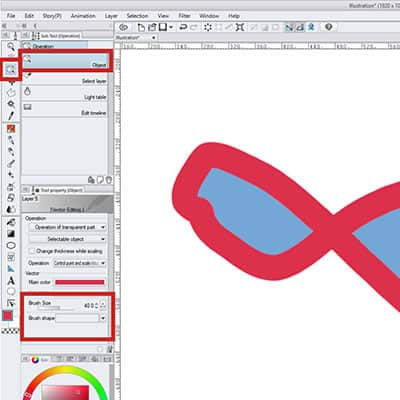
You can also change the thickness of the lines, their opacity, and their color! If you click on the small wrench icon at the bottom of the window, you can find some more settings that you can change and customize at will.
Connecting Vector Lines In Two Ways
Sometimes while drawing our lines, they might not go as intended or we just decide they look better differently or connected with each other.
I like to do these changes by hand, but again, in the beginning, I’d use some help.
And you might do so as well!
There are actually two ways to connect vector lines:
- Vector Line Connect
- Vector Magnet Option
One is very direct and the other serves more as a helper while drawing the line art.
Remember that for this to work, you need to draw your lines in a vector layer.
Vector Line Connect
Let’s say you drew a line or more, but they’re not connected. Either because you didn’t mean for them to connect or it was just a mistake. So, naturally, you want to join these two lines together.
You don’t need to erase them and repeat them!
Just go to the toolbar and select the last icon on it. The ‘Correct Line’ tool. There are quite a few options here, but what we need right now is the ‘Connect Vector Line’.
This tool works like a brush, similar to how we use the fill option I’ve mentioned above.
Just draw on top of the two lines you want to connect, the software will recognize the blank part and then will join both lines.
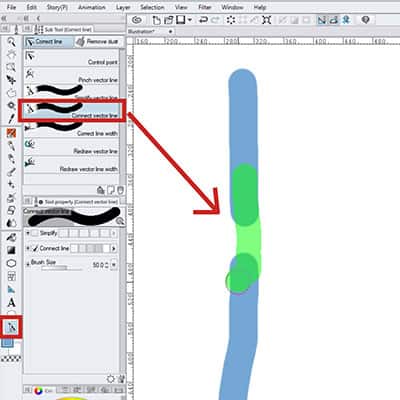
This is very useful when you want to make minor changes and connect lines that aren’t joined.
It’s quick and painless and the tool will make it so that the line stays with the same thickness and properties!
All the other options in the correct line sub tool window can also be quite helpful if you want to make more complex edits to your lines.
For example, you want to change the thickness of the line, but not to all of them, just some parts of it. The ‘Correct line width’ tool can do that for you.
You might also want to curve some parts of your lines and the ‘Pinch vector line’ can be of great help for that!
Explore each of these tools and experiment with them, if you tend to edit your vector lines a lot, I’m sure you’ll find these options very useful!
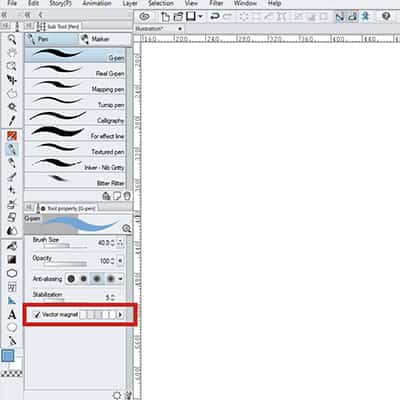
Vector Magnet option
The Vector Magnet is an option you must enable when you select a pen or brush.
It is also only available when you’re using a vector layer.
What this does is that it will help you make your lines and snap them so they’re all in a similar style and will connect the lines to each other.
This is very helpful if you’re just beginning and trying digital art and line art.
If you feel your lines are still too trembly and tense, then try to enable this option. It will help you make better lines and have more confidence in them.
I always recommend my students to practice a lot, it’s only with practice and repetition that we improve. But that doesn’t mean we can’t use helpers and this is one of them!
There are different levels to it. Start with it at the highest level if needed and then lower it as you get more confident.
You’ll notice that with practice and a little help you’ll get better and soon you won’t need these tools anymore! Just have fun!
Convert To Vector In Clip Studio Paint
Sometimes we’re too distracted and start drawing our line art in a raster layer. Two hours later, we noticed our mistake. It happens!
It has happened to me and I’m sure it will happen again. Don’t panic though, because this can be fixed!
There’s no need to create a new vector layer and redo all the lines again. Just select the layer you have ‘Right click -> Convert Layer…’. A small window will appear and now you can set up the layer as you want.
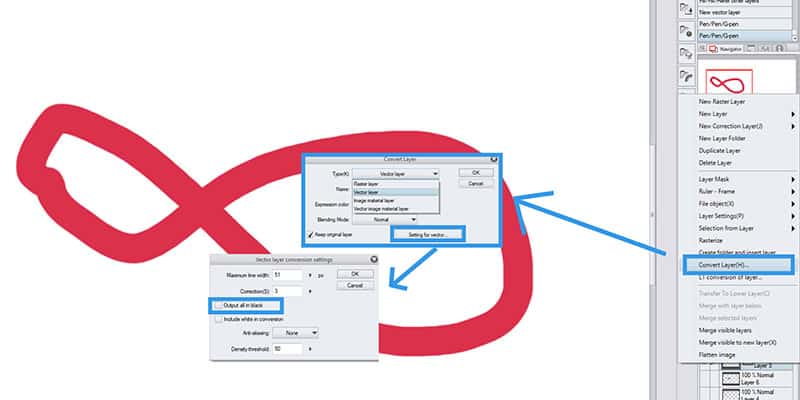
Since we want to convert our layer to a vector one, select ‘Vector Layer’ on the Type menu.
Now you can add a name to this layer if you wish to and change the color mode and others.
A small tip though!
When you convert the layer to vector, Clip Studio automatically sets it to change the content in the layer to black. Usually, I do my lines in black, so this wouldn’t be a problem, but if you are using color, this can be problematic.
Just click the ‘Setting for vector…’ button and a new, smaller window will appear.
As you can see there are some settings for you to change here, but the one we want right now is to thick off the ‘Output all in black’ option. Now the colors you used originally will remain when converting to vector layer!
Using The Figure Tool In Your Vector Drawing
Just like other drawing software, you can create shapes like circles, rectangles, and others on Clip Studio.
Go to its toolbar icon or press ‘U’ on your keyboard. There are several options to choose from, including lines, curved lines, and actual shapes.
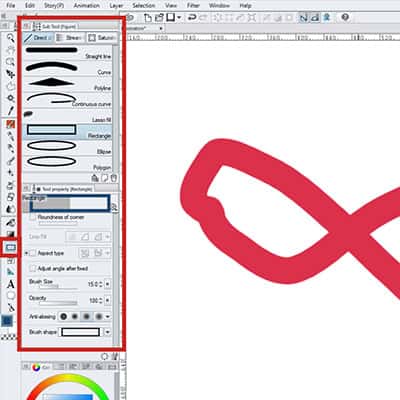
If done on a vector layer, you can control the points in the shapes or lines you just created or even create new points in them.
Clip Studio has a weird way to deal with vector and vector points, but it’s still possible to do so!
To edit the points in a shape you just need to go to the ‘Correct Line’ tool and then select the first option, ‘Control Point’.
It is worth mentioning though, that if you are creating shapes in a vector layer, you can only create outlines of these shapes.
You can not create a shape filled with color already. You might notice this is an option, but it only works on raster layers.
So if you drew a shape and want to color it, create a new raster layer below the shape and use the fill tool to add the color inside of it.
I highly recommend to always create your shapes with vector layers, because chances are you’re going to resize them and in vector, you can scale it up and down as many times as you wish without losing quality!
Additional Questions
Can I export vector drawings in Clip Studio Paint? Unfortunately, no. There’s no way to export a vector image in Clip Studio right now. But who knows, let’s hope for that in an update in a near future!
How do I change the lineart color in clip studio paint? To change the line art color, select the layer where you want the change to take place. Now go to the Layer Property window right above. Select ‘Layer Color’. Now pick the new color you want and apply it onto the bars. Your lines should change color right away!
Alright, now that you have your vector layers set up, it’s time to learn about the Reference Window in Clip Studio Paint, and how it can make you work faster!
Patricia Caldeira is the main writer here at Don Corgi. She's an art teacher with over 20.000 happy students across many platforms and courses!
Enjoy your stay and as always:
Keep on drawing!
Patricia’s courses have enrolled 22 000+ students around the world, in platforms such as Udemy, Skillshare, Gumroad and more.

")

")