If you ever wondered what is an orthographic drawing (also called an orthographic projection) and never quite figured it out, you’ve come to the right place!
An orthographic drawing is quite different from an isometric drawing, but they are related! I’ll explain that further below.
What is an orthographic drawing? An orthographic drawing or orthographic projection is a representation of a three-dimensional-object using several two-dimensional planes.
You can use an orthographic drawing to better see objects in 3D, or to plan a complex object or environment!
There are a few more things you need to know about orthographic drawing, so let’s talk about those.
Table Of Contents
- 1 What You’ll Learn About Orthographic Drawing
- 2 Why Are Orthographic Drawings Important?
- 3 Orthographic Drawing Examples
- 4 The 6 Views Of Orthographic Projection
- 5 Orthographic Drawing And Isometric Drawing Differences
- 6 Types of Orthographic Projection
- 7 How To Draw An Orthographic Drawing
- 8 Related Questions
What You’ll Learn About Orthographic Drawing
In this article, you’ll learn:
- What an orthographic drawing is.
- See numerous clear orthographic drawing examples.
- Understand the 6 standard views.
- Learn the difference between orthographic and isometric views.
- How to start creating your own orthographic drawings.
Why Are Orthographic Drawings Important?
Orthographic drawings are important for artists to better see the objects they’re drawing in a 3D space.
Not only does it help you do this, but it also allows other people who are interested in drawing that object to know all the specifics of the object from ANY angle.
Think of it like a blueprint for the object you’re drawing!
Or imagine you’re trying to describe a beautiful table to someone. It’s easier if you just take a few photos from each angle and show it to them, right? That would be something close to an orthographic projection.
Orthographic projections are also very important to use in Cartography (where the plane is projected into a globe) and computer graphics.

It makes it MUCH easier to get the measurements right than, for example, using isometric projections (which we talk about further below) instead.
When using other types of projection, we tend to use perspective, and that makes the overall drawing unusable for measuring an object correctly.
Orthographic Drawing Examples
Now that you know all about what is an orthographic drawing or projection and why it is important, I’ll show you some orthographic drawing examples that you can study from!
Feel free to copy these orthographic projection examples to practice and improve your artwork.
Vehicle Blueprints Ortographic Drawing Examples
Practically all motorcycles and cars have orthographic projection
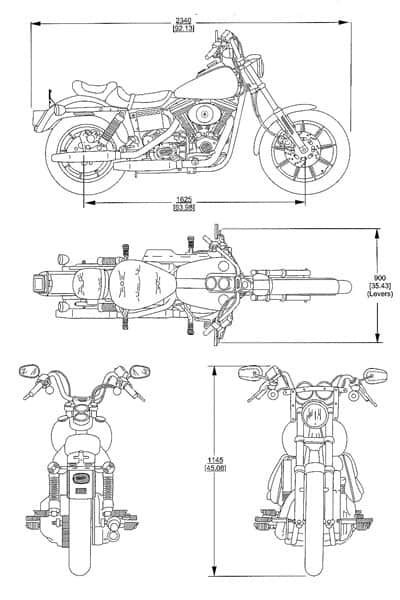
This Harley Davidson FS2 blueprint excellently demonstrates multiview projections.
A fundamental type of orthographic drawing, by providing clear front, rear, top, and side views essential for understanding the motorcycle’s design.
The orthographic projection of the Ford V3000S effectively uses standard front, rear, and side views, showcasing how these types of orthographic drawing accurately convey the vehicle’s form and dimensions.
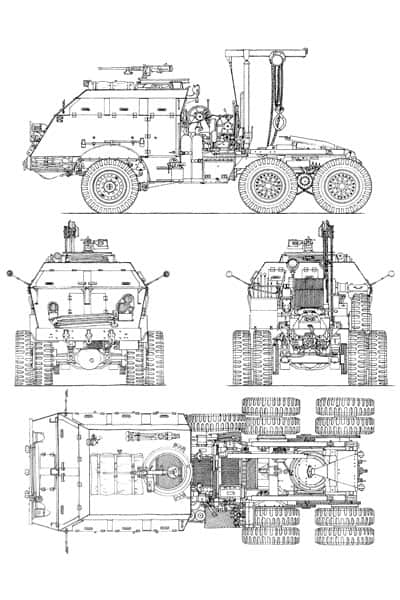
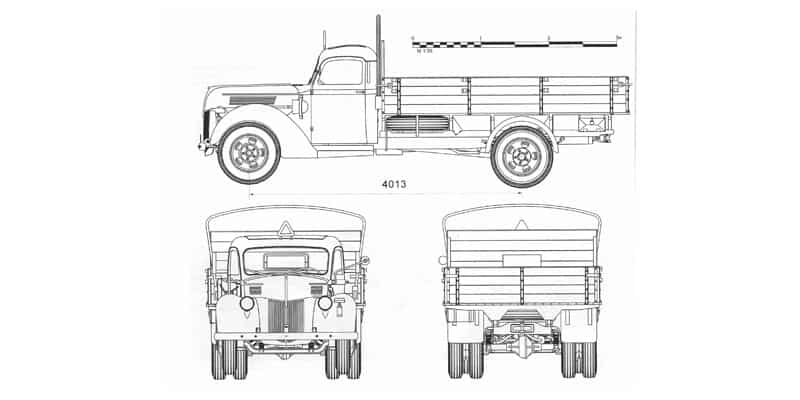
This detailed orthographic sketch of the M25 Tank Transporter utilizes multiview projections to present comprehensive front, top, rear, and side views, crucial for visualizing the vehicle’s complex structure.
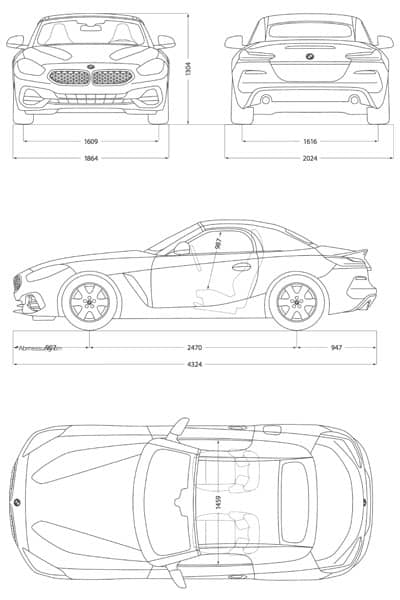
The BMW Z4 2018 blueprint is a fine example of orthographic projection.
Offering precise front, rear, side, and top views that clearly define the car’s contours, distinct from an axonometric view which would show three dimensions at once.
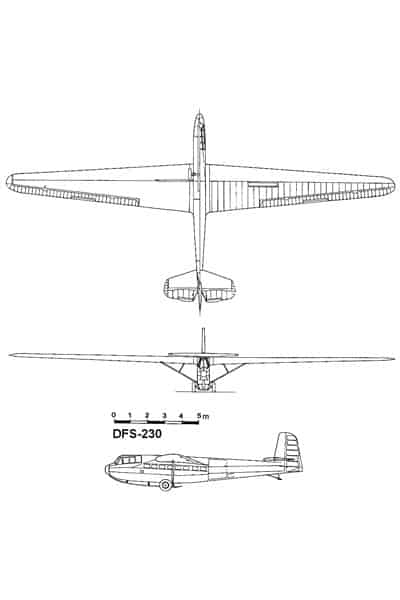
This DFS 230 aircraft blueprint employs key types of orthographic drawing.
Specifically top, front, and side views, to create an accurate engineering representation suitable for its construction, forming a complete orthographic projection.
Architecture Orthographic Drawing Examples
This image showcases multiple plan views, a fundamental type of orthographic drawing, to clearly represent the layout and spatial relationships within different levels of a building.
These multiview projections are presented without perspective, allowing for an accurate understanding of the design.

This second example is a section view, another key type of orthographic projection, which reveals the internal composition of the building along a vertical cut!
This multiview projection is crucial for understanding the building’s construction, material layers, and vertical relationships between spaces.

This drawing is an axonometric projection, specifically a planometric or axonometric plan, which offers a three-dimensional view of a floor plan while maintaining parallel lines and true measurements on the principal planes.
This type of orthographic projection effectively communicates the spatial arrangement and volume of the rooms from a bird’s-eye, yet three-dimensional, perspective.
Simple Objects Orthographic Drawing Examples
Ortographic projections and sketches can be applied to simple objects as well!
Let’s go over some examples.
This first image, showcasing an origami jumping frog, is a good example of an orthographic sketch using multiview projections.
It effectively communicates the frog’s form through a top view, a front view, and a side view, along with an axonometric projection to provide a 3D representation.
Even rings can be drawn orthographically, like this one! This features orthographic projections of a ring.
It demonstrates how different types of orthographic drawing can clearly define a complex curved object.
The top, front, and side multiview projections accurately depict the ring’s geometry and details from various perspectives.
The 6 Views Of Orthographic Projection
There are 6 views of orthographic projection, but mostly there are only used three of them.
The three main views used in orthographic projection/drawing are the Front, Side, and Plan (Top) view.
With only these 3 views, you can already have a very clear idea of how the object looks, and you can detail it quite well if you try to build a 3D version of it.
But as I said, there are actually 6 different views of orthographic projection, and these are:
- Top View (Plan)
- Bottom View
- Back View
- Front View
- Right Side View
- Left Side View
With these 6 different views, you can create a super detailed 3D object since all the angles are covered.
Artists should just use the 3 views orthographic projection if all 3 of these points are true:
- Both sides of the object are symmetrical. This means that you don’t need to separate them into a right and left side view.
- The bottom doesn’t matter for the product or is equal to the top (plan) of the object. If the bottom part won’t be used (either on a product or on a final isometric drawing) then you can skip this view. The same is true if the bottom and the top part of the object are equally designed, since you already have a top view drawn, it would be a waste of time to draw it again for the bottom view.
- The front and back view of the object is the same. Basically the same as before, if they are the same there is no point in drawing the same view twice. Okay, it’s not EXACTLY the same view, but the drawing would be the same. You get the point.
The 6-point orthographic drawing is one of the most spot-on orthographic drawings that you can design since it covers every little detail from every angle.
Orthographic Drawing And Isometric Drawing Differences
Even though an orthographic drawing and an isometric drawing are very correlated, there are a few major differences between them.
In fact, the major difference is that an orthographic drawing is a two-dimensional representation of an object, with all the views represented in it.
And an isometric drawing is a three-dimensional representation of that same object. Now, since we’re drawing on paper we can’t quite make it 3D, so we call it an isometric drawing.
You can even use some orthographic paper (click to check it out on Amazon) to help you with the drawings!

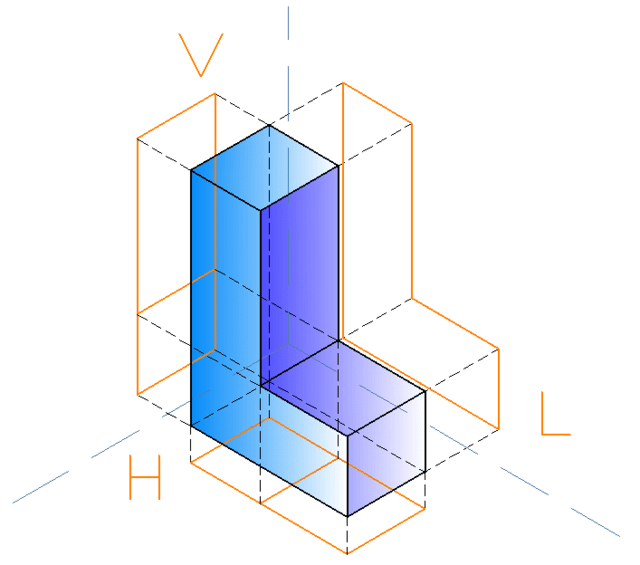
The isometric view is on the left and the orthographic view is the 2D planes broken down into separate pieces, on the right and below.
As you can see with the image above, there’s quite a difference between an isometric view and an orthographic view, but you can create one from the other!
This is also a quite useful exercise to better place your objects and environment correctly with all the details, in different drawings.
Types of Orthographic Projection
Alright, so you know that orthographic drawings give us those super clear, flat views of an object.
But guess what? There isn’t just one way to do it!
Orthographic projections come in several flavors, depending on what and how you want to show it. Think of them as different tools in your artist or designer toolkit.
Let’s break them down:
1. Multiview Projections: The “Separate Snapshots” Approach
This is probably what most people think of when they hear “orthographic drawing,” especially if they’ve seen blueprints.
- The Big Idea: Imagine you have your simple object. With multiview projection, you take separate “snapshots” of it from specific angles: directly from the front, directly from the top, directly from the side, and so on. Each snapshot becomes a flat, 2D view.
- Like a Glass Box: A classic way to explain this is to imagine your object is sitting inside a glass box. You trace the object’s outline onto each pane of glass (front, top, right side). Then, you “unfold” the box so all those panes lie flat on your drawing paper. Voila!
- What You Get:
- Multiple Flat Pictures: You’ll typically see two to six of these views. The most common trio is the front view, top view, and right-side view.
- True Shapes & Sizes (Mostly!): The cool part is that any face of your object that’s looking directly at you in a particular view (parallel to your “camera”) will show its true shape and size in that view. No weird distortions!
- Neatly Lined Up: These views aren’t just randomly placed; they’re carefully aligned. So, the top view is always directly above the front view, and the side view is lined up with the front view. This helps your brain connect all the pieces.
- Arrangement Styles (A Quick Note): There are two main ways to arrange these views on the page, called First-Angle Projection (popular in Europe/Asia) and Third-Angle Projection (the go-to in the US/Canada). They just flip how the “glass box” unfolds.
- Why Use It? This is your champion for anything that needs to be built or manufactured precisely. It gives all the nitty-gritty details, leaving no room for guesswork.
2. Axonometric Projections: The “All-In-One 3D-ish” View
Now, what if you want to give someone a good idea of what the object looks like in 3D, but in a single drawing?
That’s where axonometric projections shine!
And hey, this is where your isometric drawings fit in – they’re a type of axonometric(1) projection!
- The Big Idea: Instead of looking at the object dead-on from each side, you tilt and rotate it so you can see multiple faces (like the top, front, and side) all in one go. It still uses those parallel projection lines (like all orthographic drawings), but the object itself is angled.
- What You Get:
- One 3D-Looking Picture: It gives you a more intuitive, visual feel for the object’s overall form.
- A Bit of “Squishing” (Foreshortening): Because the object is tilted, lines that aren’t parallel to your “drawing screen” will look a bit shorter than they are in real life. This is called foreshortening. How much they squish depends on the type of axonometric view.
- The Axonometric Family: There are three main members here, and they differ by how much you tilt the object:
- a. Isometric Projection:
- This is the superstar! All three main directions (height, width, depth) are tilted equally to your view.
- This means lines along these directions are either drawn to their true length (common in “isometric drawings” for simplicity) or are equally foreshortened. The angles between the main axes on your drawing paper look like they’re all 120 degrees apart.
- It’s super popular because it’s relatively easy to draw and looks nicely balanced.
- b. Dimetric Projection:
- Here, two of the main directions are tilted equally, and the third one is tilted differently.
- So, two directions will have the same amount of “squishing,” and the third will be squished more or less.
- c. Trimetric Projection:
- You guessed it! All three main directions are tilted differently.
- This means all three directions have different amounts of “squishing.” It can look the most realistic of the axonometric family, but it’s also the trickiest to set up and draw.
- a. Isometric Projection:
- Why Use It? Axonometric drawings are fantastic for things like instruction manuals, assembly guides, or just showing off what your design looks like in a way that’s easy to grasp visually. They’re not usually the first choice for exact manufacturing dimensions (because of that foreshortening), but they’re brilliant for understanding form.
So, whether you need the nitty-gritty details with multiviews or a quick 3D visual with axonometric (like isometric!), orthographic projection has got you covered!
How To Draw An Orthographic Drawing
Ready to start drawing your own orthographic projections? Then let’s do this.
The process is very simple, here’s what you need to do:
- Choose an object. Doesn’t matter if it’s a small object or a big object or a vehicle, it’s totally up to you! My recommendation is that you start with a small object with fewer details, and then you can draw a bigger orthographic projection later on.
- Take photos of your objects. This part is important to get right, you want to take photos of your object from several different views without changing how far you are from it. Now how many photos you want to take or how many views you want to draw is totally up to you. My recommendation is to just start with the 3 main views we talked about (Top, Side, and Front) and then move on to more views as you get better.
- Draw the views! Now you just need to draw the views of the object! Try to draw them close to each other like the examples I’ve shown you above, so that you can keep the proportions right.
Here’s a fun example of photos taken of an object in the 3 main views, and the object in an isometric view by “dlister86” on Instagram.
Remember that it’s all about the practice until you get it right!
Your first few orthographic drawings might not look like much, but they will improve and get better the more you do them.
I recommend you check this great tutorial by 3DNaomi to help you with your Orthographic projection drawings!

Related Questions
How many views do you need for an orthographic drawing or projection? In most cases, 3 views are enough for orthographic drawing and are the most important ones to have. The front, side, and plan view. But there can be as many as 6 views to make the orthographic drawing more complete!
Now that we’ve covered Orthographic drawing and projection, be sure to check out my article on the 4 Types of Perspective Drawing And When To Use Them here!
Patricia Caldeira is the main writer here at Don Corgi. She's an art teacher with over 20.000 happy students across many platforms and courses!
Enjoy your stay and as always:
Keep on drawing!
Patricia’s courses have enrolled 22 000+ students around the world, in platforms such as Udemy, Skillshare, Gumroad and more.
")

")
")