It is important to know how to install new brushes in Clip Studio Paint.
After all, we just got some new and good-looking brushes to have some fun with, and we need to add them to the software! There aren’t as many Clip Studio Brushes around as we wish, but there’s still some very good material.
You can even use Photoshop Brushes in Clip Studio Paint with a few steps!
How can you import brushes in Clip Studio Paint? The easiest way is to simply drag the brushes from their folder into a Brush/Pen tab you have opened in Clip Studio Paint.
There are other ways to do it; depending on whether you’re on a computer or an iPad, you’ll have to import them differently.
I’ll explain each method right here, accompanied by images to make to whole process easier for you!
Table Of Contents
Importing Brushes In Clip Studio Paint

Importing Brushes in Clip Studio Paint is fairly easy, as long as they’re specifically made for Clip Studio. These brushes are usually named with the .sut extension!
There are actually two ways to import brushes. A more complex one, but not too much, basically it just take quite a few extra steps.
And then the easiest one, which is very useful if you’re importing more than one brush!
👉 Let’s start with the first method. Go to your pen or brushes tab.
Right-click any brush in it. Again, it doesn’t really matter which one because it won’t replace it. Now go down and click ‘Import Subtool…’. A new window will open and you just need to find the location of your brush and select it. Click Ok and it’s done!
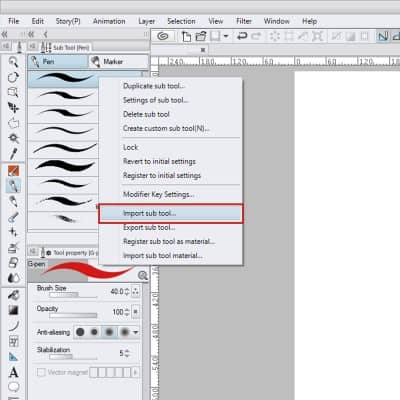
You’ll notice that the brush you just imported will be at the bottom of the list of brushes in that tab. If you wish to change its place simply click and hold it and move the brush to where you want it.
For example, you can create a new Subtool tab, by dragging it to the side of the tab you’re on.
You can put it in another Subtool tab by dragging it to the top of an existing tab and releasing it. Finally, you can also create a new brush tool icon on the toolbar. You just need to grab it and drag it in between icons!
❗ The second method is much more simple.
You can actually use this method to add just one brush as well. Open up Clip Studio Paint, choose one of the brush or pen tabs. Whichever you prefer. Now open the folder where you have your new brushes.
Select as many as you wish and drag them to the brushes tab. That’s it! The brushes you just imported will appear right away and are now ready to use.
If you want to give your brushes a more personal touch though, you might be interested in creating your own brushes in Clip Studio Paint, which you can learn how to do right here!
How To Import Brushes Into Clip Studio Paint For iPad
There are different ways to import your Brushes into Clip Studio Paint for iPad. The main difference is where you have them stored.
You can save your brushes in the Dropbox, for example.
First, open Clip Studio Paint, and choose one of the brush or pen tabs. Make sure that’s where you want your new brush to be in.
Now go to the Dropbox app and select the brush you want. Select ‘Export -> Open In…’, now choose Clip Studio!
And that’s it! If you go back to Clip Studio, you’ll notice your new brush in the tab you left open. If not, try to close and open Clip Studio again to refresh it.
Other than Dropbox, you can also import your brushes from Google Drive!
Just like before, be sure the tab where you want your brush to go is open in Clip Studio Paint. Then select the brush you want in Google Drive, select ‘Open In…’ and then ‘Copy to Clip Studio’.
Your new brush should now be ready to use!
Notice that you should have each individual .sut file available both in Dropbox and Google Drive instead of a .zip folder. Be sure to unzip the brushes you want and then you can import them.
Unfortunately, I don’t know of any way of importing more than one brush at a time. You need to go one by one. Still, it is rather simple to import your brushes and once in Clip Studio Paint you can move them to any tab you want, just like we do on the computer!
How To Download Brushes From Clip Studio Assets
Clip Studio Paint has a very handy tool where you can download new and different material. It can be brushes, models, textures, etc.
There’s a lot you can find there and they’re made by other artists and Clip Studio users. There are paid assets, but there’s also a vast array of free assets that you can download and use!
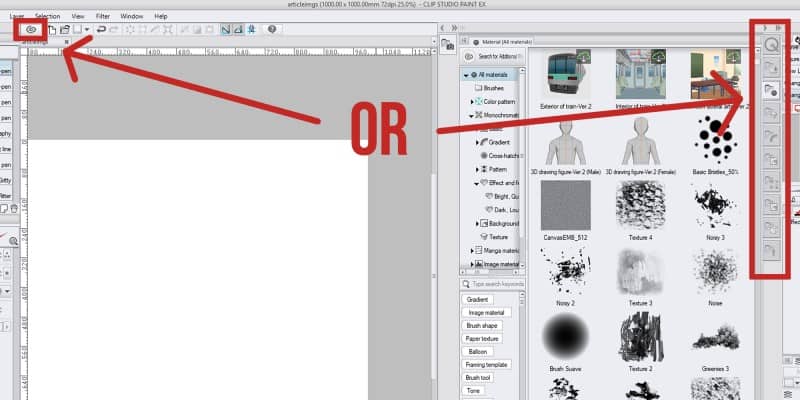
To access this, simply open the Material Tab and then select the ‘Search for Additional Materials’ button. Alternatively, you can also click the third icon on the tab below the menus!
To download a brush, you need to have a Clip Studio account. Be sure to register and login before trying to download anything, because it will ask you for it!
Now that you’re set, feel free to search for brushes or other materials. If there’s something you want to use on Clip Studio, simply open it and then click the ‘Dowload’ button to the right.
When you download a brush, you can then go back to Clip Studio Paint, go to the Material bar on the right side of your screen and go to the ‘Download’ folder. The brush you just downloaded should appear there!
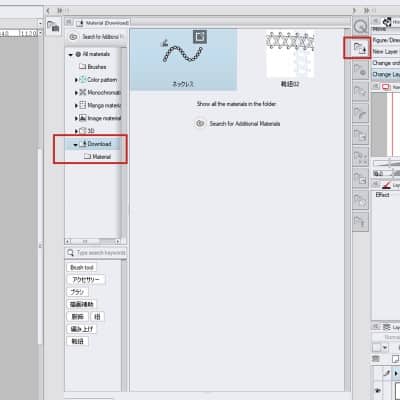
If you had this folder already open, you might need to click another folder and then go back to the downloaded material so it refreshes.
Now you just need to grab your new brush and drag it to the Pen or Brush tab you have selected! The brush you downloaded is now ready to use.
Again, you can move it to another tab if you wish to. Just click on it and drag the brush to where you want it to be!
All material assets that you download can be used both for non-commercial and commercial uses. So feel free to explore the materials available and try them out.
You can always credit the people that made the assets so other people can find their work as well and use it!
Additional Questions
How do I export clip studio brushes? To export a brush, simply right-click on it then select ‘Export Subtool…’. Choose a location and save it. You can create your own brushes in Clip Studio and export them to share or sell with other people!
Can I give the downloaded material to another person? No. When downloading something from the Asset store you cannot give it to someone else nor sell it as your own. If you want another friend to use it, simply show it to them, so they can download the material as well!
Tip: Always consider using Vector Layers in Clip Studio Paint so you’ll never lose quality!
Patricia Caldeira is the main writer here at Don Corgi. She's an art teacher with over 20.000 happy students across many platforms and courses!
Enjoy your stay and as always:
Keep on drawing!

")

")