I love to draw Corgis, they are definitely one of my favorite dog breeds!
They’re so small and weirdly proportioned.
So, of course, I wanted to figure out correctly how to draw such a cute animal! I know that dogs or even animals, in general, can seem hard to draw. Especially if you’re not used to it!
Generally, I draw people more often than dogs, but it’s all the same logic!
Draw the main shapes and go from there.
How can you draw an adorable Corgi? Simple. Break your subject down into simple shapes and build your drawing from there! Following this step-by-step guide, you’ll learn how to draw an adorable Corgi quickly.
I will go over my whole process with very simple steps so you can follow this tutorial and not feel overburdened, so let’s start!
Table Of Contents
- 1 Drawing A Corgi Step-By-Step
- 1.1 1- Draw A Big Rounded Rectangle
- 1.2 2- Add A Small Box On The Top Corner For The Neck
- 1.3 3- Draw a Half Circle For The Tail
- 1.4 4- Add Tiny Squares For The Paws
- 1.5 5- Draw A Square Shaped Box And Triangle For Head
- 1.6 6- Draw Triangles For The Ears
- 1.7 7- Sketch Up the Fur And Add Details!
- 1.8 8- Draw The Lineart Of Our Corgi Drawing
- 1.9 9- Color Your Drawing Of A Corgi
- 2 Try Different Corgi Shapes!
- 3 Drawing Dog Expressions
Drawing A Corgi Step-By-Step
When drawing a new subject I like to start with very simple shapes.
Nothing too complicated, just basic shapes like rectangles, circles, triangles, etc.
Just follow this guide on how to draw a corgi step by step!
1- Draw A Big Rounded Rectangle
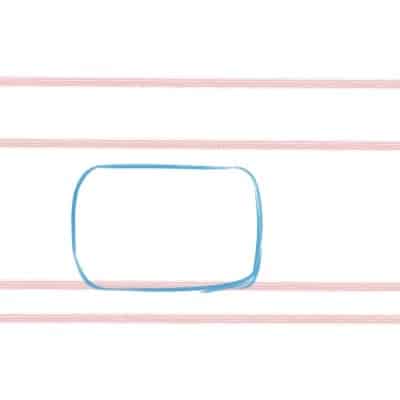
Corgi’s bodies are very rectangular. So that’s the first shape that comes to my mind and that I put down on paper.
Like a big loaf of bread from the side.
With only one shape, we already have a big part of our Corgi drawn!
You can make your rectangle as rounded as you wish. I always like to give it some roundness right away, to appeal to the cute fluffy side of Corgis.
2- Add A Small Box On The Top Corner For The Neck
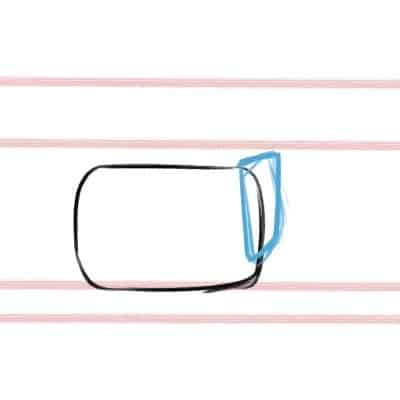
Now draw a small box on the top corner for the neck, we can worry about the side of the head later!
Corgis are very small and disproportionate.
Even though they look like it’s just a body and head, there’s still a neck there, and we need to draw it.
This is a very small shape to help us figure out where and how the head should be!
3- Draw a Half Circle For The Tail
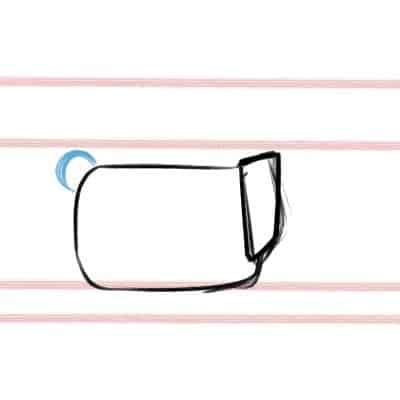
Before drawing the head and its features, let’s add some other very simple but also very important shapes!
On the opposite side of the rectangle, let’s add a half circle.
Simply draw a curved line for the tail.
It’s very rare to see Corgis with tails, so we’re going for the stub as a tail since it’s the most common.
Use light lines with your pencil or pen if you’d like for now!
Wen can worry about cleaning everything up and erase what looks wrong later.
4- Add Tiny Squares For The Paws
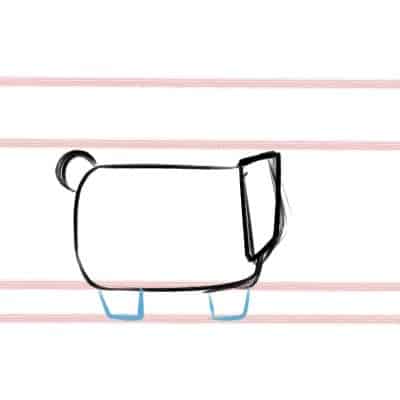
Now, draw two small boxes for the Paws!
Corgis legs are very, very short. This is one of the features that make them look so cute.
And that’s why we add such small shapes.
We can barely see the paws, tiny little things underneath the body and fur.
Feel free to exaggerate your shapes according to your style and how cartoony you want your drawing to be. Depending on your taste and style, our drawings will look different from one another.
This is always a good time to experiment and try different things, so you can figure out how you like your art to look!
5- Draw A Square Shaped Box And Triangle For Head
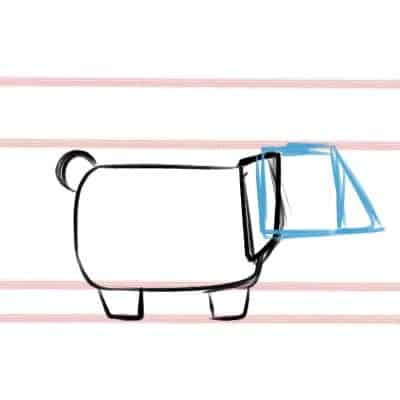
For the corgi’s head, add a square-shaped box and a triangle for the snout!
Leave the top of the head very flat for now.
Let’s not add too much here yet. We’ll need to draw the face, but we’ll leave that for the next stage.
But if you look at what we have right now, it’s already starting to look like a dog!
Just one thing missing.
6- Draw Triangles For The Ears
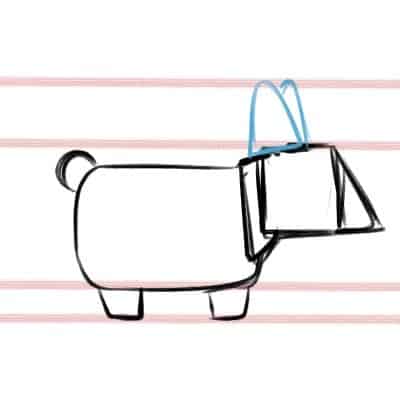
Corgis usually have rounded tips at the end of their Ears so don’t make them too sharp!
You can add the ears by drawing two rounded Triangle shapes next to each other on top of the previous box we did for the Head.
We can worry about the inside of the ears of our cartoon corgi drawing later!
We now have the General shape of our Corgi Dog. Well done!
With very simple shapes, we already have something that resembles a Corgi.
Now, we just need to refine our drawing and clean it up.
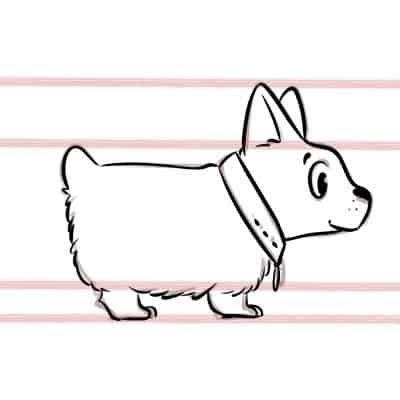
7- Sketch Up the Fur And Add Details!
Before doing our final lines, I like to do a second sketch.
Here I add more details and have a better idea of where everything is and how it’s going to look.
Add small lines for the fuzzy and furry hairy parts of the Dog, like under the belly, near the legs, and Neck.
Next, we add a small nose and an Eye for the Dog.
You can do any shape you want, I will go with a Simple Round Eye. Feel free to add a Collar as well if you’d like!
This is the perfect time to add personalized details to your cute corgi drawing.
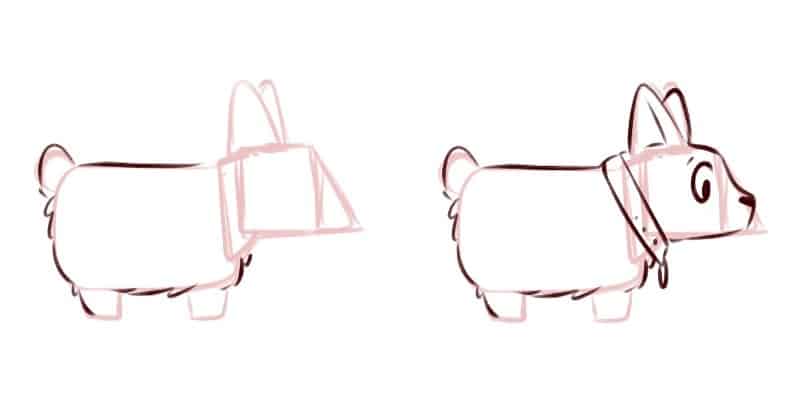
You can add a collar or any other kind of accessory! Like a flower crown or a bow on the neck or tail.
Let your imagination roam and try out new and different things.
Finally, we can also add some more detail to the paws.
We only have stubs right now, and we can add little toes to them! It all depends on how simple you want your style to be.
You can leave them as squared shapes to appeal more to the cuteness of a Corgi or give it more detail. Just have fun!
Don’t rush it. Loosen up and enjoy the process.
Remember, this is only your sketch, so use simple lines for our pembroke welsh corgi drawing.
It doesn’t need to look perfect right now.
That’s for our next step!
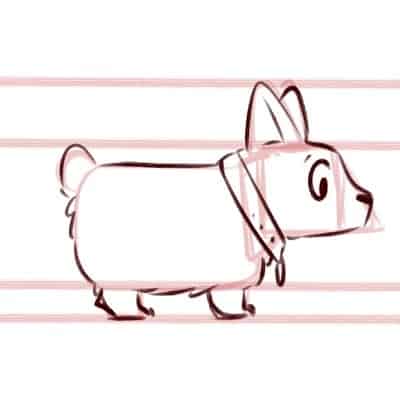
8- Draw The Lineart Of Our Corgi Drawing
We started with shapes, then a final sketch to lay everything we needed down. Now, let’s get started by cleaning up our lineart!
On top of your sketch, draw your final lineart. Take all the time you need and relax.
If you’re doing this traditionally, use a pen and erase the pencil lines later.
Digitally, just add a new layer on top!
Draw long smooth lines when you feel they’re needed and short lines for the fur.
You’ve done all of this already in your sketch, now it’s all a matter of repeating the process!
9- Color Your Drawing Of A Corgi
We are mostly done with our drawing, now all we are missing is to color our cartoon corgi’s fur!
This doesn’t need to be too complicated, either.
So start with the Base colors, choose a color that you’d like your Corgi main Body to be, and start Painting!
The most common colors for a corgi are cream-tone or black.
Then paint the Details: the Collar, the Eye, the little Medal, keeping everything pretty simple.
They also have very characteristic patterns, so remember to add those!
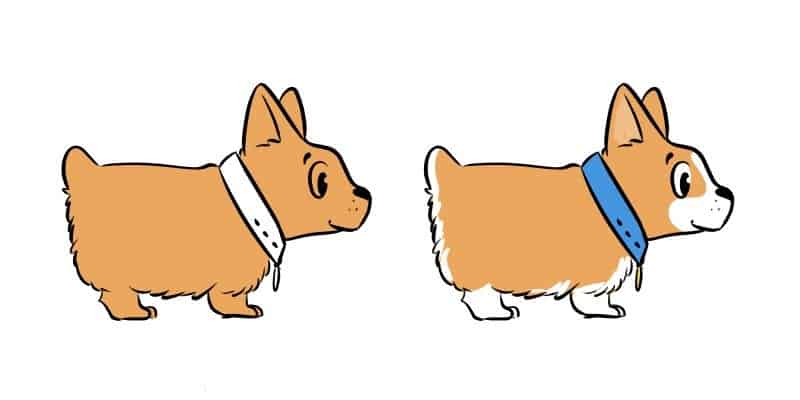
And you’re done! You can now (hopefully) draw an adorable Corgi with very simple and easy shapes with this drawing tutorial.
Look at that cute muzzle!
Just go step-by-step, without worries, and have fun while doing so. I’m sure you’ll end with a very good drawing!
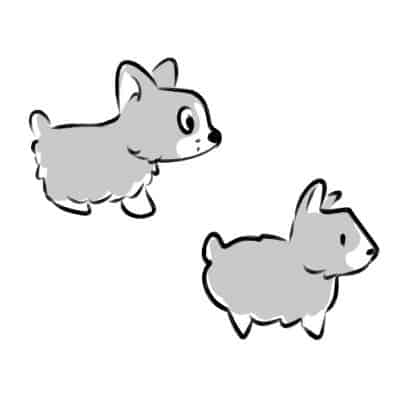
Try Different Corgi Shapes!
Now, I gave you a step-by-step guide, but this doesn’t mean you need to follow these steps strictly.
Be inventive with your shapes!
Try different shapes or even play with the proportions. You can exaggerate even more how long the body is. Or draw the head with very big ears.
There are lots of options for you to explore, and I highly recommend you to experiment with them.
This is how we improve as artists and find our own art style!
By experimenting, by looking at how other artists express their art. We’re always learning and always improving.
You can look for more photo references or other artists that draw dogs and corgis.
This is always a good way to find inspiration and maybe even understand and learn something new.
We constantly learn with the world around us and other people. As always, all these are just a stepping stone for your own style and drawings.
The goal is not to either copy exactly what we see (unless you’re really aiming for realistic art) or to copy other people.
The goal is to learn with others, so we can improve and do our own thing. And, as always, while having fun with our drawings!
Take your time by trying our different shapes for your Corgi drawings. I’m sure you can get hilarious looking Corgis or even cuter! This is what makes drawing fun: experimenting, even if it looks or sounds silly.
Drawing Dog Expressions
If you’re going with the cartoony style, play with expressions. Even dogs in real life will show different expressions!
Happy, sad, nervous or scared. Anything you want.
It’s also a good idea to make an expression sheet if you wish to.
Practice your expressions and when you’re happy with them, add them to the sheet. This way, you have something to go back to if you can’t remember or something’s missing in your drawing.
When drawing the expressions, it is the same logic as with when drawing people’s emotions. Happy and positive emotions are very open, and that will show in the drawings.
While negative expressions are the opposite!
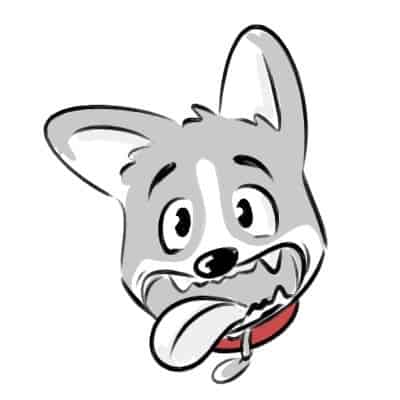
Again it’s good to find references of dogs, in different activities and showing different attitudes and demeanor.
Having a good understanding of both a dog’s expression and people will help you immensely in drawing a cartoon dog.
Watch some of your favorite cartoon series or movies.
Disney is very well known for their character design and can be a good way to study expressions on animals.
It is also a good excuse to watch some of your favorite movies for an evening or two!
Every subject becomes easier to draw once we break it down to simple shapes.
It is much less scary to draw simple shapes than all the details at once.
Just relax and have some fun with dogs!
Want to draw more cartoon art? Check my article on How To Draw Cartoons On Your Computer!
Patricia Caldeira is the main writer here at Don Corgi. She's an art teacher with over 20.000 happy students across many platforms and courses!
Enjoy your stay and as always:
Keep on drawing!

")

