Free Transform in Clip Studio Paint is very simple. With it, you can scale your image, rotate it, flip your selection horizontally or vertically, and even distort it a bit!
I don’t use it for very complex actions, but I still use the Free Transform mode a lot on my artwork!
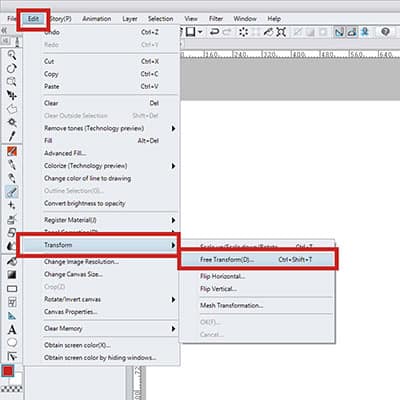
How can you Free Transform a selection in Clip Studio Paint? Simply go to ‘Edit -> Transform -> Free Transform or press ‘Ctrl+T’ on your keyboard. You’re now ready to make any change you need to make!
You might notice, though, that once you enter this mode, some options and settings will appear and there’s more to Free Transform than it looks at first glance.
Let’s see in detail all the ways you can resize, rotate, scale, and even distort your images!
Table Of Contents
How To Free Transform In Clip Studio Paint
I use Free Transform a lot while working on Clip Studio Paint. Mostly very simple things.
Resizing the whole work or just parts of it, flipping things around and rarely distorting things.
It is a very common tool, very useful, and easy to use!
You can access it by either selecting the layer or layers you want to transform or make a selection of a specific part of your drawing.
After that, you can go to ‘Edit -> Transform -> Free Transform’. Alternatively, you can use the shortcut by pressing ‘Ctrl + Shift + T’.
Scaling and Rotating With Free Transform
Once you enter in Free Transform mode, a frame will appear around your selection. The points around this frame can scale up and down your drawing or rotate it.
Just hover the mouse above these and then click and move.
When you can rotate the selection a curved arrow with two ends will appear. To resize, it shows a straight arrow.
Very simple and similar to other drawing software!
Careful with resizing on Clip Studio Paint though! If you’re using raster layers, you’ll lose quality as you scale things.
For example, if you’re trying to scale it up, you’ll notice the selection will start to look fuzzy and distorted. It won’t be noticeable if it’s a very small resize of the selection.
But if you’re doing so, better use vector layers (here’s how), so you won’t lose any quality in your drawings!
I always use vector layers for my line art so that I can resize them if I ever need to.
That way I’m never worried about having to redo my lines because they lost quality.
Skew And Distort
Even though Clip Studio doesn’t have a clear option to skew and distort a selection in the menu, you can do it while in Free Transform mode.
Simply hover the mouse over the points that show around the frame. Press ‘Ctrl’ and a small white arrow will appear. Click the Left Button of your mouse while pressing Ctrl, and you can now skew and distort your image!
You can do this with either of the points and move everything around as you wish.
Free Transform Menu
Now, when you enter Free Transform mode, you’ll notice a new tab to the left.
This tab has a few options that you can use. For example, let’s say you need to rotate the selection you just made.
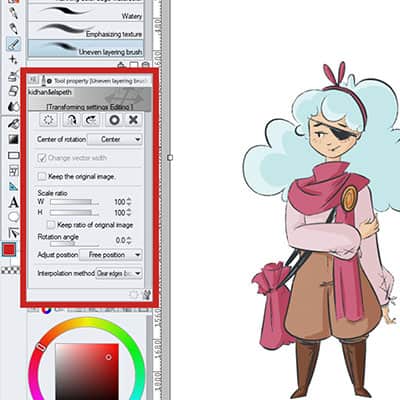
There are different ways to rotate in Clip Studio Paint. What I mean by this is that you can choose where the center of your rotation will be.
It can be in the center of the drawing, top left, top right and so on. Depending on what you choose, the rotation will behave differently.
You can also select the scale ratio you want and even type in the rotation angle you need!
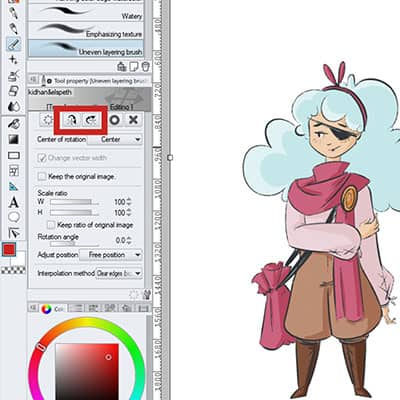
At the top bar of the Free Transform window, there are also some useful buttons.
The first one will reset the transformations you made. The two that follow serve to flip your selection, and then you can confirm or cancel the transformation.
If you end up doing something you don’t want to, let’s say you scaled the drawing up but decided it was too much, you can hit Ctrl+Z to undo your last move. Here are 30 other Clip Studio Paint Shortcuts To Create Art Quicker!
When you’re done with your changes, select the confirmation button on the tab to your left or simply press ‘Enter’. Your selection is now transformed!
How To Flip Your Selection In Clip Studio Paint
There are different ways to flip your work or selection in Clip Studio.
You can do it through Free Transform.
Simply press ‘Ctrl + Shift + T’ and then you have two buttons on the Free Transform tab: one will flip the selection horizontally, the second vertically.
Choose the one you want, and when you’re done, press enter.
You can also go to ‘Edit -> Rotate/Invert Canvas -> Flip Horizontal or Flip Vertical’ to flip the whole canvas.
Notice that you have other options here, such as rotate by 90 degrees, 180 degrees, etc. You can do these simple rotations through this menu as well!
I want to take the time here to give a very quick tip: If you’re in Free Transform mode and want to rotate your selection by 90 degrees, press ‘Shift +Left Mouse Button’ and move the mouse around.
This will rotate your drawing from 90 to 90 degrees, perfectly!
Flipping the whole canvas or a simple selection is very useful, especially if you’re drawing a human figure.
While working, we flip our work to be sure the proportions are right and that everything makes sense, even seeing it from a different perspective
Scale The Horizontal And Vertical Ratio In Free Transform
As I mentioned before, you can scale your selection by controlling its horizontal and vertical ratio on the Free Transform menu.
This means that instead of scaling using the frame around the selection, you can use these two bars.
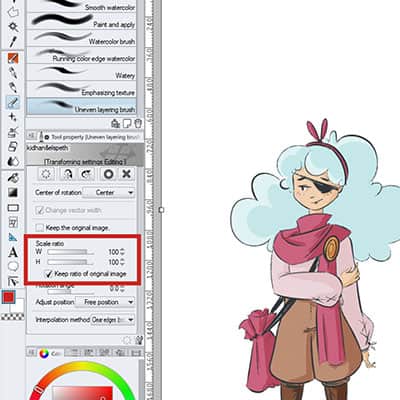
The first bar is signaled with a ‘W’, when moving the bar around, you’ll notice that the width size is changing.
The second bar, marked with an ‘H’, scales the height of the selection.
Personally, I feel it’s very weird to scale something using these bars. I prefer to have more control over it by moving my selection around.
But, as always, everyone has their own preferences and both ways work!
You can enable the ‘Keep ratio of the original image’ and now, if you scale the width of the image, the height will scale accordingly.
This way, you’ll avoid any kind of distortion in your selection!
If you have this option enabled and decide to use your mouse on the selection to scale it, the same will happen, maintaining the original ratio of the image.
If you have the ‘Keep ratio of the original image’ disabled, you can also press ‘Shift+LeftButtonMouse’ when resizing, and it has the same effect!
Frequently Asked Questions
Can you liquify in Clip Studio Paint? Yes! There’s now an option to Liquify on Clip Studio Paint. If you want to transform and warp your art instead, use the Mesh Transformation option which I cover here.
How do you rotate the canvas in Clip Studio Paint? As mentioned above you can go to ‘Edit -> Rotate/Invert canvas’ and choose one of the options. Alternatively, you can also use the rotate tool by pressing ‘R’ on your keyboard and rotate the canvas at will!
I have an entire article on how you can rotate, move and flip the canvas right here!
Patricia Caldeira is the main writer here at Don Corgi. She's an art teacher with over 20.000 happy students across many platforms and courses!
Enjoy your stay and as always:
Keep on drawing!


")
