Hands are one of the toughest subjects to draw when drawing the human body!
But they can be quite easy (well, easier) to draw if you follow some of these tips for drawing hands.
Whether you’re going for a more anime, cartoon, or realistic style, every drawing tip here will help you draw better hands!
The short answer? Use shapes! Basic hand shapes can be easily drawn and afterwards you can keep on adding details and improving the overall form.
But let’s see what I mean by this and what other steps you can take to make the whole process easier for you.

Table Of Contents
01. Find The Basic Hand Shapes First!
The first tip for drawing hands that I have is pretty simple.
Every single body part can be drawn by splitting them into shapes. And hands are no exception.
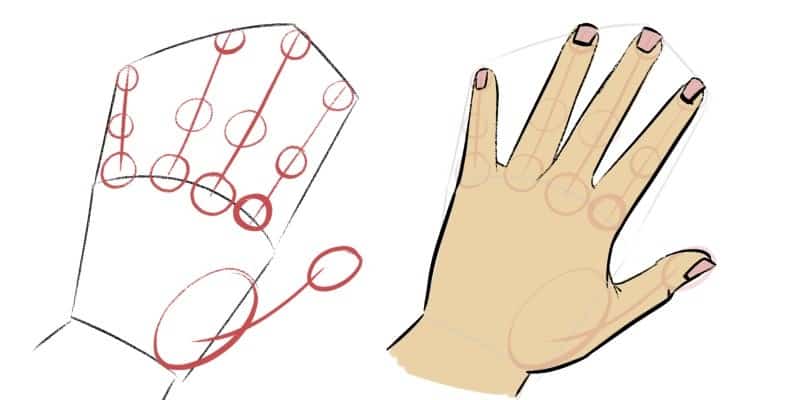
This goes not only for drawing anatomy but to every other subject.
When you’re in doubt: find basic shapes.
Gather some references and draw on top of them.
Find squares, circles, triangles, or other weird shapes.
What matters is that it makes sense to you.
This way, our brains will have an easier time memorizing the movements and shapes they need to be able to draw specific subjects.
This is one of the best drawing tips for artists that I can give you.
Instead of seeing the whole hand. Divide it into several parts.
First a shape for the palm of the hand.
Then the fingers.
And even the fingers, can be divided into several shapes.
If you look at them, we can clearly see the lines that divide one joint from the other.
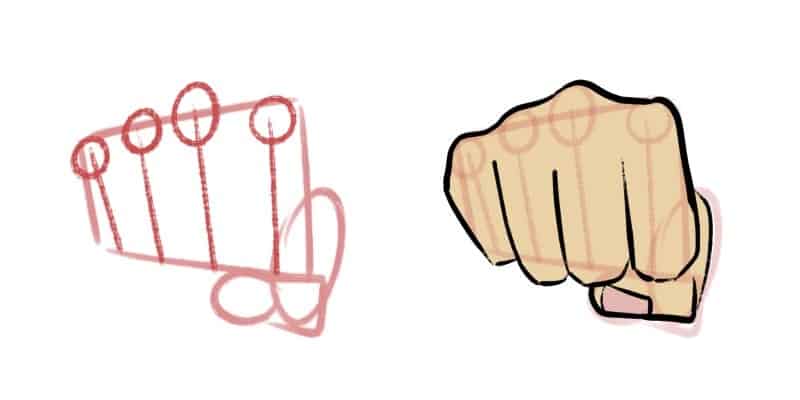
Now, the shapes you use, are mostly up to you.
There’s really no wrong way to go about it, as long as it works for you!
For example, for the palm of the hand, I always use an irregular pentagon shape. But for the fingers, there are several different shapes you can use.
Here are some examples:
- The French Fry Method: a funny name, but it works! If you want to simplify the structure of the hand, you can just use rectangular shapes for each finger. You get fewer shapes this way, but it works!
- Circles and Lines: you can use circles for each of the joints and tips of the fingers. Once you figure out the right place for these circles, connect them using a line.
- Rectangles, and…bullets? This is my favorite method. Divide each finger into two parts: the lower part is made out of rectangles and the top part is made out of bullet shapes, resembling the tips of the fingers.

Now as I said, these are just some examples and you might find even more!
We’re all different and have different ways of thinking. One method might work better for me, but maybe not for you.
That’s why it’s so important to experiment in this phase. Before going for a final look at your drawing, practice several shapes. See what’s more intuitive for you.
You might need to split the hand into more shapes or less. So, try out different things and see what works best for you!
02. Draw The Gesture
Gesture drawing is not only for drawing the whole human body but also for drawing hands and other body parts!
If you’re focusing on learning certain body parts, then do just that. In this case, hands. So draw only hands until you feel confident in them.
I once challenged myself to draw hands every single day for one hour, for a whole week.
This was not a whole lot of time.
However, it was more than enough to make me feel more comfortable about drawing hands.
From then on, I didn’t worry as much about how they looked and felt more confident in drawing several hand positions. I really learned a lot from it!
When practicing drawing hands, first look at their pose – the movement they evoke.
Now, before drawing the whole hand, full of detail, sketch out its gesture.
Use simple lines and shapes. All you want here is to have a semblance of a hand along with its pose.

Find the most important aspect of the hands and draw them. You can even time these gestures. This way, you’re sure to focus on what’s really important and ditch the details.
This is also a good opportunity for you to practice those shapes we just talked about!
Draw these quick gestures using different kinds of shapes and lines.
See what makes the most sense to you.
Fill out at least a spread of your sketchbook just with these. Quick gesture drawings of hands. Just the main shapes and movements.
This is the most important phase.
Once you’re comfortable and confident about these quick drawings, then you’re ready to draw hands on your characters!
03. Don’t Focus On The Hand Details
Details are not that important when learning to draw hands. In fact, details are not important at all when it comes to any subject in art.
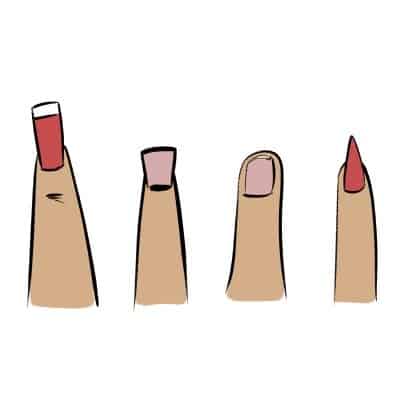
Especially at the beginning.
This is something to think about later on when you’re refining your own style.
When it comes to hands, some artists will just draw their shape and that’s it.
They won’t even draw nails!
Personally, it really depends if it makes sense for the character I’m drawing. Sometimes I will draw nails, others I won’t.
I have a very simple style, devoid of most details.
And the ones I add honestly depend on my mood and the kind of drawing I’m making! For example, if I’m drawing a very feminine character, I like to add some nails.
If I’m drawing a vampire or demon girl, I like to add long nails to them, almost resembling claws.
But none of this is important when you’re just starting.
First focus on the basic shapes and gestures.
Focus on mastering drawing a whole hand.
Afterward, you can have fun adding details in the hands!
When you’re ready, you can refine how you draw your hands. You can draw nails in different styles. You can also add hair and even wrinkles to your hands!
It all depends on what type of character you’re drawing. But, that’s something to think about later!
04. Experiment With Different Art Styles
This is a drawing tip for hands and for pretty much every other subject!
Sometimes specific styles and ways of drawing don’t “click” with us.
So you need to experiment and see what works specifically for you.
This is a drawing hands tip I discussed above, but specifically for the first stages of hand drawings.
If you notice, artists have different ways of drawing hands.
Some draw them very realistically, others go as simple as they can.
You can draw all five fingers, or you can draw just four of them if you’re into a more cartoony style.
The hand can be even more simplified: just a thumb and all the other fingers into one shape, like oven mitts. Maybe the whole hand is a circle!
Try out different things and see what you like the best! Maybe you prefer to draw pointy and long fingers. It could also be the opposite, short and round fingers.

There are many styles and ways to draw hands.
Look for your favorite artists and see how they draw their hands. Replicate them even! Look for styles that you like and study them.
This will teach you different ways of drawing hands as well as learning a bit more about your art and what you want to do with it.
The best way to learn what kind of art style you want to have is by experimenting with several and seeing what is the best fit for you.
Not only that, but this is a nice break from drawing the same kind of hands over and over and just having some fun with different styles of them!
Try drawing them in different ways and don’t give up.
05. Don’t Stick To Just One View!
Drawing the same hand over and over again can be quite helpful, but don’t overdo it!
This is one of the best tips I can give you for drawing hands.
In the beginning, the best way to figure out the basic shapes is to draw a very standard hand pose.
But, you also want to learn how to draw hands from every point of view.
This way, you’ll know how to draw your hands in every position imaginable.
Once you got the hang of drawing hands in their most basic position, then go for the next level.
Look up reference images in different poses and views and practice drawing them, one at a time.
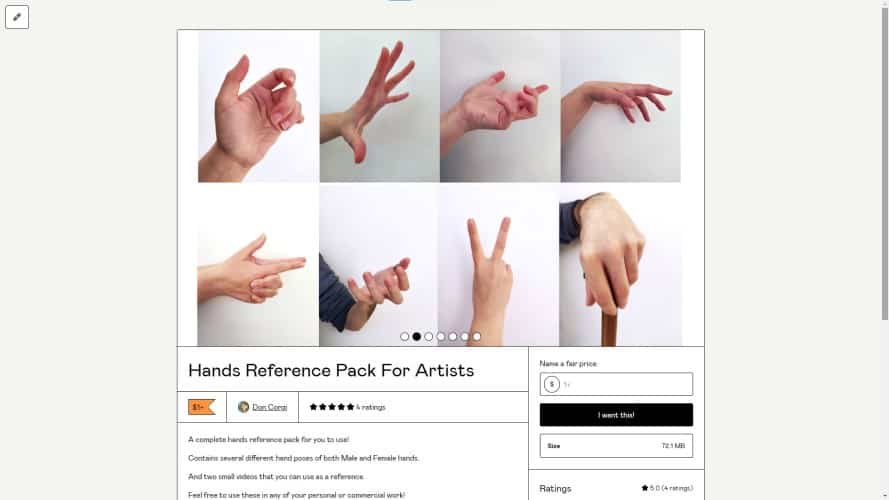
In fact, I’ve made a Hands Reference Pack with over 100 images and 2 videos to help you out.
You can click the link above to check it out or click this image below.
Now, this is not to say for you to jump from one hand pose to another without a second thought.
If you’re having difficulty in drawing a specific position, repeat drawing it as many times as needed. Try out different approaches until you manage to draw it comfortably.
In my studies, if something isn’t up to my liking or expectations or if I find it a bit more difficult to draw, I like to go over it again.
I’ll go to my reference and draw shapes on top of it. Before making a finished drawing I’ll practice those shapes several times.
Maybe I’ll even try out different combinations of shapes.
I’ll repeat this process as many times as needed until I’m happy.
The important thing is to start small and grow from there. There are many hand positions that you can draw, and some will be easier than others.
The best thing to do is to increase the difficulty as you learn and feel more confident with your drawings!
Frequently Asked Questions
Why is drawing hands so hard?
It’s weird, right? We keep on looking at them throughout our days, but when it’s time to draw hands we suddenly forget how they look like.
I think it’s actually because we keep on having them in front of us that it’s so hard to make them “just right”! Still, if you split everything into basic shapes and don’t rush it, you’ll be fine and master how to draw hands in no time!
How can I draw hands in an anime or cartoon style?
You can draw hands in an anime or cartoon style with a few changes! I advise you first to learn the “semi-realistic” approach of drawing hands as they look in real life.
And then once you got that mastered, you can adapt them to a more cartoon, anime, or manga style!
They are usually simplified types of drawings with a few nuances. The best you can do is to get references for your favorite styles, watch the hands carefully and mimic the style.
I would also advise you to get some anatomy reference books to help, here are my favorite ones!

Patricia Caldeira is the main writer here at Don Corgi. She's an art teacher with over 20.000 happy students across many platforms and courses!
Enjoy your stay and as always:
Keep on drawing!


